Creating a Candidate

 Walkthrough
Candidate records will generally be created via iCapture to make use of the parser. However there may be times where you will need to add a candidate to the database without a CV. The step by step instructions below are just as guidance and does not go through all options, see more information at the bottom of this topic for more in depth details
Step 1
Step 2
If you have Distance and Lookup licence you can utilise the Address lookup feature to autofill the address, for more information on Distance and Lookup clickhere
Step 3


Need more information, click below:
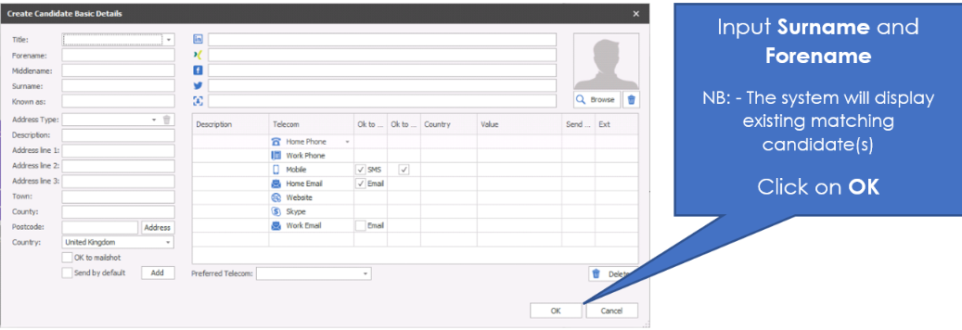
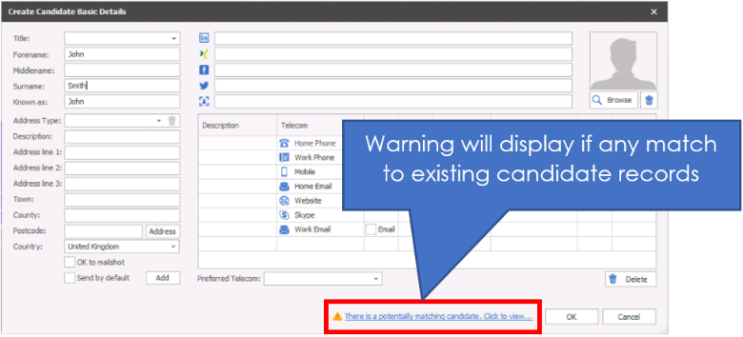
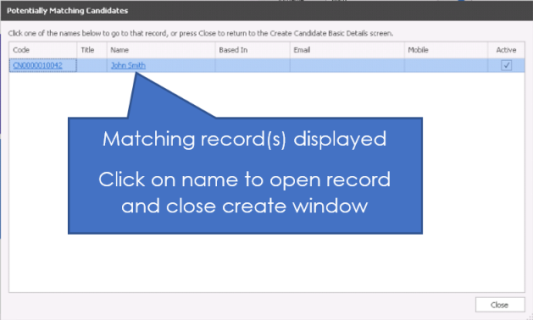
When creating a new candidate record, the system will check for any current records with that name to ensure duplicates are avoided. Any potential duplicates will appear in the results box. Potential duplicate candidates will appear in the first box and potential duplicate contacts will appear in the second box.
Review the matches
Candidate records include tabs on the right hand side which include:
- Preview CV - this offers a quick view of the default CV, although you can click on other CV's in the record to preview other CVs
- Suitable Jobs - offers a quick way to run a search of jobs appropriate for the candidate, see suitable jobs for more details
- LinkedIn - this is an iResearch tab and will use the LinkedIn URL field to navigate to the appropriate LinkedIn profile, if no URL is recorded it will run a search for the candidates name, see iResearch section for more detials
- Other tabs - tabs on display are setup within the iResearch Destinations admin area, any ticked as Autoload for candidate entries are displayed, see iResearch Destination settings for more details

|
Saves the candidate record
|
|||||||||||
|
|
If the Lock icon is displayed then another user is currently in the record, to identify the user you can hover your mouse on the icon and it will display the users name
|
||||||||||
|
|
Record Status - Active or Inactive You can choose to deactivate a candidate if they have asked to be removed from your database at this time or have retired. When you search for jobs, inactive candidates will automatically be removed from the search unless you remove the Advanced search criteria of candidate status exactly equals active. If you are utilising Privacy Audit to manage GDPR it is recommended that you utilise the restriction options rather than inactivating records. NB: - You will require to have appropriate permissions, see your system administrator for more details or click here to view permission administration
|
||||||||||
|
|
Log events via the event logger, see the add events section for more details
|
||||||||||
|
|
Access the Comms Centre to access your email, SMS or postal templates, see the Comms Centre section for more details
|
||||||||||
|
Access the candidates attachment file(s) here, most file types are accepted and Word documents will allow you to then edit within the system (save changes within the attachment area)
|
|||||||||||
|
|
CV submit this candidate's CV to a contact either speculatively or for a job, see the spec CV submit sections or Job CV submit for more details
|
||||||||||
|
Opens Google map and accesses the address of the candidate
|
|||||||||||
|
Create a meeting that is categorised as an internal interview
|
|||||||||||
|
|
Link or unlink the candidate as a contact or link them to an existing contact record Candidates can be linked to contacts and vice versa. If your candidate is placed at a company and becomes your new contact, or a contacts discretely asks if you can look for work on their behalf then it may be beneficial to link the candidate and contact records. To create the link, go to the candidate record and select the link button, this will then open the linking wizard:
Once linked you can access both event tabs allowing you to quickly view appropriate events without the need to open the other record. However, if you wish to access the contact record click on the link button and select the record from the dropdown
|
||||||||||
|
|
Access the candidate Temps Calendar to access their availability and add entry unavailability or availability, see the Temps Calendar section for more details
|
||||||||||
|
|
Directly place the candidate into a Temp placement, this will initiate the process of creating or finding the temp job and assign the candidate into shifts in either a confirmed or awaiting confirmed status, see Direct Temp Placement section for more details
|
||||||||||
|
|
Access a consolidated view of all temp placements for the candidate, includes options to calculate average working hours in accordance with Working Time Directive, see Global Temp Defaults for more information
|
||||||||||
|
Access the candidate reviews and add entries to record feedback:
See the Reviews section for more details
|
|||||||||||
|
|
Personal / Financial details The personal details are the date of birth, gender and marital status of the candidate. This is also the area that the financial information is stored. See Candidate financial's for more information Access Referee and ICE contact details, see Reference section for more details
|
||||||||||
|
|
Privacy Audit
** If restriction is switched on, see Privacy Audit setup section for more details Floating your cursor over the Privacy Audit button will display a tooltip:
You can view Contractual / Legal Lawful Basis and Consent / LI (Legitimate Interest) Lawful Basis and which type of consent you have to retain the candidates information and record the origin of the data:
Permission is required to manually change the information, it will automatically fill this information as you complete Privacy Audit actions, see Privacy Audit section for more details
|
||||||||||
|
|
More... Access additional buttons and options:
|
||||||||||
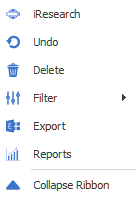
|
Open iResearch to research the candidate on LinkedIn, Facebook, Twitter or any other iResearch locations
|
|||||||||||
|
Undo any changes made since previous save or opening the record
|
|||||||||||
|
Delete the candidate record, a password prompt will open and once you have entered your Infinity password you can click on Delete to confirm the deletion, you cannot delete a candidate that has a status of "Offer Accepted", access the placement record and withdraw the candidate
NB: - you will need to have permission to delete a candidate record, please speak to your system administrator for more details or click here to view permission administration When completing a deletion the candidate record is anonymised to ensure reports and historical activity is kept within Infinity. The candidate name will be "Deleted Deleted" and telecoms removed. This process runs on a service so there can be a slight delay if completing deletions / bulk deletions at the same time
|
|||||||||||
|
Set filters to Show hidden data
Show closed interviews and placements - will show any historical interviews and placements Show cancelled interviews and placements - will show any historical cancelled interviews and placements NB: - These can be set to default within the user options
|
|||||||||||
|
Export the candidates details to Exchange, will then be a contact in Outlook and any other application synchronised to your exchange or Office 365 account NB: - You will require to have appropriate permissions, see your system administrator for more details or click here to view permission administration
|
|||||||||||
|
|
Access candidate report(s) : Person Work History report - outputs the candidates Work History, this includes parsed work history (from iCapture) and placement history
|
||||||||||
|
|
Collapse / Expand Ribbon bar, this allows you to decrease the size of the Ribbon bar and button sizes
|


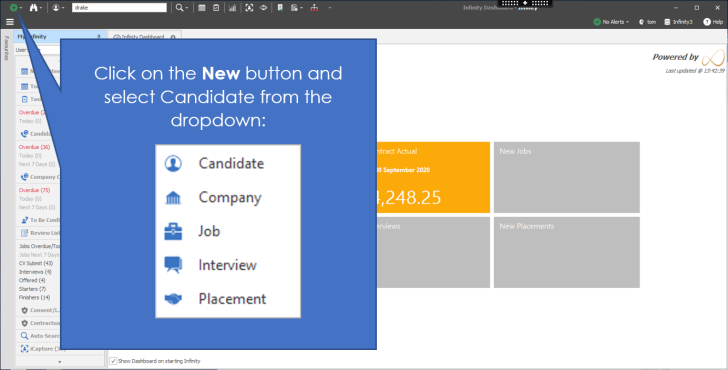
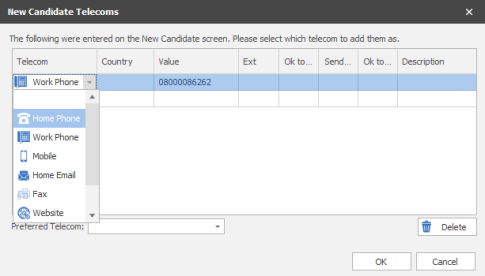
Enter the candidate’s name and phone number and select the Create Candidate button. Then the type of telecom via the dropdown list and click on OK
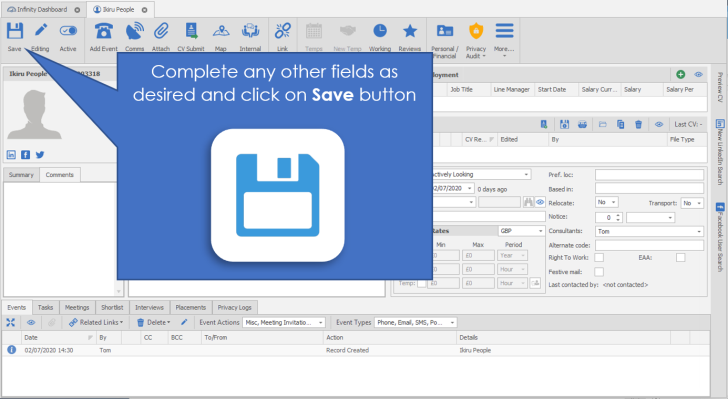
Once the candidate screen opens up you are able to click on the edit button
You can :
- Enter the Forename, middle name, surname and known as name here
- Enter the candidates LinkedIn / Facebook / Twitter or Xing address in the Public URL:
- Add a photograph here if necessary. This can be done by clicking browse and selecting the photo.
- The Address field enables you to have more than 1 postal address. To add another address, click add and choose the type of address you are entering the details for, enter the address and click OK. This list is editable by your System Administrator (see reference data section). Fill in the details of the address and mark whether this is address is OK to mail shot, or is the default. If you have created multiple addresses you will be able to scroll down to view them all in the candidate record.
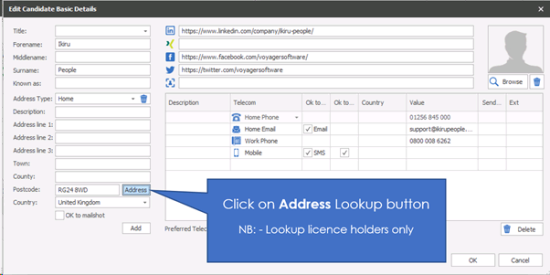
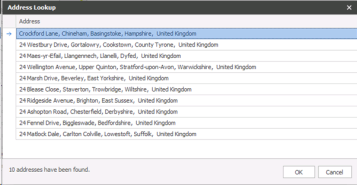
NOTE: Screen shot shows the Address button, this allows you to "lookup" a post code, this requires a Distance and Lookup licence please speak to your system administrator for more information or click here to view user administration section
- To add Telecom's. Choose the type of telecom that you are adding from the drop down list.
- Enter the description (if necessary). This is useful for identifying different telecom's of the same time. E.G. Mums Phone, Husbands email, Work number etc.
- Enter the value of the telecom. I.e. the actual email address, telephone number, Skype address etc.
- OK to SMS allows the mobile number to be used to send text messages. If this box is not ticked you won’t be able to send the mobile a text message.
- Choose the country (if necessary)
- Ext enables you to add an extension number (if necessary)
- Send by default enables you to choose that this telecom is the default one that comm's centre templates should go to. (Please note that send by default will only appear if you have more than one email / mobile.)
The Preferred Telecom option at the bottom of the dialogue box enables you to identify which is the telecom that the candidate would prefer that you use to communicate with them.
When you have filled in the details, click OK (or Cancel to leave without saving). Click on Save on the main record to save the changes.
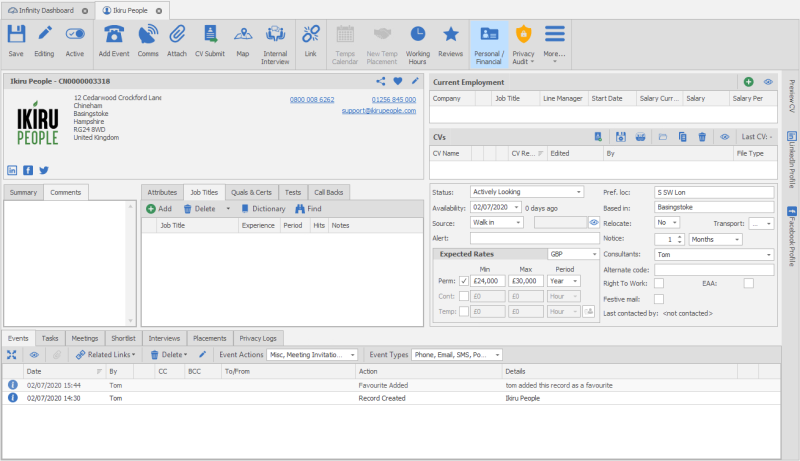
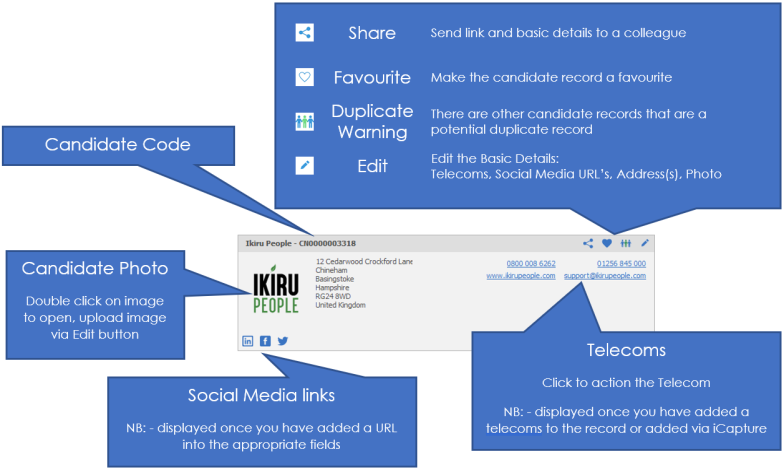
In this view you are able to:
- View contact details for the candidate
If there are more details than fit on the screen you will notice scroll bars start to appear. Anything in blue and underlined has an action that you can make associated with it.
- View defaults and preferred contacts
Next to email addresses and telephone numbers you may notice (pref) and (default). The (Pref) telecom is the number that the candidate has specified as being their preferred number for you to call / email on.
The (default) is the email / SMS number that will be picked up and used if this candidate were to be sent a mailshot. If the candidate doesn’t have a default email / SMS they will not be able to be sent communication from the comm's centre.
 Suggestion – Where possible ensure that each candidate has a defaulted email, mobile telephone number and postal address to make full use of the Comm's Centre. However you only need to use default if there is more than one email / mobile available.
- Direct email the candidate
Click on the underlined email address to open the comm's centre or directly into an Outlook email (see user options for Default Quick Email Setting). The first time will offer a prompt:
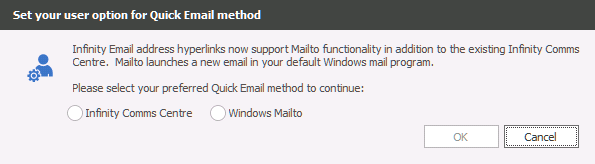
Infinity Comms Centre will require an HTML template and can be set as the default in the Quick HTML email / SMS template in the user options
Windows Mailto - will set quick emails to open in Outlook
- View the Social Media profile of the candidate
On the right-hand side you can use the appropriate tab to see their social media Profile(s). See the iResearch section for more details.
To make changes to the details click Edit in the top right hand corner of the basic details box.
- To add Telecom's. Choose the type of telecom that you are adding from the drop down list.
- Enter the description (if necessary). This is useful for identifying different telecom's of the same time. E.G. Mums Phone, Husbands email, Work number etc.
- Enter the value of the telecom. I.e. the actual email address, telephone number, Skype address etc.
- OK to SMS allows the mobile number to be used to send text messages. If this box is not ticked you won’t be able to send the mobile a text message.
- Choose the country (if necessary)
- Ext enables you to add an extension number (if necessary)
- Send by default enables you to choose that this telecom is the default one that comm's centre templates should go to. (Please note that send by default will only appear if you have more than one email / mobile.)
The Preferred Telecom option at the bottom of the dialogue box enables you to identify which is the telecom that the candidate would prefer that you use to communicate with them.
When you have filled in the details, click OK (or Cancel to leave without saving). Click on Save on the main record to save the changes.
In this view you are able to:
- View contact details for the candidate
If there are more details than fit on the screen you will notice scroll bars start to appear. Anything in blue and underlined has an action that you can make associated with it.
- View defaults and preferred contacts
Next to email addresses and telephone numbers you may notice (pref) and (default). The (Pref) telecom is the number that the candidate has specified as being their preferred number for you to call / email on.
The (default) is the email / SMS number that will be picked up and used if this candidate were to be sent a mailshot. If the candidate doesn’t have a default email / SMS they will not be able to be sent communication from the comm's centre.
Suggestion – Where possible ensure that each candidate has a defaulted email, mobile telephone number and postal address to make full use of the Comm's Centre. However you only need to use default if there is more than one email / mobile available.
- Direct email the candidate
Click on the underlined email address to open the comm's centre or directly into an Outlook email (see user options for Default Quick Email Setting). The first time will offer a prompt:
Infinity Comms Centre will require an HTML template and can be set as the default in the Quick HTML email / SMS template in the user options
Windows Mailto - will set quick emails to open in Outlook (your default email program, see FAQ to see how to set your default Mail app within Windows)
- View the Social Media profile of the candidate
On the right-hand side you can use the appropriate tab to see their social media Profile(s). See the iResearch section for more details.
To make changes to the details click Edit in the top right hand corner of the basic details box.
Make the candidate record a favourite, see favourite section for more details
Share the record with colleagues, choose to share via email or Teams to send details, see share section for more details
Summary
This is external comments that you’d like to make about the candidate. This is where you will write the profile that you will want to send with the candidate CV’s (or maybe alone). This is also the area that iCapture will write a summary for you if not manually adding the CV. To edit this field double click in the box and it will open in the text editor, see the Infinity text Editor section for more details.
Comments
This is the internal comments that you make about the candidate. This is not intended for people outside of your business to see. To edit this field double click in the box and it will open in the text editor, see the Infinity text Editor section for more details
Insights
This is designed to build an AI profile via the ChatGPT button within the CV grid, see ChatGPT for more details.

Candidate Attributes
The attributes tab is where you can add the candidates attributes and industries. Please see the attributes section for more details.
Job titles
Job titles are separate to attributes, but work in the same way. Please see the Job Titles section for more details.
Quals & cert's
Quals and Cert's are any qualification or certificate that expires. Once added you can click on the eye icon and enter an expiry date a review date is also created (in accordance with your Qual and Cert dictionary settings) which is then used to populate your Expiring Items lists and ensure compliance. Please see the Quals and Cert's section for more detail.
Driving Licence*
Manage candidate driving licence data within the grids. The "last checked" triggers "Review List" reminders within My Infinity (candidates you "own") and the Application menu (system-wide candidates). See driving licence section for more details
* Enable driving licence functionality via General Settings
Tests
You are able to assign tests to a candidate and also review tests from here. Please see the Tests section for more details
Call backs
You are able to setup future call backs and view outstanding ones from here. Please see the Call Back section for more details.
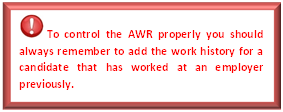
To view work history click on the Show All button on current employment
 This is the history of the candidate and where they have worked. The information can be added to this area in a variety of ways.
- Manually
- System generated from a placement made in Infinity
- From the CV
- From iCapture
- Linked Record
NB:- you can customise your grid / columns to your own requirements
 1. Manually adding Work History
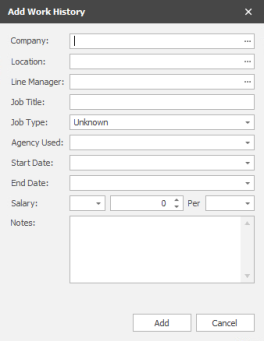
To add employment details click the add new button
Add the information into the relevant boxes. You can type directly into the boxes if you don’t have the information already in your database. Use the ellipses button to choose records that you already have the in the database.
Tick the End existing current employment(s) to end the current position that they currently hold. Make sure that you enter the correct end date in here.
Click Add to complete entry.
2. Adding work history when you make a placement
When you make a placement through Infinity, the database will automatically update the work history to record that the candidate is now working in this company.
3. Adding work history from the CV
Work history can be added automatically when you send the CV. This will only be available if you use iCapture.
4. Adding work history from iCapture
When a CV is parsed through iCapture the database will find the work history and add it to the candidate record when it is posted to infinity, you can also process PDF’s from iResearch in the same manner.
NB:- To un-tick the current box you must enter a date the candidate left that job, this will automatically remove it as a current entry
See ChatGPT section for details for using AI to build a profile.
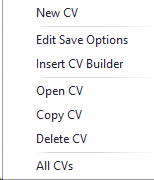
This is where the candidates CV’s are stored. They may have been added via iCapture or dragged and dropped into this area. Candidates can have multiple CV’s on file and you can edit and delete them from this area. Right click on the CV to receive options:
| New CV |
Enables you to create a CV from a blank document or utilise a CV Builder (without a CV)
|
|
Edit Save options |
Enables you to rename or mark the CV as the Default, Formatted and/or Current
|
|
Insert CV Builder |
Enables you to insert a CV Builder into the CV, this will open the CV Builder Options and then launch the CV with the Builder inserted
|
| Open CV |
Allows you to open the CV, if it is a Word CV then you will be able to edit as appropriate, if you have set the user option to enable editing of PDF CVs in Word 2013 or later then you will also be able to edit as appropriate, a dialogue box will appear when opening PDF's, this can be switched off by ticking Don't show this message again, see PDF to Word section for more details
(NB: - save the CV as .docx or .doc to allow you to insert a CV Builder, saving back in PDF will disable the ability to insert a CV Builder) Note: In a terminal server environment, the Word pop up may not automatically appear. To solve this issue, opened a pdf in word outside of Infinity, and tick the tick box ‘Don’t show this message again’. The next time a pdf is opened in Word using Infinity, the pop-up will no longer appear and word will open the pdf.
|
|
Copy CV |
Allows you to make an exact copy of the CV, this will add an additional CV to the list with the name copy of ....
|
| Delete CV |
Allows you to delete the CV completely, if you have the appropriate permission level, speak to your system administrator for more details or click here to view permission administration
|
| All CVs |
Will open a dialogue box which includes all CV's for this candidate, this will include CV's that are not current
|

Word - Voyager Infinity Ribbon Bar
We would recommend that you copy a CV, then edit the copy (this will ensure you keep an original version on record). When Word opens you will have a Voyager Infinity ribbon bar:

Save Options - Name of the file, file type, online reference (if applicable), tick boxes for Current, Default and Formatted. Each candidate can have as many Current and Formatted CV's as desired but only one default CV (this is the CV the system will default to when submitting and previewing CV's).
NB: - If you have inserted a CV Builder which includes merge codes use .docx or .doc file types, you can set it to PDF during the CV submit process
Cancel - allows you to exit the CV without keeping any changes you have made and return to the candidate record.
Insert Merge Fields - allows you to insert a merge field into a cover sheet so you can refer to data held within a candidate record. For more assistance please contact your system administrator or click here to view template administration
Invalid Merge Fields - allows users to check for any invalid merge codes, this is normally completed when creating the CV Builder by a system administrator or click here to view template administration
Preview Results - will preview the merge codes with the appropriate data the merge code relates to, this can be toggled on or off as desired
Highlight Skills - will highlight all skills (attributes / job titles) that are within the CV, this can be toggled on or off as desired
Candidate Skills - will highlight skills that are recorded within the candidate record, this can be toggled on or off as desired
Autoscan - enables users to run the skilling and then run through the results, adding any missing skills found to the appropriate section (attribute / job title / qual or cert)

Show Spelling and Grammar - enables users to toggle whether they wish to have Word's auto spell check (red / green underlines) on or off
To activate the Temps calendar you must tick the candidate as Temp within the expected rates grid. It also essential that Temp candidates are assigned the appropriate Temp job title(s) for them to be found when running the Shift Planner search area
|
Temp Calendar (inactive) – greyed out |

|
|
Temp Calendar (active) - colour |

|
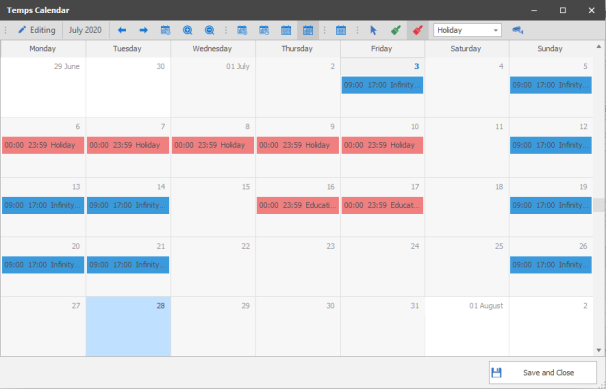
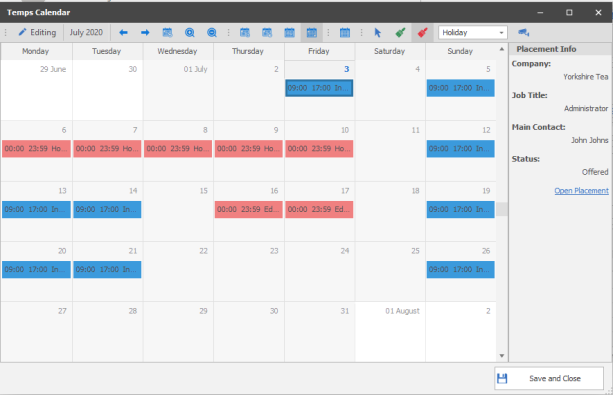
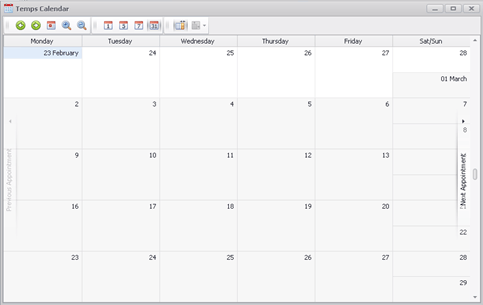
The calendar will display any temp jobs the candidate is placed at, the calendar will show the candidate as Unavailable and if you wish to access further information you are able to double click on the appointment to open the appropriate placement record or use the Placement Info panel to view basic details:
It is also used to record any times the candidate is available or unavailable to complete temp jobs for example education or holiday you can right click on entries to make adjustments. This will then be utilised when using the temp searching facility within the temp jobs, allowing you to identify available candidates for jobs more efficiently.

| Editing |

|
You have locked the candidates Temp Calendar |
| Back |

|
Go backward to view previous |
| Forward |

|
Go forward to view next |
| Goto Today |

|
Return to today’s date |
| Zoom In |

|
Allows you to zoom into the calendar NB:- you can also use SHIFT and MOUSE WHEEL UP |
| Zoom Out |

|
Allows you to zoom out of the calendar |
| Day View |

|
Allows you to view the calendar as a single day view, showing hour by hour (zoom in or out for more detailed view) |
| Work Week |

|
View Allows you to view the calendar as a detailed working days in a week, showing hour by hour (zoom in or out for more detailed view) |
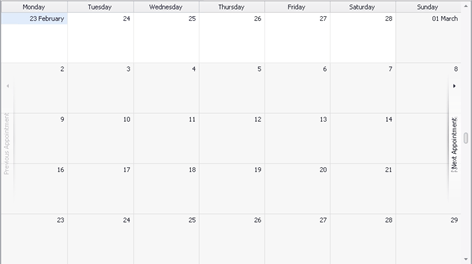
| Week View |

|
Allows you to view the calendar by week in a compact view (no zoom function) |
| Month View |

|
Allows you to view the calendar in a month view, showing start and end times of appointments (zoom in or out for more detailed view) |
| Compress Weekend |

|
(only available in month view) – Allows you to compress Saturday and Sunday together for more compact view of the monthly calendar uncompressed:
Compressed:
|
| Select Cursor |

|
Sets the cursor to select, this allows you to click within the calendar to highlight specific day / hours and use the right mouse button to then add entries of availability or unavailability. It also allows you to click on existing placement entries within the calendar to access further information or open the placement record or click on existing unavailability entries to edit them |
| Availability Painter |

|
Sets the cursor to the availability painter, this allows you to highlight days / hours within the calendar and mark the candidate as available for work |
| Unavailability Painter |

|
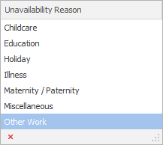
Sets the cursor to the unavailability painter, this allows you to highlight days / hours within the calendar and mark the candidate as unavailable for work, this works alongside the unavailability reason dropdown selection for you to clarify the reason for this unavailability |
| Unavailability Reason |
|
Once you select the unavailability painter then you can then select from the dropdown your unavailability reason, this can be customised via Reference Data:
once entries are added to the calendar the reason will be recorded with the unavailability |

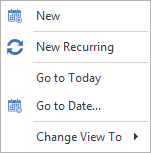
To add entries to a candidate’s Temps Calendar, marking them as unavailable for a period of time you can highlight the period within the calendar by holding your mouse button. Once highlighted, right click and the appointment dialogue box will open:
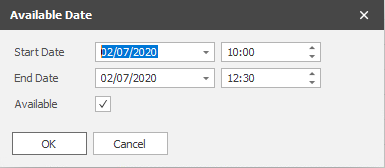
Selecting New will then open the Unavailable – Appointment box, which will display the dates and times you have highlighted:
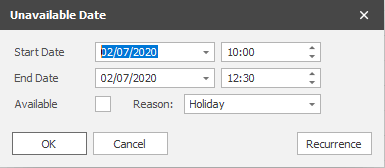
You are able to make alterations as required to these dates / times. The Reason dropdown list allows you to record the reason why the candidate is unavailable:
The Available tick box allows you to mark the candidate as available (reason dropdown will be greyed out), although candidate’s will be assumed available for any date / time they have no calendar entries but if marked as available will be put higher up on results when searching.
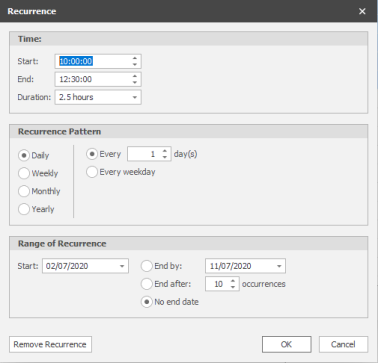
Recurrence button will open the Recurrence dialogue box in which you can set the appointment to recur, allowing you to quickly set a candidate as unavailable for a period of time or unavailable for the same day / time each week.
To add entries quickly to a candidate’s Temps Calendar, marking them as unavailable or available for a period of time you can use the unavailability or availability painter cursor. Once selected the mouse cursor will change and when highlighting days / hours within the calendar it will immediately add the entry to calendar. You can make adjustments to any entries within the calendar by dragging entries, if you need to make multiple adjustments you can hold the control key to select multiple entries and then drag which will adjust all entries selected.
You are able to double click on existing entries to access the date and time dialogue box and edit as required:
| Available Date entry | Unavailable Date entry |
|
|
You can also right click on an entry to Open or Delete the entry:

By default the unavailability painter is selected making it quick and easy to mark candidates unavailability

Status
This is the current status of the candidate. Additional status' can be added to the system via reference data. The status will change automatically by Infinity under certain circumstances, listed below, these are system status' and therefore cannot be manually adjusted within the candidate record unless the placement withdrawn or offer declined or finished in role:
Candidate is Offered a role (via shortlist or via interview event log or via My Infinity Interviews section event log) - Status changed to Under Offer
Candidate Accepts the offer (via placement event log or via My Infinity Offered section event log) - Status changed to Placed, Not Started
Candidates Starts in role (via placement event log or via My Infinity Starters section event log) - Status changed to Placed By Us / Working For Us / Temping For Us
Candidate Finishes role (via placement event log or via My Infinity Finishers section event log) - Status changed to previous none system status they had prior to Offered
All other candidate status' can be manually changed by clicking on the dropdown and selecting the appropriate status.
Availability
Record the date of the candidates availability, this will default to the date that the candidate was originally uploaded but can be manually updated. This can then be used as search criteria or even the quick "Available Now". This is generally not used for Temps as the Temp calendar will allow more accurate availability recording.
Source
This is the source of the candidate. This is the ideal place to record where the candidate came from and you can check that you are advertising in the right places. System option "Referral" will allow you to also lookup the candidate records and select the appropriate candidate. System option "Company" will allow you to lookup the Company records and select the appropriate Company that has referred the candidate. System option "Other" will allow you to free type into the field and make a note.
Alert
The alert box allows you to add important information to the candidate that you wish to be clearly visible. For example you might add in this box that this candidate is currently on holiday. Once you have saves the record this alert will appear in red and bold.
Expected Rates
The expected rates grid enables you to register whether the candidate is a Perm, Contract or Temp once one or more are ticked it enables you to add the rates that the candidate would like to receive for a new role. These are useful for searching purposes. Min = Min they would work for – Max = the required / preferred salary.
NB:- To enable the Temps calendar the Temp tick box must be ticked and the record saved
Candidate Temp Rates can be implemented and the button will display:

 click on button to access Candidate Temp rates specific to Temp Job Titles:
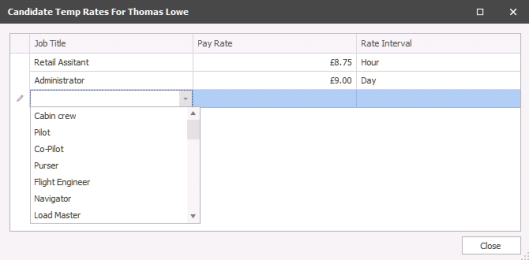
These will then override Pay Rates in Temp jobs for the appropriate rate recorded here.
Pref. Loc
Preferred Location(s) - manually add differing locations the candidate would consider, ensure consistent content is added to benefit searches.
Based in
where candidate is based - automatically completed by iCapture, can be manually edited at any time
Relocate
record whether candidate is willing to relocate, default is No
Transport
record whether that candidate has access to transport himself to locations, default is No
Notice
Enter the number of weeks or months’ notice the candidate is on / would require.
Consultant
Enter the owning consultant for the candidate here. You can select multiple consultants if required by clicking in the consultant box and ticking the consultants names.
Alternate code
If you have another numbering system that you would like to give the candidate enter it here. It could also be used for old codes from a data conversion from another database.
Right To Work
Tick manually to mark as compliant or can be setup in conjunction with Quals & Certs so automatically ticked if all Quals & Certs are recorded.
EAA
European Agency Act, tick manually to mark as compliant or can be setup in conjunction with Quals & Certs so automatically ticked if all Quals & Certs are recorded.
TrustID fields*
Will display "Auto" or "Manual" depending on whether you have utilised TrustID registration. Manual will be displayed if user has manually recorded in fields (this can be controlled by permissions. See TrustID integration section for more details.
Festive Mail
Put a tick in this box if you’d like to send this candidate some sort of greeting at Christmas, or other time of the year. This could also be used for things like marketing or newsletters.
Last contacted by
This will show the last consultant to communicate with the candidate. When logging events there is a tick box against certain types of communication, if the last contacted box is ticked then the last contacted date will automatically be updated.
No Current placements
This is the current number of placements that the candidate has been placed in. Infinity will put this number in for you.
No Current Interviews
This is the current number of interviews that the candidate has. Infinity will display this number for you.
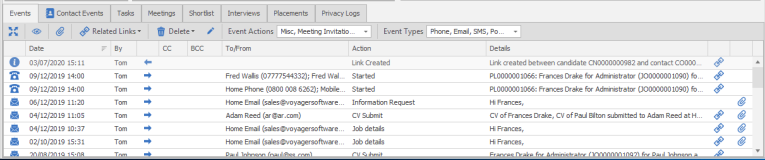
Events
The candidate events tab shows the last 25 communications that your business has had with this candidate. You are able to manually add an event in here by using the comm's centre or by adding an event. Infinity will also be updating this area for you when you complete normal tasks like submitting CV’s and arranging interview etc.

NB:- you can customise your grid / columns to your own requirements
Utilise the options below to manage and review events:
 Expand the event grid to view more notes |
|

|
Show All events, opens a separate dialogue box |

|
Access relevant attachments for the highlighted event |

|
Access relevant records relating to the highlighted event |

|
Delete the highlighted event* *permissions required |

|
Edit the highlighted event* *permissions required |

|
Filter the events by Action, multi-selection available to filter the grid to desired content |

|
Filter the Event Types , multi-selection available to filter the grid to desired content |

Contact Events
This tab will only appear if you have linked a candidate to a contact and it will show you activities made for this person as a contact.
Candidate tasks
This shows all the incomplete tasks that have created in relation to this candidate. You are able to view and action the tasks from here.
Meetings
This shows the incomplete meetings that are arranged for this candidate. You are able to add, edit and delete the meeting from here. View historical meetings via the Show All button
Shortlist's
This shows the shortlist entries that are associated with this candidate. You will see a line per company, job or CV submission. You will see the ticks in the boxes that indicate how far along the process the candidate is. These could be related to Jobs or spec submission.
Interviews
View the candidate interviews here. If you wish to view historic interviews you will need to go to the filter icon on the candidate ribbon or setup defaults in the user options.
Placements
View a list of the candidate placements here. If you wish to view closed interviews or placements you will need to go to the filter icon on the candidate ribbon or setup defaults in the user options.
Privacy Log
All candidates include a Privacy Logs tab (Privacy Audit events are not editable or deletable) within their action / information tabs which detail any event or action that relates to the consent processes that have been carried out for that candidate: See Privacy Audit section for more details
Although every effort should be made to avoid creating duplicate candidate records, it can be possible to create a duplicate version of the same candidate.
NB:- The duplicate facility is run once a day and therefore may not show until this service has run.
See below where you can identify a duplicate record and how to use the merging facility. The ability to merge records will depend on your permissions as you will need to have permission to HARDDELETE candidates
The warning message will appear when you first load the candidate record just below the ribbon bar and a "Has potential duplicates" warning will show next to the Candidate Basic Details:
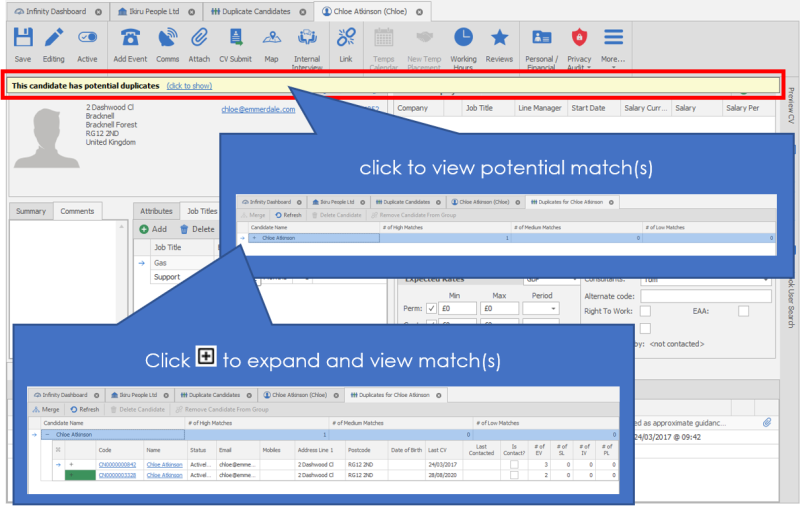
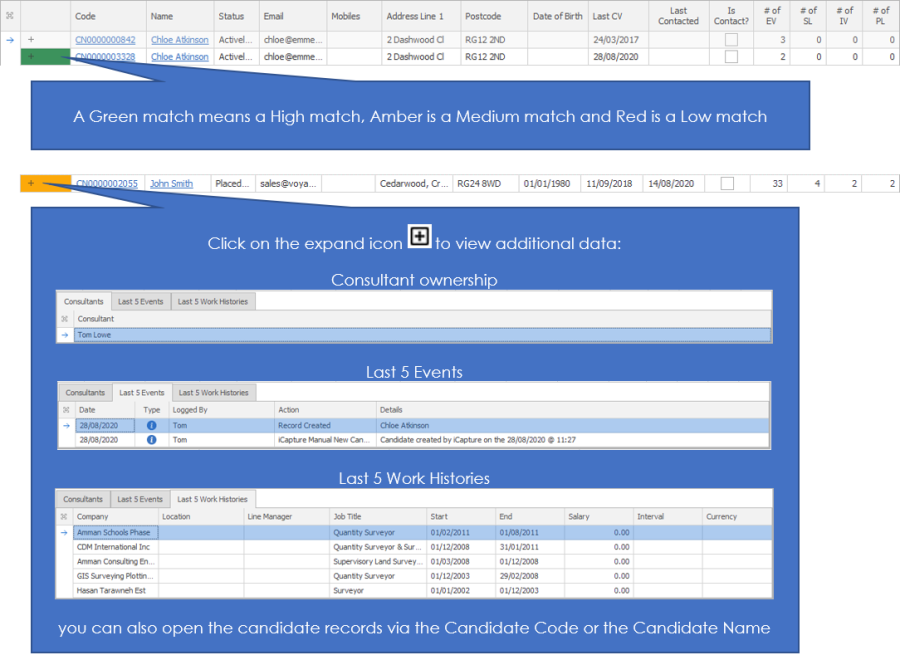
Hold CTRL or SHIFT key to highlight the top entry along with the matching entry:

 You are able to access a full list of potential duplicate candidates via the application menu. In here you will see each candidate record that has been identified that there may be a duplicate record on file.

If you require further assistance please contact Ikiru People using the details published on www.ikirupeople.com
Visit our Customer Portal at https://portal.ikirupeople.com/ for future events and clinics.
If you would like to make suggestions or have found any errors with this Help section please contact our Support team.
Version 4.87
Voyager Software is a brand of Ikiru People Ltd, a subsidiary of Dillistone Group Plc. The group is a leading global provider of software and services that enable recruitment agencies and in-house recruiters to better manage their selection process and address the training needs of individuals. Across its brands – which include Voyager Software (recruitment software UK & Australia), Dillistone FileFinder executive search software, GatedTalent, the global database of the world’s leading executives, Talentis.Global – the next generation of recruitment software and also ISV.Online, provider of online pre-employment skills testing and training tools. Dillistone Group serves thousands of clients worldwide. Ikiru People Ltd: Registration Number 02043300. Registered in England & Wales.
 |  |  |  |