Creating a Job 
 Walkthrough
The step by step instructions below are just as guidance and does not go through all options, see more information at the bottom of this topic for more in depth details
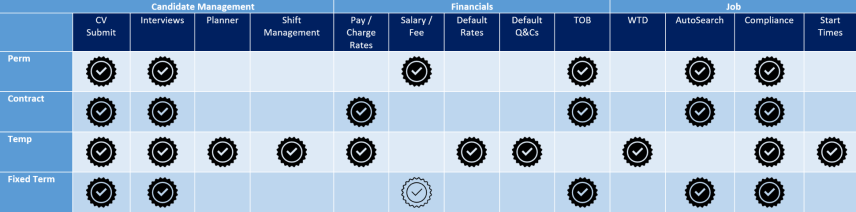
Contract
- Has a Start Date & End Date
- Contracts are typically longer term than Temp jobs
- The Shortlist process is used to manage recruitment
- You can search for candidates based on ‘Availability Date’
- The candidate is paid the ‘pay rate’ and the Client is charged the ‘charge rate’.
- Candidates can be any worker type e.g. Ltd Company, PAYE
Temp
- Each Temp job consists of one or more shifts
- Temps are typically shorter term than contract jobs, or jobs that are rolling week to week
- The ‘Shift Planner’ and ‘Temp Planner’ screens are used to manage recruitment
- The Shortlist process is used to manage recruitment (Temp jobs can be marked as a shortlist job)
- Each candidate has a calendar, and you can search candidates who are available for specific shift(s), based on the availability in their calendar
- The candidate is paid the ‘pay rate’ and the Client is charged the ‘charge rate’
- Candidates can be any worker type e.g. Ltd Company, PAYE
Perm
- Has a Start Date only
- The Shortlist process is used to manage recruitment
- A one off Fee is charged, and the Candidate is paid by the Client
Fixed Term
- Has a Start Date & End Date
- The Shortlist process is used to manage recruitment
- A one off Fee is charged, and the Candidate is paid by the Client
Step 1
Step 2
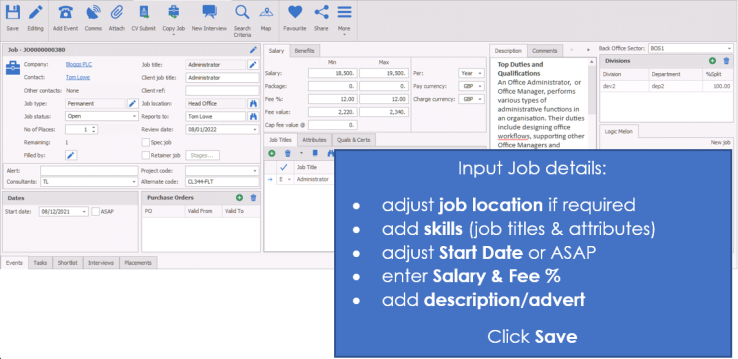
Step 3 - Contract Job
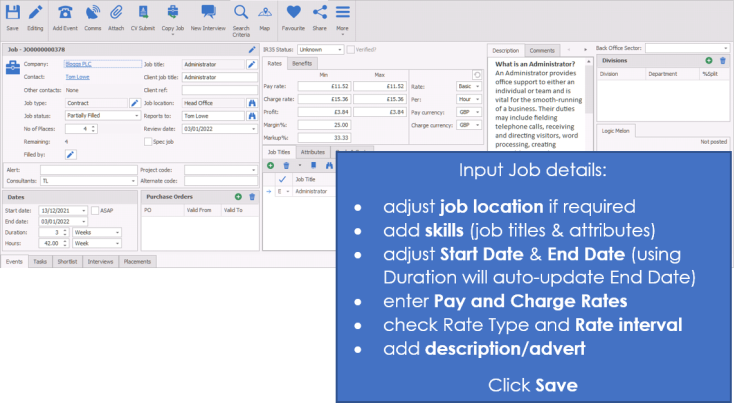
NOTE: - Ensure you record whether the job is inside or outside of IR35, use Verified once confirmed with the Company
Step 3 - Fixed Term Jobs
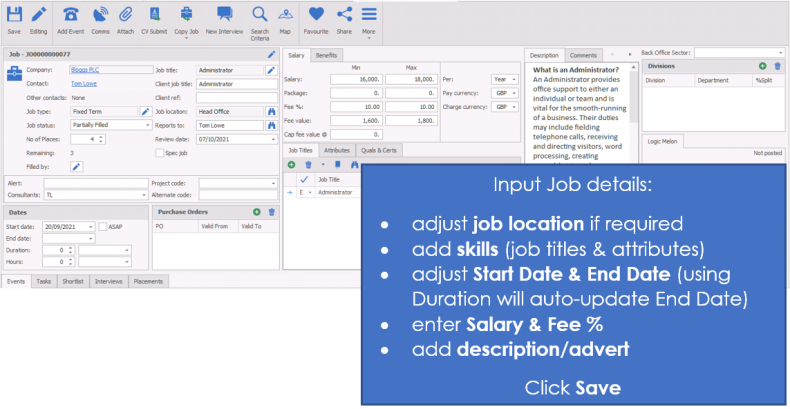
NOTE: - Ensure you record whether the job is inside or outside of IR35, use Verified once confirmed with the Company
Step 3 - Temp Job
NB:- When creating the Temp job you will need to have the job title set as a Temp job title, speak to your system administrator if you require a job title adding
Shortlist can be activated if CV Submit / Interviews are required
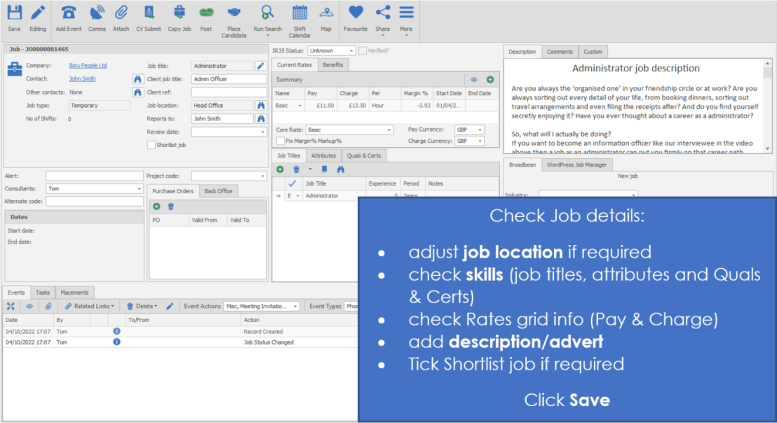
NOTE: - Ensure you record whether the job is inside or outside of IR35, use Verified once confirmed with the Company
Step 4 - Job Calendar - Temp Job (cont.)


Need more information, click below:
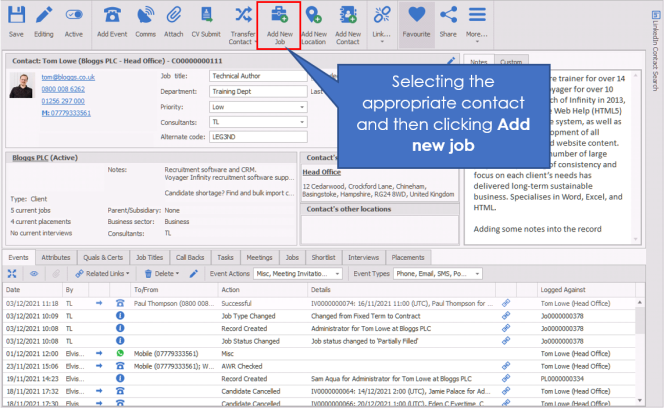
You can set a job against a Contact / Company / Location, ensure you have selected the appropriate contact, company or location before selecting the Add new job button to get the appropriate Contact Jobs / Company Jobs / Location Jobs tab at the bottom of the screen.
The majority of the screen can be typed into directly.
You can add a job either from
- company / location / contact record – add new job icon
- The new job on the quick reference tool bar
- The application menu – new – job
 Suggestion – It is quicker if you create a job from the company if they are already on your database as it will auto complete Company and contact details.
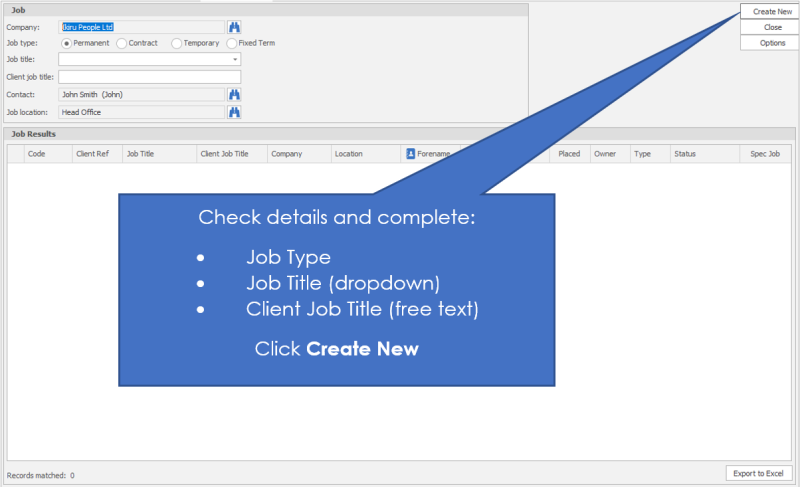
Enter a generic job title from your skills dictionary (you can leave it blank if none-temp job) however it will assist you when searching for jobs in the future. When creating a Temp job you will need the job title to be marked as a Temp job title, speak to your system administrator for more information or click here to view job title dictionary administration section. If you have agreed rates setup with the Company then only job titles that have rates setup will be available for all other job types you will need to complete the financials manually. Enter the Client job title (if different from the generic title) and select a job type of Permanent, Temp, Fixed Term or contract. Once these details are complete hit create new button.
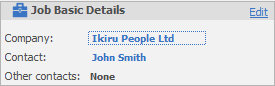
The basic job details are the company, contact etc. related to the job. If you create the job directly from the contact at the correct location and the correct company you will not need to fill this information in. If you have created the job independently, you will need to complete this information.
This information can be amended / added to by clicking the Edit button.
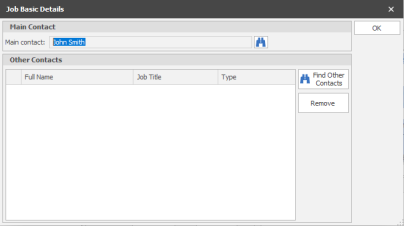
You can change the main contact here by clicking on the binoculars. You can also add other contacts here.
NOTE – You cannot change the company that the job is allocated to
Perm / Contract / Fixed Term jobs only
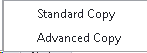
Standard Copy - enables you to copy a job, the system will adjust the start dates and copy fields into the new job record. Ensure you check copied details like start date, end date, financials and any other details.
Advanced Copy - enables you to copy a job but alter the Company and contact it is with. The system will adjust the start dates and copy fields into the new job record. Ensure you check copied details like start date, end date, financials and any other details.
 The 'New Interview' button allows you to quickly create an interview record without the need to shortlist or complete any prior actions, you will initially required to assign the candidate before the interview record will be created. This will also back-fill the candidate into the shortlist.
NB:- business rules may require you to complete shortlist actions
 The ‘Place Candidate’ button on the temp job toolbar, allows you to add a candidate to the shortlist, and create a placement in one step. The placement page automatically opens.
 Allows you to open the search builder to run searches, please see the search section for more details
Run Search Defaults(Temp jobs Only)
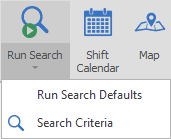
Allows you to immediately run the default criteria (Run Search Defaults) or access the full Search Criteria screen and create your own search parameters, please see the temp search section for more details
Search Criteria
Allows you to open the search builder to run searches, please see the search section for more details
Job type
Specify here the type of job. Permanent / contract / fixed term / Temp. This is a drop down list.
Job status
This is the status of the job, whether it is open, on-going, filled etc. This status will update automatically, but can be changed manually if necessary.
Job Retainer (Perm Only)
Record whether the Job includes retained services payments, record up to 3 stages for your retained services, along with placement fee's, all available as merge codes for you to send to clients, see job retainer section for more details
Spec Job
If this is a role which has been created from a speculative submit then this box will be ticked, however if it is a job that you have created for a Client who doesn’t have an existing role but may have an opportunity in the future, you can manually tick the box.
Alert
Type anything here that you would like as an alert on the job page. Once you save the record, this information will appear in red and in bold.
Job title
This is the job title for the role. This is a drop down list, not a free format area. The Job title list is controlled by your System Administrator (click here to view dictionary administration section). Job titles are treated in a similar way to an attribute. It is assumed that a candidate will need to hold this job title to match in searches for this job.
NB: - This is mandatory for Temp Jobs
Changing the Job title (Temp jobs) will prompt:
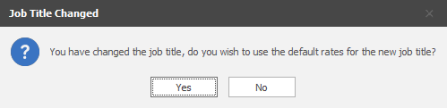
Yes - will remove any rate information and replace with the default rates setup with the Company or Global
No - will leave the rate grid as is
Client Job title
This allows you to put the clients job title onto the record. For example you may have called it a Administrator role as a job title but the client may have called it a Senior System Secretary.
Job location
If you have created this job from a company record it is likely that this will be populated for you. If you need to change the location however, click on the binoculars and choose the correct location.
You can also utilise the Custom Address option, manually inputting the address details. In addition, you can use the "Recent" button, this will include custom addresses previously recorded against the Company. These addresses will be remembered for 6 months (3 months for Temp jobs).
Reports to
You are able to either type directly into here, or choose from the binoculars the correct person that the job reports to. This is different from the contact that owns the job at the company. This is likely to be the line manager for the candidate.
Shortlist Job (Temp only)
Ticking this will activate the shortlist tab in the record, this enables you to record CV submissions and also any Interviews required. If left unticked then these processes will not be available.
Job Titles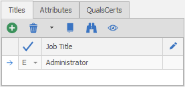
You are able to add any Essential (E) or Desirable (D) job titles required for this role, Infinity will automatically add the job title selected when creating the job record. This data will be used in the calculation made in the results list and shortlist which gives you a score for each candidate found.
Attributes
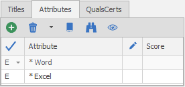
You are able to add any Essential (E) or Desirable (D) attributes required for this role, This data will be used in the calculation made in the results list and shortlist which gives you a score for each candidate found.
NB: - If Temp defaults have been set by your system administrator (see Global Temp Defaults administrationsection) then attributes can automatically be added (triggered by the selected Job Title)
QualsCerts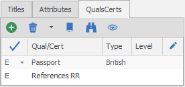
You are able to add any Essential (E) or Desirable (D) Qualifications or Certificates required for this role, This data will be used in the calculation made in the results list and shortlist which gives you a score for each candidate found.
NB: - If Temp defaults have been set by your administrator (see Global Temp Defaults administration) then Quals & Certs can automatically be added (triggered by the selected Job Title)
Dates
The Dates box will display differently for each job type:
Perm

Start date of the job, if the ASAP is ticked then it will disable the start date entry
Contract
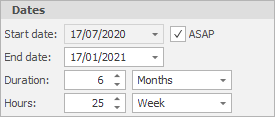
Start date of the contract, if the ASAP is ticked then it will disable the start date entry
End date of the contract, if you have entered a duration then this will automatically complete the end date
Duration can be used to automatically complete the end date, if preferred you can manually enter the end date and leave the duration blank
Hours should include the hours of work, hours per day, hours per week etc. This will allow dashboards and reports to calculate revenues
Fixed Term
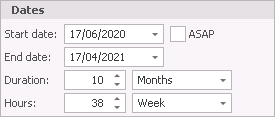
Start date of the fixed term contract, if the ASAP is ticked then it will disable the start date entry
End date of the fixed term contract, if you have entered a duration then this will automatically complete the end date
Duration can be used to automatically complete the end date, if preferred you can manually enter the end date and leave the duration blank
Hours should include the hours of work, hours per day, hours per week etc. This will allow dashboards and reports to calculate revenues
Temp
The shifts are setup via the Temp Calendar, see the Temp Calendar section for more details
Salary (Perm Only)
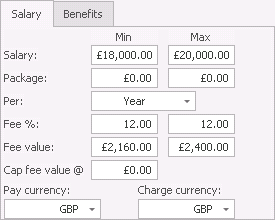
When adding a Perm job you are able to enter the salary amount (Min and Max), Package value (this is not included in the Fee calculation), Per, Fee % or Fee value (these will autofill when inputting either), Cap fee value (if required) and Pay and Charge currencies.
NB:- if you input agreed Fee% into the Company Terms of Business area then this will automatically enter into the job records
Pay and Charge Rate (Contract Only)
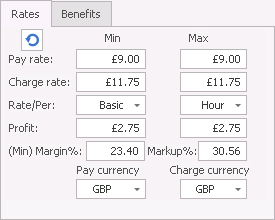
When adding a Contract job you are able to enter the Pay and Charge rate(Min and Max), Rate Type to apply, Rate Per (interval of the rate), Profit and Margins will automatically calculate from the Pay and Charge rate amounts (see below note regarding Terms of Business) and Pay and Charge currencies.
NB:- if you input agreed Margin% or Markup% into the Company Terms of Business area then this will automatically enter into the job records and therefore will calculate the Charge rate from the Pay rate entered
Current Rate Grid (Temp Only)
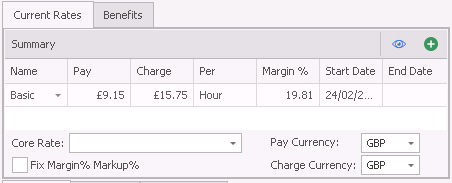
When adding a Temp job you are able to enter multiple rate information using the Rates grid. If you have setup rates for the job title within the Company or Global rates areas then these will be applied automatically. The order of these rates are:
- First - Jobs Location
- Second - Main Contacts Location
- Third - Company
- Fourth - Global
(i.e. If you have setup agreed rates within the Company record these will take priority over the Global rates, see Company rates for more details)
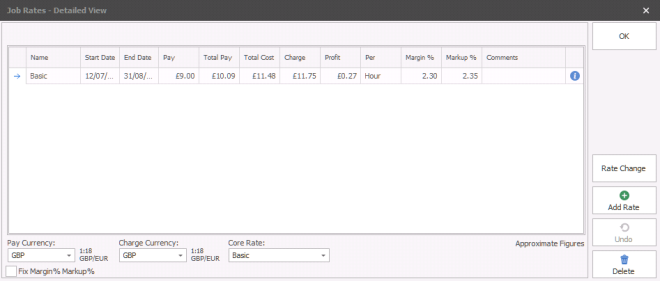
Using the Add button  will open the Job Rates – Detailed View and will have added an entry to be completed. Alternatively you can use the Show All button
  to open and view the rates without adding an entry.

Hover mouse on  Rate breakdown, including expected holiday pay, NI and any other costs setup within the administration area:
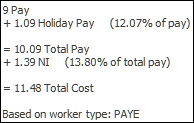
Worker type is stored per job. The icon provides the details of the rates and states ‘Based on worker type: PAYE’ by default. Speak to your system administrator (see reference data administration section) if you require the default to be set differently.
NB:- Once the temp job has been created, it is not possible to change the worker type. When placements are created from the job, the worker type can be changed per placement. By default, the worker type of the placement is the same as the worker type of the candidate.
Review date
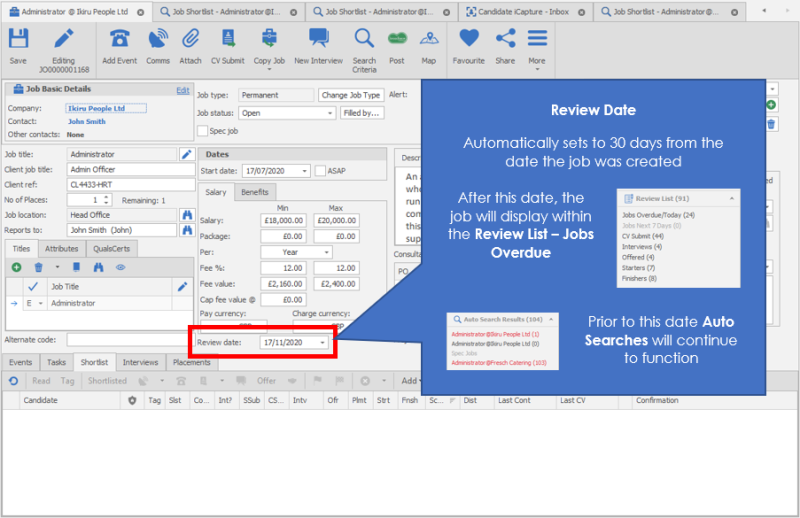
Shortlist Job (Temp only)
Ticking this will enable the shortlist tab within the job record, this allows you to build a shortlist, allow auto-population of applicants in shortlist, track CV submissions and setup interviews.
PO number
Allocate the correct PO number to the job here. See the section on Company financial's for more details.
Project code
Here you can enter the project code if the client has one. See section on Project Codes.
Benefits
Enter the benefits available for this role by clicking on the on the plus. Additional benefit types can be added by your system administrator (see reference data administration section).
Broadbean / Own Jobsite
Once you have completed the job description you can select the job boards and post the job from here. Set up for Broadbean ID’s is done by your system administrator. See the Job Posting section for more detail.
Client ref
Enter a manual reference here if the company has asked you to reference a particular job number.
No current placements
This is a system generated field that tells you how many placements have been made against this job
No current interview
This is a system generated field that tells you how many current interviews there are against this job.
Start dates / ASAP
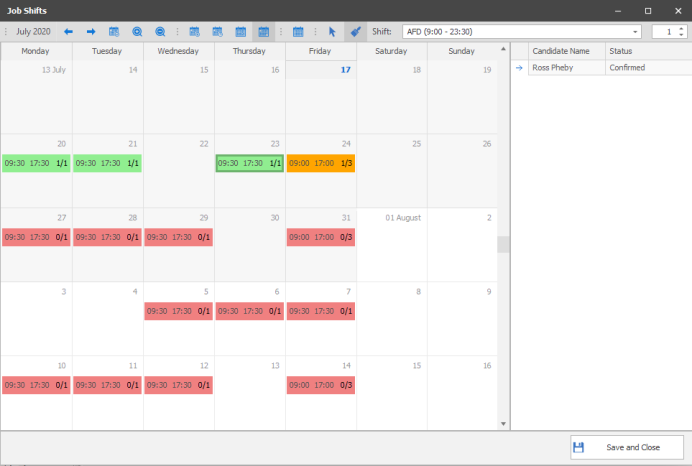
Enter the start date for the job (if there is one) or tick the box for ASAP, enter end date (contract/fixed term) or use the duration for the system to automatically complete the end date. For Temp jobs you are able to define the working pattern via the Job Calendar button the start and end dates are completed in the Job record from the first entry within the Job calendar and the last entry automatically.

The job calendar is used to ensure it is quick and easy to identify candidates that are available to fulfil the required hours you require, when completing the search the system will use the candidates availability calendar to compare with the job calendar.
clicking on the calendar button will open the job calendar, shifts within the calendar will be colour coded, red is for unfilled shifts, amber is for partially filled shifts and green is for filled shifts, click on a filled or partially filled shift to view the candidate(s) within the right hand panel (double click to open the appropriate placement record):

| Back |

|
Go backward to view previous |
| Forward |

|
Go forward to view next |
| Goto Today |

|
Return to today’s date |
| Zoom In |

|
Allows you to zoom into the calendar NB:- you can also use SHIFT and MOUSE WHEEL UP |
| Zoom Out |

|
Allows you to zoom out of the calendar |
| Day View |

|
Allows you to view the calendar as a single day view, showing hour by hour (zoom in or out for more detailed view) |
| Work Week |

|
View Allows you to view the calendar as a detailed working days in a week, showing hour by hour (zoom in or out for more detailed view) |
| Week View |

|
Allows you to view the calendar by week in a compact view (no zoom function) |
| Month View |

|
Allows you to view the calendar in a month view, showing start and end times of appointments (zoom in or out for more detailed view) |
| Compress Weekend |

|
(only available in month view) – Allows you to compress Saturday and Sunday together for more compact view of the monthly calendar uncompressed:
Compressed:
|
|
Select |

|
Allows you to highlight days / hours within the calendar to add work pattern manually |
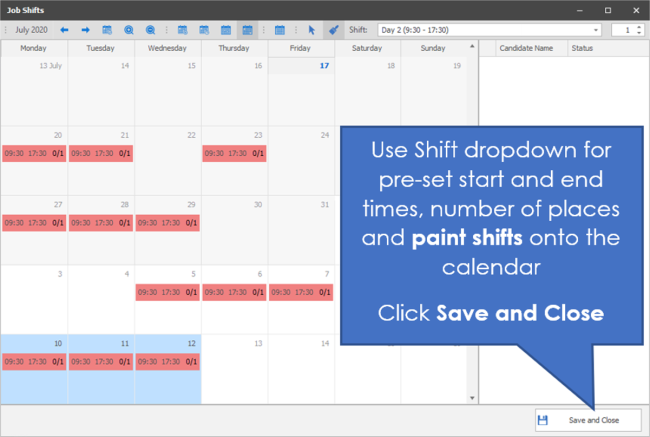
| Painter |

|
Allows you to paint days / hours into the calendar, highlight the days / hours required for that job. When highlighting a day (month view mode)once added to the calendar this can then be dragged to adjusted in day / week view or double clicked to then manually adjust date and times Used in conjunction with the shift and places fields to make it quick to setup the requirements for that job |
|
Shift - Select the appropriate shift type from the dropdown list, this will allow you to "paint" the shifts into the appropriate days Number of Places - use Number of Places to the appropriate numbers of places for the shift you are about to paint Select all unfilled shifts today or in the future - once clicked will select the appropriate shifts so you can make adjustments as required |
||

To add entries to the job Calendar you can highlight the period within the calendar by holding your mouse button. Once highlighted, right click and the appointment dialogue box will open:
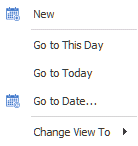
Selecting New will then open the Appointment box, which will display the dates and times you have highlighted:
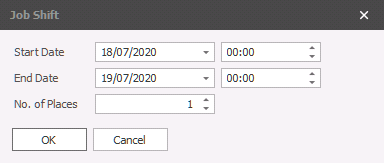
You are able to make alterations as required to these dates / times.
To add entries to the job Calendar you can highlight directly into the calendar the work pattern required, if in month view it will default to 09:00 to 17:00, when in day or week view you can highlight the hours required for the job. The shifts options can be setup via the Global Temp Defaults area, see your system administrator for more details. You can make adjustments to any entries within the calendar by dragging entries, if you need to make multiple adjustments you can hold the control key to select multiple entries and then drag which will adjust all entries selected.
You can double click on existing entries to access that specific Required Date and make amendments as required:

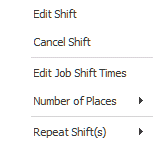
You can also right click on an entry to Open or Delete the entry:
|
Edit Shift will open the Job Shift box for adjustment |
| Cancel Shift will delete the shift from the calendar | |
|
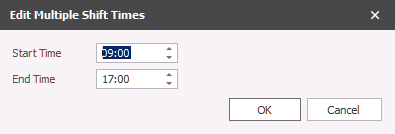
Edit Job Shift Times will allow you to adjust multiple shifts in one:
|
|
| Number of Places will allow you to adjust the number of places needing to be filled, this can also completed in bulk | |
|
Repeat Shift(s) will allow you to copy the selected shift(s) into the future:
|
Salary
Enter the minimum and maximum salary and package values.
Enter the % fee value; Infinity will work out the expected fee. Please note if you have entered terms of business for this company then the % fee should already be completed. If you try to go outside of the agreed terms of business the system will warn you.
Check and correct (if necessary) the currencies.
Consultant
This is the owing consultant for the job. Change it here if necessary. You are able to multiple owners by clicking on all the names that apply. This will ensure appropriate users are reminded of key processes (CV submissions, interviews, placements) via My Infinity
Description
This is the description of the role. It is likely to be a job advert, or a job description. This field can be a merged and can be formatted and spell checked by double clicking in the description box.
As a text box you are able to double click within the box and launch the Infinity editor, please see the Infinity Text Editor section for more details.
Comments
These are consultant’s comments and notes about the job. This field could be merged and can be formatted and spell checked by double clicking in the description box.
As a text box you are able to double click within the box and launch the Infinity editor, please see the Infinity Text Editor section for more details.
Events
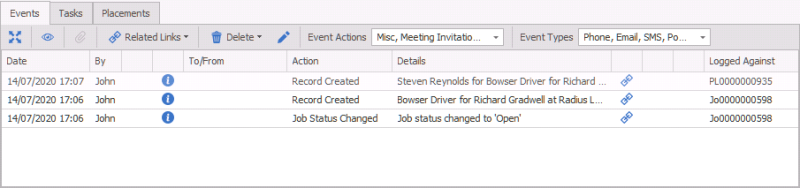
This will show you all the events that have been made against the job. You can filter and change the view of the events here. You can also delete (assuming you have the access rights) and view attachments.
Tasks
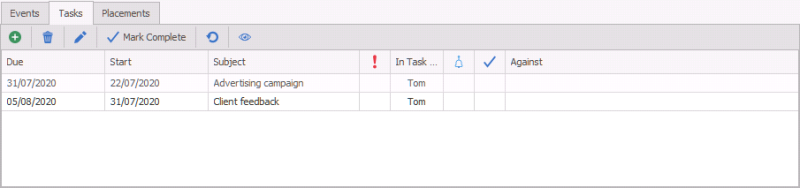
This will show all the tasks that have been allocated to this job. You are able to add, edit and mark are completed here.
Shortlist
Perm / Contract / Fixed Term jobs only
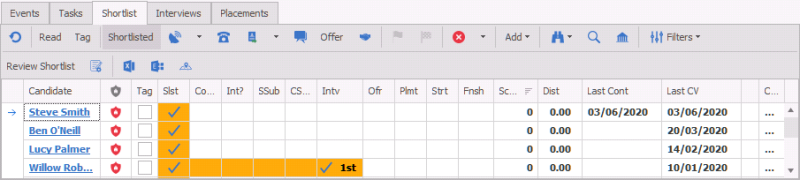
This shows the shortlist entries that are associated with this job. You will see a line per candidate. You will see the ticks in the boxes that indicate how far along the process the candidate is. These could be related to Jobs or spec submission.
See the Results (Re Job) section for more details.
Interviews
Perm / Contract / Fixed Term jobs only
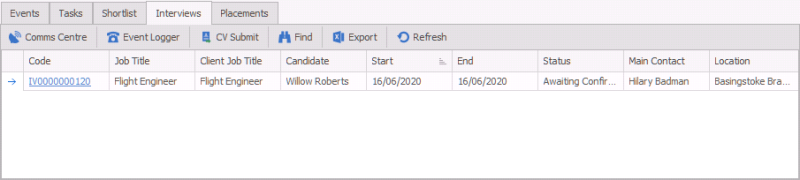
These are the interviews associated with the job. It is recommended that you continue the process here.
See the section on interviews for more details
Placements
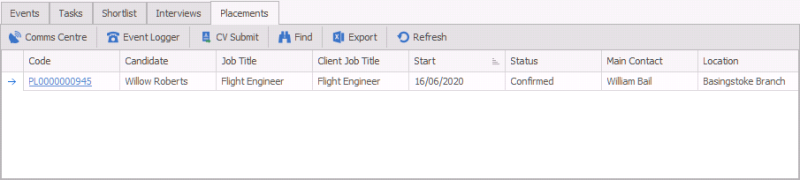
View the placement(s) that have been made against this job. See the placement section for more details.

If you require further assistance please contact Ikiru People using the details published on www.ikirupeople.com
Visit our Customer Portal at https://portal.ikirupeople.com/ for future events and clinics.
If you would like to make suggestions or have found any errors with this Help section please contact our Support team.
Version 4.87
Voyager Software is a brand of Ikiru People Ltd, a subsidiary of Dillistone Group Plc. The group is a leading global provider of software and services that enable recruitment agencies and in-house recruiters to better manage their selection process and address the training needs of individuals. Across its brands – which include Voyager Software (recruitment software UK & Australia), Dillistone FileFinder executive search software, GatedTalent, the global database of the world’s leading executives, Talentis.Global – the next generation of recruitment software and also ISV.Online, provider of online pre-employment skills testing and training tools. Dillistone Group serves thousands of clients worldwide. Ikiru People Ltd: Registration Number 02043300. Registered in England & Wales.
 |  |  |  |