 Creating a Company
 Walkthrough
The step by step instructions below are just as guidance and does not go through all options, see more information at the bottom of this topic for more in depth details
Note that the Company, Location, Contact record are individual records in their own right and therefore different users can access and edit different entities, it will only be locked if another user is editing the same record
Step 1
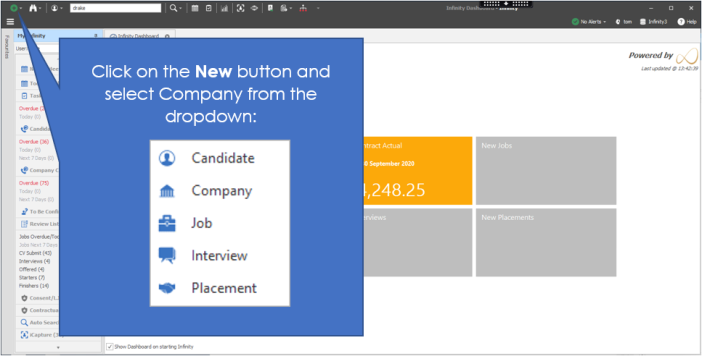
Step 2
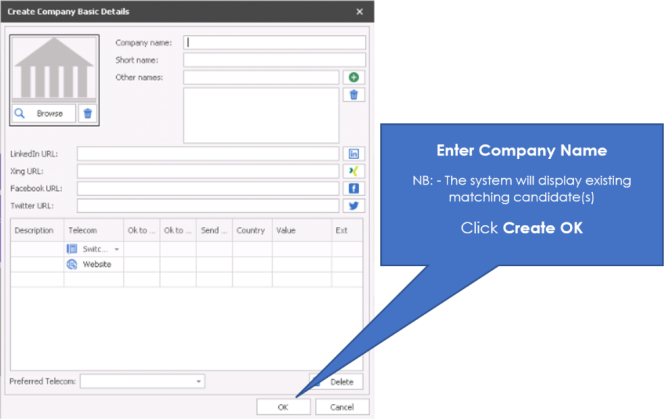
Step 4
NB:- it is highly recommended that you check if the contact is already present within Infinity by completing a find candidate / contact
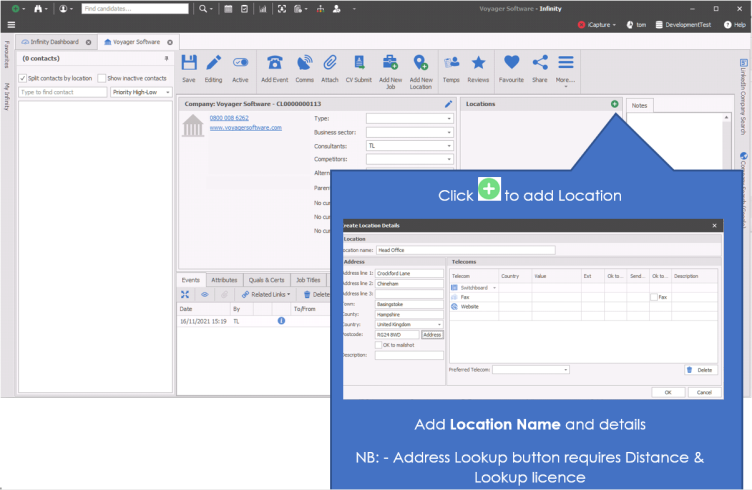
Step 5
Click Save


Need more information, click below:
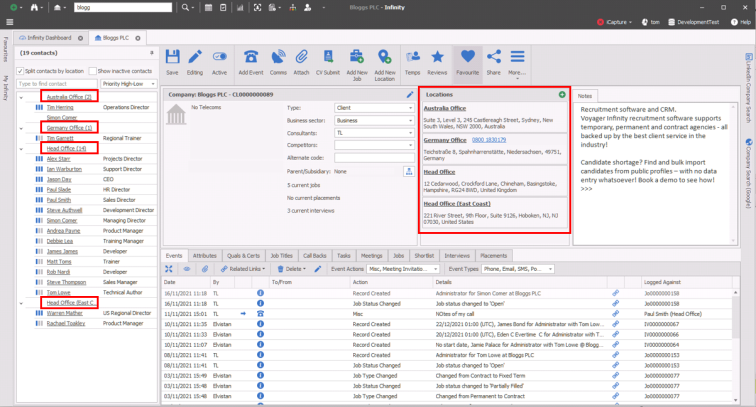
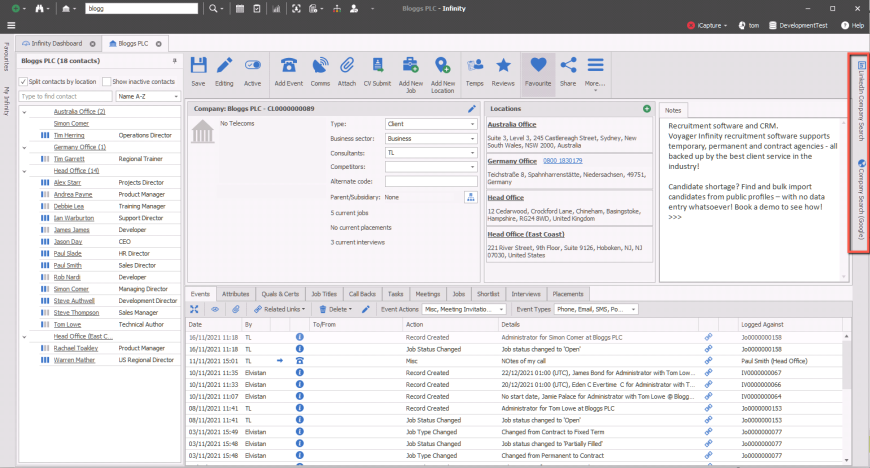
The Company is made up of 3 entities:
- Company
- Location
- Contact
You cannot add contacts to a company until you have created a company and location, as contacts are linked to a location and the location is linked to the company. This enables the ability to consolidate actions and information in each of these records, for example, review all events logged against a location which has 5 contacts.
The contact list sits to the left of Company, Location and Contact records, offering quick navigation. The panel can be undocked to then be a vertical tab within the records.
The list has filtering and ordering options available:
| Split contact by location |
tick - displays location names with appropriate contact below untick - no locations displayed
|
|
| Show inactive locations and contacts |
When ‘Show inactive locations and contacts’ is ticked:
When ‘Show inactive locations and contacts’ is unticked:
Note: locations made inactive whilst the company page is open will be greyed-out but still visible in the navigator until the page is closed and reopened. |
|
| Type to find contact | type name to find the appropriate contact | |
| Sort Order dropdown |
Order Name A - Z (by forename) Order Name Z - A (by forename) Priority High - Low Priority Low - High 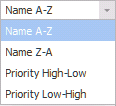
|
|
| Owning Consultant filter | Filter the list of contacts by owning consultant. When a consultant is selected in the drop-down list, contacts are shown that are owned by the selected consultant. The default can be configured by the user in User Options Display settings. |
|
Saves the company record
|
|
|
|
If the Editing icon is displayed then you have full access to the record and can make changes as appropriate If the Lock icon is displayed then another user is currently in the record, to identify the user you can hover your mouse on the icon and it will display the users name
|

|
Inactivate company. When a company record is made inactive, the user is prompted to make all locations and contacts at that company inactive also. |
|
|
Log events via the event logger, see the add events section for more details
|
|
Access the Comms Centre to access your email, SMS or postal templates, see the Comms Centre section for more details
|
|
|
Access the companies (location or contacts) attachment(s) files here
|
|
|
|
CV submit to the company / location / contact either speculatively or for a job, see the spec CV submit sections or Job CV submit for more details
|
|
|
Transfer the contact to: Another Company record - completing the transfer will copy the contact to a company and inactivate the contact within this company (this ensures you have a historical record for the contact). You will be required to select another contact to take any current jobs, interviews and placements. Within the same company - completing the transfer will copy the contact to the other location and inactivate the contact within this company (this ensure you have historical record for the contact). You will be offered the option to take any current jobs, interviews and placements. The following fields are automatically copied to the new contact at the selected location:
|

|
Add a Job to the Company / Location / Contact |
|
Opens Google maps and accesses the Company / Location / Contact address
|
|
|
Link or unlink the contact as a candidate / contact or link them to an existing candidate or contact record
|
|

|
Review Temp defaults for the Company, set agreed rates by job title, required attributes or Quals & Certs, see the Company Temps section for more details
|

|
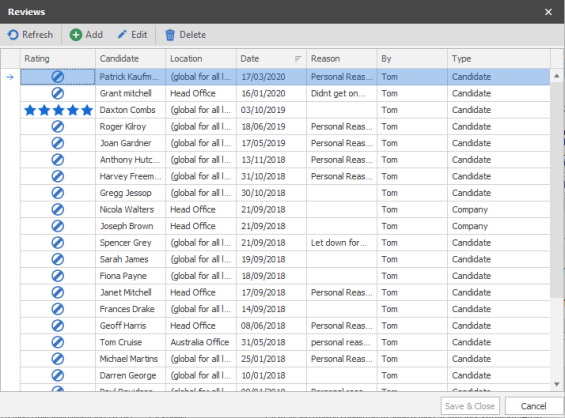
Review any candidates, see Review section for more details
|
|
|
Make the company / location / contact record a favourite, see favourite section for more details
|
|
Share the record Choose to Share the record via Email or Teams, see the share section for more details
|
|

|
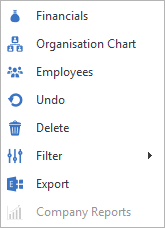
More... Access additional buttons and options:
|

|
Review the Company financial information, VAT, invoice details, TOB etc... see the Company Financial section for more details
|
|
Review the Companies organisation chart, setup hierarchy for contacts within the company record
|
|
|
Review all employees (contacts and candidates) that have been placed with Company
|
|
|
Undo any changes made since previous save or opening the record
|
|
|
Delete the company record, a password prompt will open and once you have entered your Infinity password you can click on Delete to confirm the deletion, you cannot delete a company that has current interviews or placements NB: - you will need to have permission to delete a company record, please speak to your system administrator for more details or click here to view permission administration
|
|
|
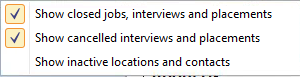
Set filters to Show hidden data:
Show closed jobs, interviews and placements - will show any historical interviews and placements within the information area Show cancelled interviews and placements - will show any historical cancelled interviews and placements within the information area Show inactive locations and contacts - will show any inactivated locations and contacts within the Company record NB: - These can be set to default within the user options
|
|
|
Export the contacts details to Exchange, will then be a contact in Outlook NB: - You will require to have appropriate permissions, see your system administrator for more details or click here to view permission administration
|
|

|
Access reports Person Work History report - outputs the contacts Work History, if contact was originally a candidate record that has been linked then this includes parsed work history (from iCapture) and placement history
|


 Clicking on the edit button will allow you to input the company telecom's, LinkedIn URL and image. Use the browse button to upload their logo to the system, enter the URL and then the telecom's details.Company Fields
Competitors: a multi select drop down list is available to mark the companies competitors are
Alternate Code: allows you to record an alternative company code
Type: a drop down list of company types available, this list is managed by the system administrator (click here to view reference data administration section)
Business Sector: a drop down list of company types available, this list is managed by the system administrator (click here to view reference data administration section)
Consultant: a multi select drop down list is available to mark which consultant(s) are the account holder for this company
Alert: The text displays in red and can be 255 characters long. When viewing location or contact pages, the alert field is shown in red, in the company section.
Parent / Subsidiary: clicking on the  button will activate the dialogue box for adding parent or subsidiaries to the company record:
This allows users to Add Parent / Subsidiary companies by finding the appropriate company record, the company will need to already be on the database prior to adding,
Once they are added these are hyperlinks for easy access to the company record on the database.
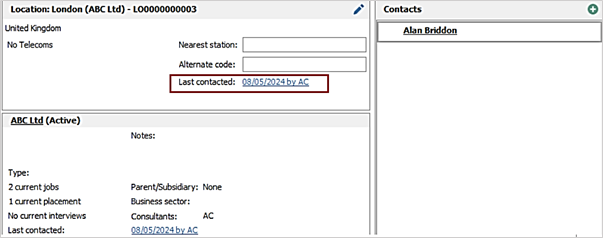
Last Contacted
- This is the latest contacted date plus consultant taken across the whole company record (company page, location pages and contact pages).
- The field will automatically update if ‘Update Last Contacted’ is ticked when logging an event via the Event Logger, Comms Centre and Email synching on any of those pages.
- If a user has the company page open, a refresh will need to be done to see the latest update.
- The field is a clickable hyperlink to go to the page that last updated the date, if different to the current page.
- When the hyperlink is clicked, the current page is closed, and the user is taken to the page that last updated the field.
- If the field is not a clickable hyperlink this means that the user is on already on the page that last updated the date.
Company Notes: insert relevant notes about the company in here, you are also able to access the text editor by double clicking as well as other tools available, please see the Infinity Text Editor section for more details.
 NOTE – The details for the company should be main line telecom's not specific to a contact within the company, i.e the main switchboard number. However the location telecom's should be added under the location section.
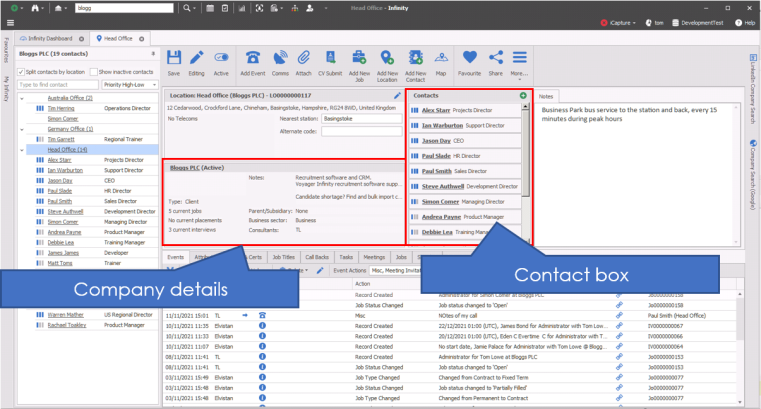
 The location record is accessible via the contact list to the left, within the location box within the Company record or via the location name link in the contact record:
The location record
Locations can be:
|
deleted |

|
| inactivate location |
|
| Add new location |

|
When a location record is made inactive; the user is prompted to make all contacts at that location inactive also.
NB:- inactive locations can be viewed via filters, if inactive is already displayed then ensure you review the active status box, so you are aware you are viewing either an active or inactive location
To add a location to the company, click on the Add button  in the Company record or via the Add location button:
![]()
Enter the Location Name, Post Code (You can also lookup the address via the Address button if you have a Distance and Lookup licence, speak to your administrator for more information or click here to view user administration section) as well as any telecom's you have specific to that site.
NOTE – The details for the location should be specific to the location within the company
Location Fields
Nearest Station: allows you to record the nearest train station to the location, this can be used as a merge field within email / SMS / Postal templates
Location notes: insert relevant notes about the location in here, you are also able to access the text editor by double clicking as well as other tools available, please see the Infinity Text Editor section for more details.
Location last contacted information
Last contacted information is on the location page.
- This is the latest contacted date plus consultant, taken across the whole location record (location page and contacts at that location pages).
- The field will automatically update if ‘Update Last Contacted’ is ticked when logging an event via the Event Logger, Comms Centre and Email synching on any of those pages.
- If a user has the location page open, a refresh will need to be done to see the latest update.
- The field is a clickable hyperlink to go to the page that last updated the date, if different to the current page.
- When the hyperlink is clicked, the current page is closed, and the user is taken to the page that last updated the field.
- If the field is not a clickable hyperlink this means that the user is on already on the page that last updated the date.
- The fields are automatically populated upon upgrade using the latest last contacted information found across the whole location record (location page and active contacts at that location page).
- The location ‘Last Contacted’ date is shown in the ‘Contacted’ column when ‘Split contacts by location’ is ticked.
- The location ‘Last Contacted’ Date and By fields are available in Location Search / Search Criteria / Advanced Search section / Location menu.
- Searching ‘Last Contacted’ date will return locations with a last contacted date field that matches the date criteria selected.
- The location ‘Last Contacted’ date field is shown as default in location search lists.
- The location ‘Last contacted’ date and by fields are available in the Company Comms Centre / location group to merge in your templates.
 Access contact record via find, via a contact list within a Company, Location or Contact records or via the contact box within the Location record
|
delete contact |
|
| inactivate contact |
|
NB:- inactive contacts can be viewed via filters, if inactive is already displayed then ensure you review the active status box, so you are aware you are viewing either an active or inactive contact
View and manage contacts from the location record or via the add Contact button. Greyed out contact are inactive contacts (note you can display inactive contacts via the filters)or via the Show inactive contacts tick box within the Contact List.
NB:- filter default options available
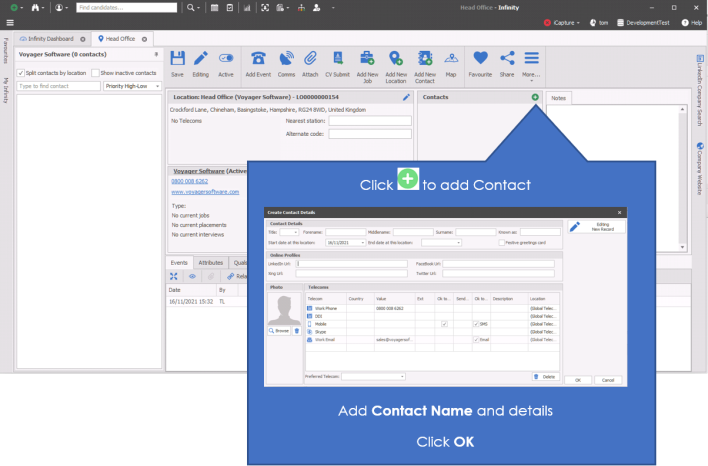
Steps to adding a contact
Ensure you have the appropriate location selected prior to creating a contact. To enter a contact into the company, click on the Add button within the location box or click Add contact button.
Enter the contact name and details, title, enter LinkedIn URL, Browse for a photo, enter the telecom's for the contact and define the Preferred Telecom. To enter a telecom, first select the type of telecom from the drop down and then enter the details in the value column, the system will default any telecom location to Global Telecom. This can be edited to be location specific telecom as appropriate. This would mean that if the contact were to be transferred to a different Company or a different Location the location specific details will not be displayed, although still accessible within the edit screen.
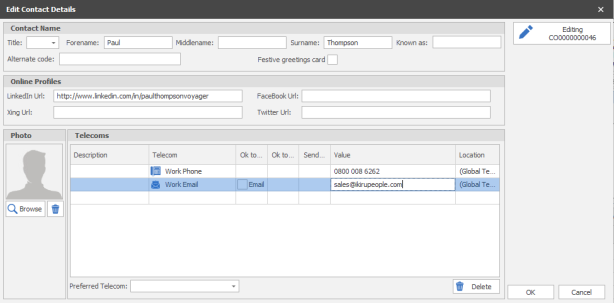
Click on OK to confirm.
If you need to edit any of these details once they have been created, then click on edit within the Telecoms box.
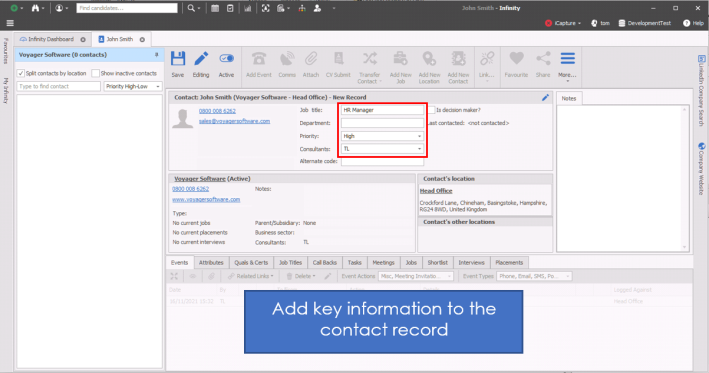
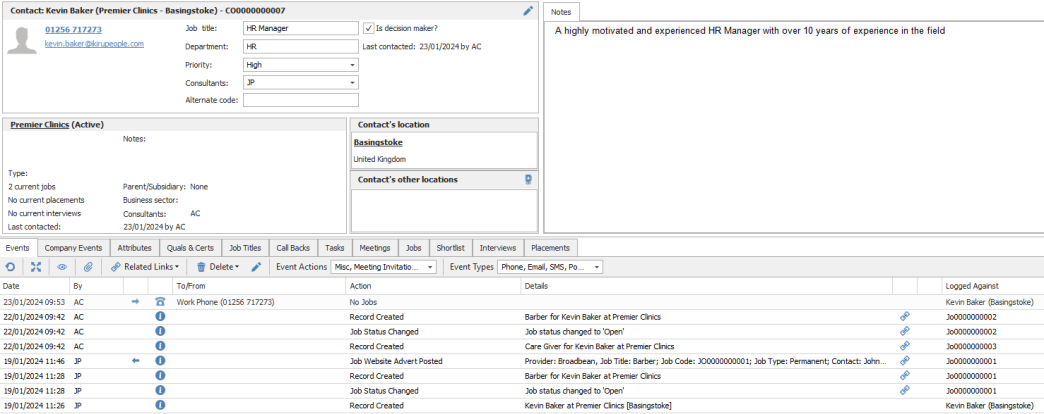
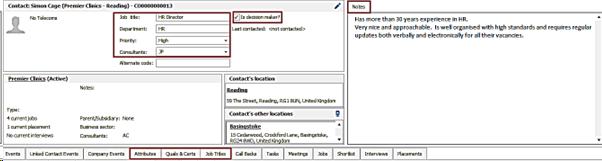
Contact Fields
Pty (Priority):a drop down that includes High, Medium or Low, allowing users to mark which contacts are high, medium or low priority
Job Title: is a free text field and should input the contacts job title
Is Decision Maker: tick box to mark the contact as a main decision maker, this is searchable and therefore useful for creating lists of key contacts
Department: is a free text field for users to record the contacts department
Consultant(s): is a multi-select drop down list allowing users to take or remove ownership for this contact
Contact Notes: insert relevant notes about the contact in here, you are also able to access the text editor by double clicking as well as other tools available, please see the Infinity Text Editor section for more details.
Make a contact available at multiple locations at that company
On the contact page, there is a button (link icon) on the 'Contact's other locations' section to link the contact to other locations.
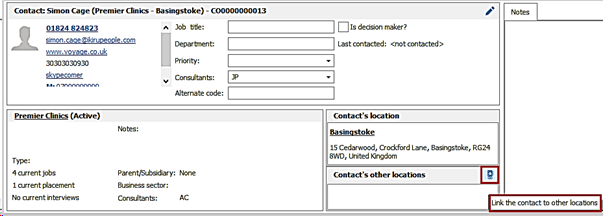
When pressed, the user can multi-select locations to link the contact to.
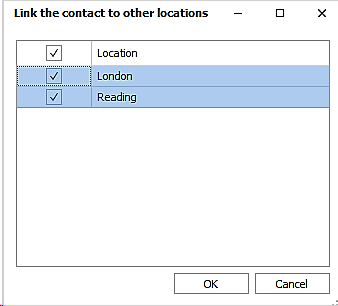
Active locations and the ones the contact is not currently linked to are listed.
When locations are selected and the ‘OK’ button pressed, the contact is created at and linked to those locations and the user is returned to the contact page.
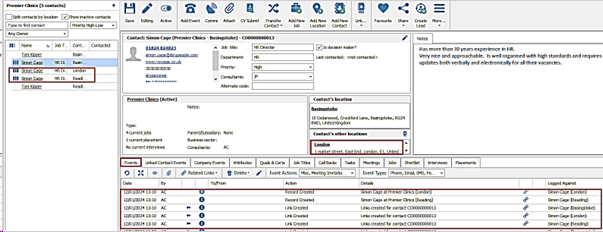
- The locations show in the contact's other locations section
- The Contact Navigation panel is refreshed with the new contacts at the selected locations
- A ‘Record created’ event is logged for new contacts at the selected locations
- A 'Link created' event is logged against the contact at the original location and the new contact at the selected locations
NOTE –it is not possible to unlink contacts. If a contact is not longer at a location, they will need to be marked as inactive
The following fields are automatically copied to the new contacts at the selected locations:
-
Job Title
- Department
- Priority
- Consultants
- Is decision maker
- Notes
- Attributes / Job Titles / Quals & Certs
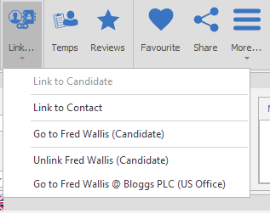
Contacts can be linked or unlinked to candidates and vice versa. If your candidate is placed at a company and becomes your new contact, or a contacts discretely asks if you can look for work on their behalf then it may be beneficial to link the contact and candidate record.
To create the link, go to the candidate record and select the link button 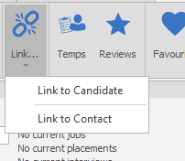
This will then give you options to either link to another candidate or link to a contact. If you select link to a contact you will then get wizard options to select the following information;
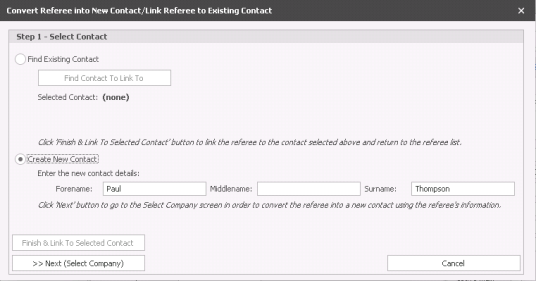
Step 1 - Select Contact
Use the radio button to either find and look for the contact already present within the system (you will be able to Finish & Link to Contact as all other details will autopopulate) or Create New Contact:
NB:- it is recommended that you use the find to check if the contact is already present
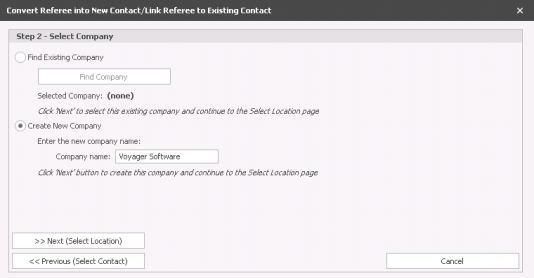
Step 2 - Select Company
Use the radio button to either find and look for the Company already present within the system or Create New Company:
NB:- it is recommended that you use the find to check if the company is already present
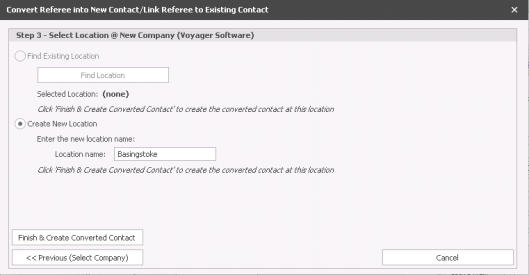
Step 3 - Select Location
Use radio button to either find and look for the location already recorded within an existing Company record or Create New Location:
NB:- it is recommended that you use the find to check if the location is already present

If a contact and candidate are linked together there are new Events grids for Candidate and Contact these tabs will only be displayed if a Candidate and Contact have been linked via the “Link to” option on the main ribbons.
Using these tabs will allow you to differentiate between candidate and contact events clearly and easily whilst viewing either Candidate or Contact details.


If a contact is linked to both a candidate and another contact record. You can use the button to navigate to the appropriate records.
![]() The Transfer contact button allows you to transfer a contact either to another company or to another site within the same company. If transferred to another company, the contact will have an additional events tab called Linked Contact Events keeping the contacts historical events
The Transfer contact button allows you to transfer a contact either to another company or to another site within the same company. If transferred to another company, the contact will have an additional events tab called Linked Contact Events keeping the contacts historical events
You are able to review the Company and / or Contact's LinkedIn and / or other social media profile(s) from within the vertical tab, please see the iResearch Company section for more details
 Here you will be able to add the company financial details, PO numbers / Project codes and Terms of Business. See Company financial's for more details.
 Setup agreed temp rates for specific job titles to ensure efficient Temp job creation, see Company Temp Rates for more details
 You can review and add Blocklist entries for the Company. This can assist in future placements with the company as you can review higher scoring candidates and place candidates that have a previous positive relationship.
- Find the Candidate that you wish to review for the company, 1 star will also be "blocked" and business rules (temp settings) can warn or prevent users from placing candidates which have had Poor scores against the company
- Set whether the review should apply to the whole Company or just to one specific Location
- Date the review / block should apply from
- Add a reason/ note for the score
Contact / Company / Location Events
Will show you activities logged against the Contact / Company / Location depending on which section you are currently active in. Utilise the filters and options to review actions.
 Expand the event grid to view more notes |
|

|
Show All events, opens a separate dialogue box |

|
Access relevant attachments for the highlighted event |

|
Access relevant records relating to the highlighted event |
|
|
Delete the highlighted event* *permissions required |

|
Edit the highlighted event* *permissions required |

|
Filter the events by Action, multi-selection available to filter the grid to desired content |

|
Filter the Event Types , multi-selection available to filter the grid to desired content |

Candidate Events
This tab will only appear if you have linked a contact to a candidate and it will show you activities made for this person as a candidate. If you wish to view all communications you can select the show all button.
Attributes
Contact / Company / Location Attributes can be added via the Contact / Company / Location Attributes tab at the bottom of the screen. To add an attribute against a Company, click on the company section of the screen and then go to the attributes tab and select add attribute. See the Attributes section for more detail.
Quals & Certs
Contact / Company / Location qualifications and certificates can be added via the Contact / Company / Location Quals & Certs tab at the bottom of the screen. To add a qualification or certificate against a Company, click on the company section of the screen and then go to the Quals & Certs tab and select add Qual/Cert. See the Quals & Certs section for more detail.
Job Titles
Contact / Company / Location Job Titles can be added via the Contact / Company / Location Job Titles at the bottom of the screen. To add a job title against a Company, click on the company section of the screen and then go to the company job titles tab and select add job titles. See the Job Titles section for more detail.
Call Backs
You are able to set a call back to a Contact / Company / Location at the bottom of the screen. To add a call back against a contact, click on the contact and then click on the contact tab and then select the green cross add button. See the Call Backs section for more detail.
Tasks
You are able to view incomplete / setup Tasks that will then show as related to the Company / Location / Contact that you are in. See the Tasks section for more detail.
Meetings
This shows the incomplete meetings that are arranged for this candidate. You are able to add, edit and delete the meeting from here. View historical meetings via the Show All button
Jobs
This shows the current active jobs listed against the Contact / Company / Location. If you wish to see the historic jobs you will need to go to the filter icon on the Company ribbon or setup defaults in the user options.
Shortlist's
This shows the shortlist entries for all jobs that are associated with this Contact / Company / Location. You will see the ticks in the boxes that indicate how far along the process the candidate is.
Interviews
View the Contacts / Company / Location interviews here. If you wish to view historic interviews you will need to go to the filter icon on the candidate ribbon or setup defaults in the user options.
Placements
View a list of the candidate placements here. If you wish to view closed / historic placements you will need to go to the filter icon on the candidate ribbon or setup defaults in the user options.

If you require further assistance please contact Ikiru People using the details published on www.ikirupeople.com
Visit our Customer Portal at https://portal.ikirupeople.com/ for future events and clinics.
If you would like to make suggestions or have found any errors with this Help section please contact our Support team.
Version 4.87
Voyager Software is a brand of Ikiru People Ltd, a subsidiary of Dillistone Group Plc. The group is a leading global provider of software and services that enable recruitment agencies and in-house recruiters to better manage their selection process and address the training needs of individuals. Across its brands – which include Voyager Software (recruitment software UK & Australia), Dillistone FileFinder executive search software, GatedTalent, the global database of the world’s leading executives, Talentis.Global – the next generation of recruitment software and also ISV.Online, provider of online pre-employment skills testing and training tools. Dillistone Group serves thousands of clients worldwide. Ikiru People Ltd: Registration Number 02043300. Registered in England & Wales.
 |  |  |  |