Comms Centre
 Walkthrough
The step by step instructions below are just as guidance and does not go through all options, see more information at the bottom of this topic for more in depth details. You have the option of using the Comms Centre or just a direct email:
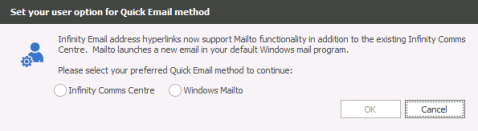
Direct email the candidate - (Individual message) Click on the underlined email address to open the comm's centre or directly into an Outlook email (see user options for Default Quick Email Setting). The first time will offer a prompt:
Using Comms Centre - (individual or in bulk)
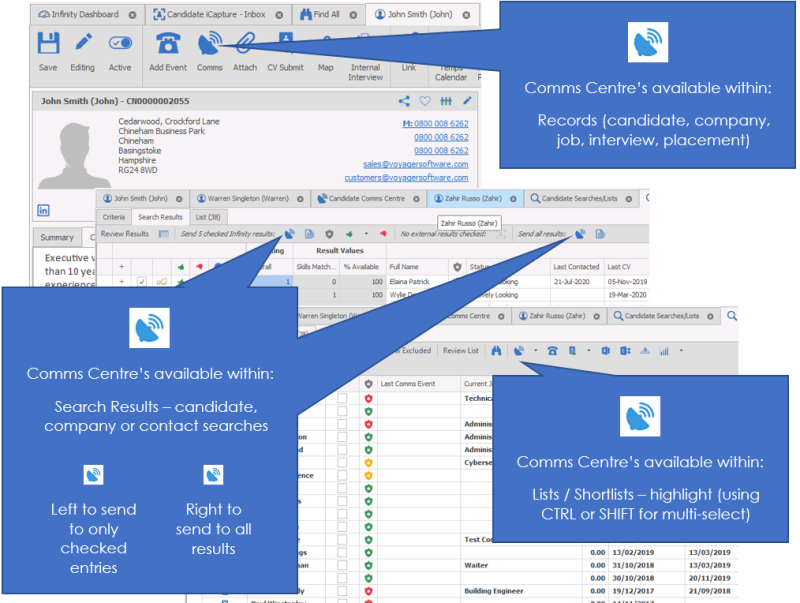
Accessing Comms Centre
Email Options
Sending Options
Editing Email (Optional)


Need more information, click below:
The comm's centre is the area that you use to send communications. This differs from the event logger, which is a retrospective record of an action. Using the comm's centre will send the communication and log the event at the same time.
The templates that are available will be specified by the System Administrator, more information can be viewed within the template administration section (NB: - you will require permissions to add or edit templates).
If you have set default templates in your user options area the comm's centre will automatically default to that choice first.

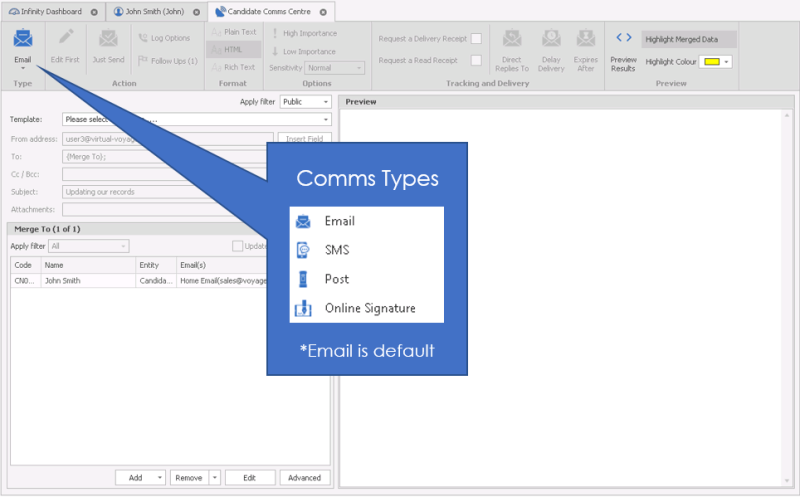
Click the Comm's centre icon 
Make sure that your chosen delivery method is set to email (default)
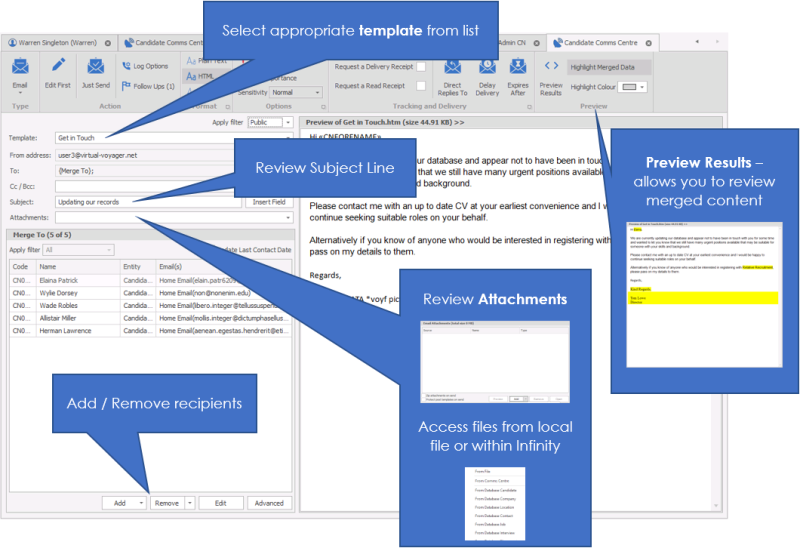
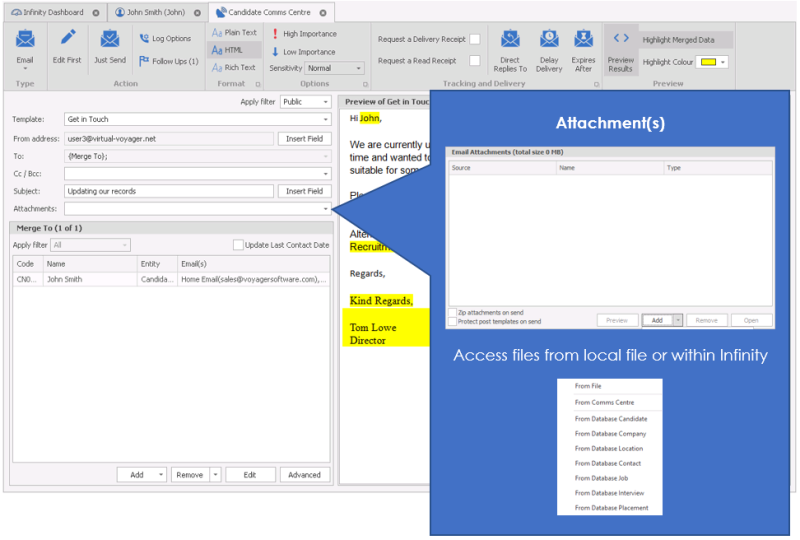
Choose the template that you would like to send by click on the drop down box next to Template:
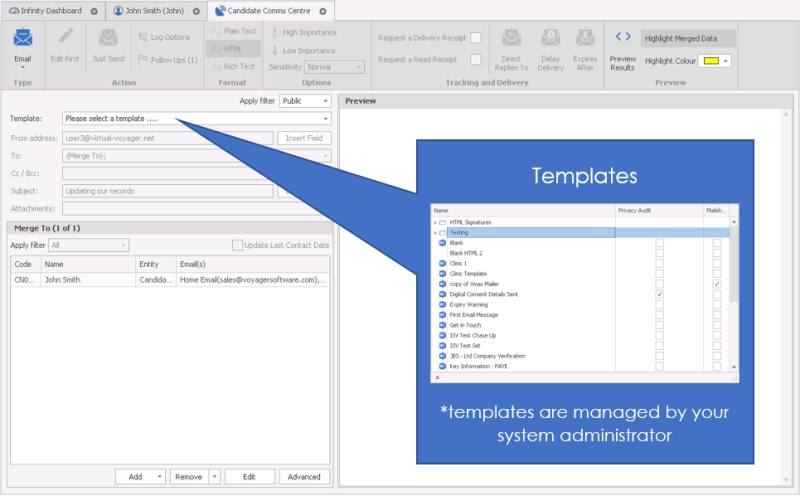
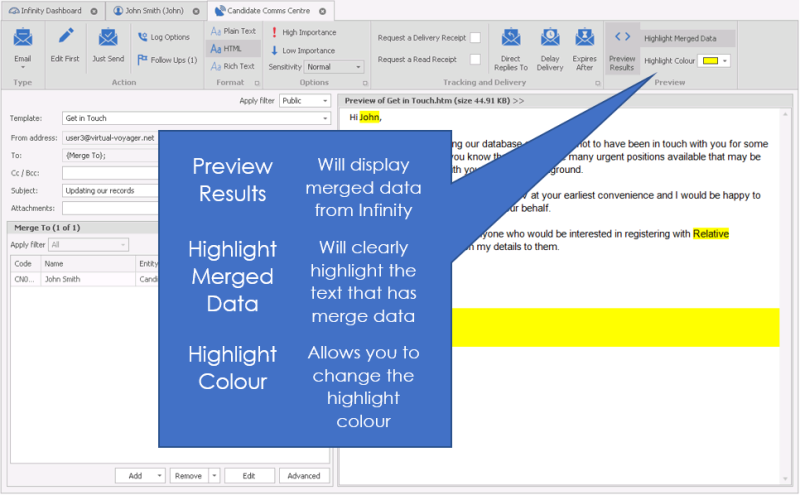
When you choose the template that you’d like to send from the list, you will notice that the template shows on the right hand side of the screen. You are not able to edit the template here but you can preview the merge codes, use Preview Results
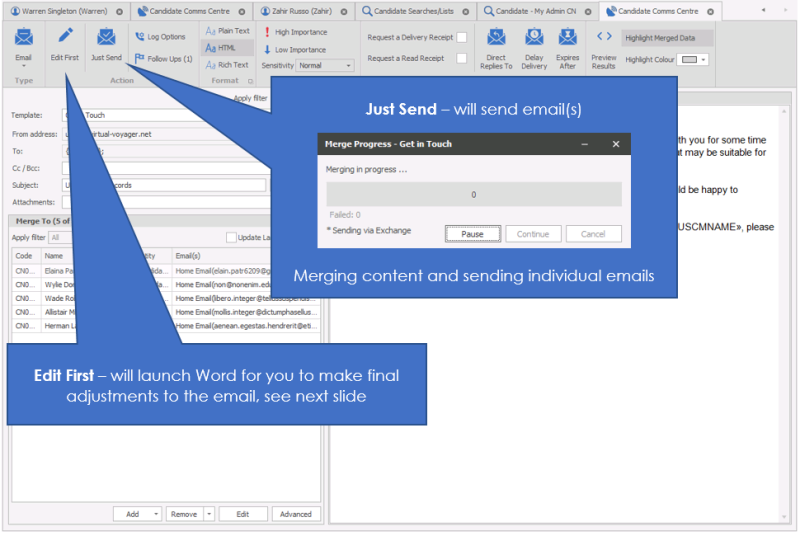
If you’re happy with the template (and its settings), click Just Send.

Click "Continue" to confirm
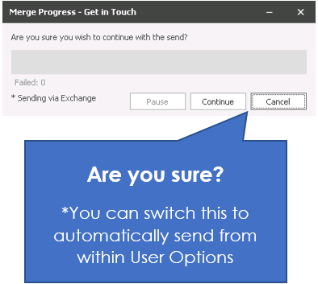
Cancel – Goes back to the previous screen for you to make changes, or close without sending.
Send Test The placement Comms centre has a ‘Send Test’ button, from the ‘Edit First’ screen. This is designed for you to test the comms centre, but also allows you to send a document to a user outside of Infinity, just type required email address:
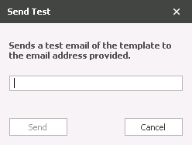
NB: - Send Test utilises SMTP not Exchange so may not be recorded in Sent Items

This could also be used to send a ‘Placement Form’ to your accounts team.
Test emails can contain:
• From Email Field
• Email Subject
• Email Contents
• Attachments (including merge-able)
An event is not logged, as there is no Candidate / Contact in Infinity who received the message.
The email is sent either by Outlook (if exchange sync is configured) or by SMTP (using the ‘email other’ option)
However if you want to make changes to the template before it goes. You should make the necessary changes on the left hand side of the screen to the cc / bcc, subject line and attachments
NB:- cc / bcc if you Add a colleague or an email address that is already on the system the email will be recorded in that record as well as the record you are sending to, unless they are excluded, see your system administrator for more details
Adding Attachments
NB: - You can have attachments automatically attached to emails, please speak to your system administrator or click here to view template administration content
To add any attachments, click on the drop down box next to the attachment.
Click Add and browse your computer as normal to find the correct attachment. You are also able to attach a postal template to the email template, allowing you to have merge fields within the attachment.
Put a tick in the box to zip attachments on send together, this will compress the files, reducing the size of the attachments.
Put a tick in the box to protect the Word postal templates on send
 Suggestion: Large attachments should be Zipped on sending. This means that the recipient’s mail box is less likely to reject your email because it’s too large.
Click remove to remove an attachment, and Open to open the document to check it. This may be useful if the template has an automatic attachment associated with it to check the documents before sending. Any changes you make to an attachment will be saved for this send.
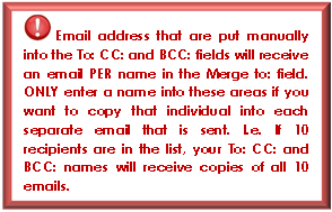
To send a copy of the email to another recipient use the To: BCC: and CC: Fields. This will not include them in the mailshot (i.e. merge their details), but will send them copies of the emails that are sent.
You can also add a colleague to the CC / BCC section, once you have selected your template click into the cc/bcc field and select add, then various recipient options will appear. Select colleague from the list and press OK your colleagues will appear for you to select from.
NB:- cc / bcc if you Add a colleague or an email address that is already on the system the email will be recorded in that record as well as the record you are sending to, unless they are excluded, see your system administrator for more details
To include another merged email to another recipient, click Add at the bottom of the screen and use the find option as described in the previous section. This will automatically send the email to this recipient, with their details, without the need to add them to the To: field
Remove recipients by highlighting the relevant line and clicking Remove
Edit enables you to make a change to the email address if you notice that it is incorrect
If a recipient doesn’t have an email address showing at the bottom of the screen they are likely to not have been ticked as Ok to mail (However the mailing template may have been created as a mailshot template and therefore requires Ok to mail to be ticked) However the mail to. You will not be able to send the email until you have told Infinity which is the correct email address or Privacy Audit is blocking sending until Consent or Legitimate Interest process has been completed.
- Click the Advanced button under the email address to find the correct email address. Here you will see a list of email addresses that have been marked as default.
- Click the Show all emails if you haven’t got a default email address to choose. The list will show you all the email addresses against those in the lists. Here you can tick the address that you would like the email to go to.
- You will not be able to choose the default from here. You will need to set the default against the record.
- Click OK
Make sure that you are happy with the options on the top of the screen. These are set as default with the template, but you are able to make changes here if necessary.

Change log options, Follow ups, importance and sensitivity, Request a delivery and/or read receipt
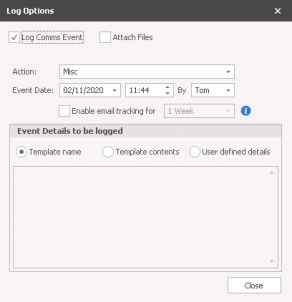
Changing the Log options will change the way that this email is logged in the database, against the record. This will be a set default within the template, but it can be changed here.
You can choose a different action that the template will be logged against, the date and time both default to the ‘now time’, and are not editable.
Enable email tracking* for: Choose timeframe you wish for tracking to be active, this can be setup within the template or user can adjust manually
*Infinity SaaS clients only see tracking section for more details
You can also change the details to be logged against the record.
Template name - Records the template name alone against the record
Template contents – Records the contents of the email against the record
User defined details – Opens the box beneath so that you can type your own choice of event log
Click the Follow ups button on the toolbar to amend the pre-set follow up that will be set with the template. See Follow up for more details
Direct Replies to, Delay delivery and Expires after all show the same screen when clicked. The option that you clicked to open the screen will automatically be ticked. In this case Direct Replies To
Replies sent to – Enable responses to be sent to another email address
Do not deliver before – Allows you to schedule email sends for the future
Expires After – Marks emails as being expired after a defined time. This means that the email will be available to view, but will have a line through it to show that it is no longer active.
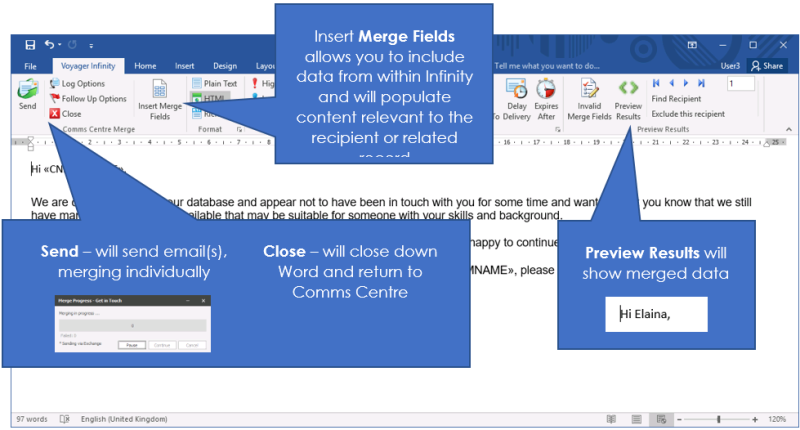
- When these options are correct, click the Edit first button on the tool bar which will open the template in Word for you to make any necessary changes.
- In Word, once you have made your changes go to the Voyager Infinity tab and select send
- From here you can Send your email – Please note you will be asked again to confirm that you’d like to send the email.
Log options – As described before
Follow up options – As described before
Email Options –
Close – Leave without sending your email.
Infinity allows you to send emails from SMTP (simple mail transfer protocol) this allows you avoid using your exchange account and will not show up in your sent items within Outlook. Particularly when sending on large scales it can be a useful alternative to the day to day exchange emails.
See General Settings section for details on setting up SMTP credentials
When accessing the Comms Centre you can switch the From Address to Email Other via the Insert Field button:
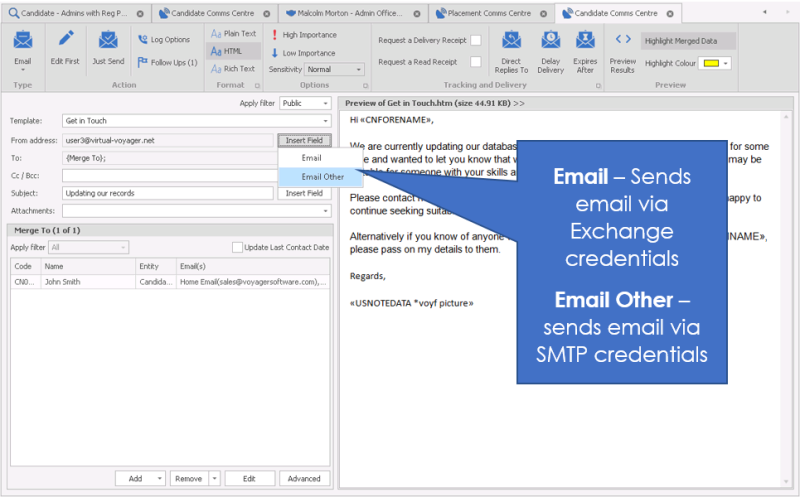
Please note when using SMTP some exchange options and features will not function, for example Delayed Delivery and Save in Sent Items

Make sure that your chosen delivery method is set to Post
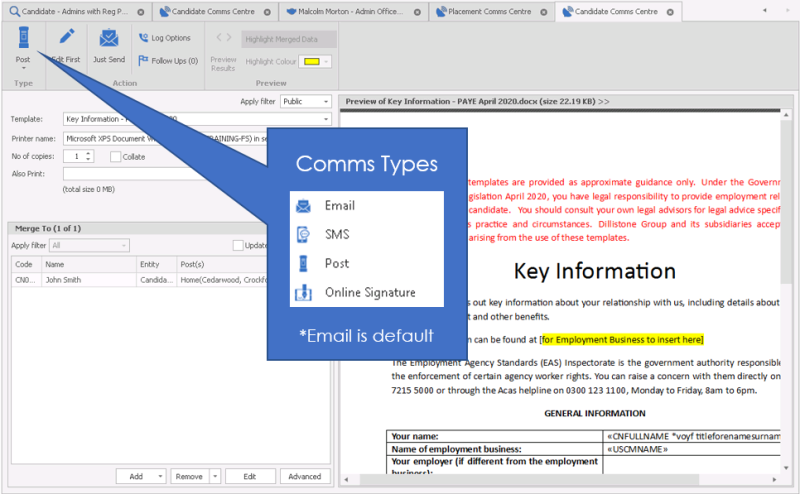
- Chose the correct template from the drop down box next to Template:
- Check the details on the left of the screen
- Also Print: enables you to browse and pick up other documents to print at the same time
- Log options and Follow ups are described in the previous section and work in the same way.
- If you are happy with the template and the logging / follow up options click Just Send
- This will send the document to the printer specified on the left hand side of the screen.
If you would like to edit the document before sending
- Click the edit first button
- This will open the document in Word, where you can make your changes.
- When finished, go to the Voyager Infinity tab
- From here you can Send your document to the printer
- Log options – As described before
- Follow up options – As described before
-
Click the Comms Centre button to choose the type of communication that you’d like to send
- Email Options – Choose your options regarding delay sending etc.
- Close – Leave without printing your document
From the Comms centre make sure that you have chosen SMS as the type of communication.
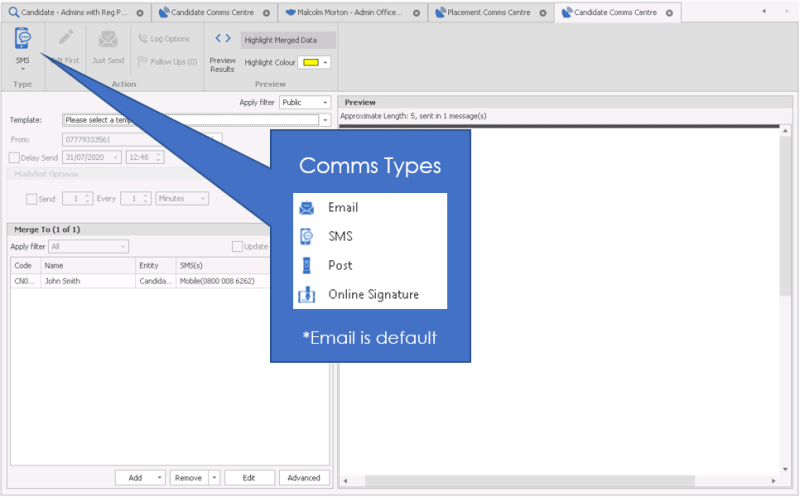
- Choose the correct template that you would like to send. Using the drop down next to Template:
When you choose the template the default text will show on the right hand side of the screen.
- If you are happy with the template, click Just Send
- You can make changes to the template, but first click Edit First
Editing the SMS will open the text in a text editor

- Use these arrows to move through a list of people that you are sending SMS messages to. Use this to check the results before sending. The number to the right of the arrows indicates the number in the list.
Find recipient – Find a name in the list. If you want to check that a name is in the list, use this option
Exclude this recipient – Use this option to remove the recipient that is showing on the screen.
From – This shows who the SMS will be send from. Click the insert field to amend this.
Insert field - Choose which number or ID you would like the SMS to come from
Delivery receipt – Enter a tick here if you would like a delivery receipt
Delay send – Specify when you’d like the SMS to be sent
Mailshot options – Enter the details here if you’d like to stagger the SMS sends so that they don’t all go at the same time.
Approximate Length - Will count the characters you have used and the number remaining, making you aware if the message will be sent in one message or in multiple. If you preview the message it will recalculate more accurately, when sending in bulk use the arrows to cycle through each recipient to check character limits

You can utilise AI to build your email, SMS and Postal messages, see Infinity CoPilot for more information.

If you require further assistance please contact Ikiru People using the details published on www.ikirupeople.com
Visit our Customer Portal at https://portal.ikirupeople.com/ for future events and clinics.
If you would like to make suggestions or have found any errors with this Help section please contact our Support team.
Version 4.87
Voyager Software is a brand of Ikiru People Ltd, a subsidiary of Dillistone Group Plc. The group is a leading global provider of software and services that enable recruitment agencies and in-house recruiters to better manage their selection process and address the training needs of individuals. Across its brands – which include Voyager Software (recruitment software UK & Australia), Dillistone FileFinder executive search software, GatedTalent, the global database of the world’s leading executives, Talentis.Global – the next generation of recruitment software and also ISV.Online, provider of online pre-employment skills testing and training tools. Dillistone Group serves thousands of clients worldwide. Ikiru People Ltd: Registration Number 02043300. Registered in England & Wales.
 |  |  |  |