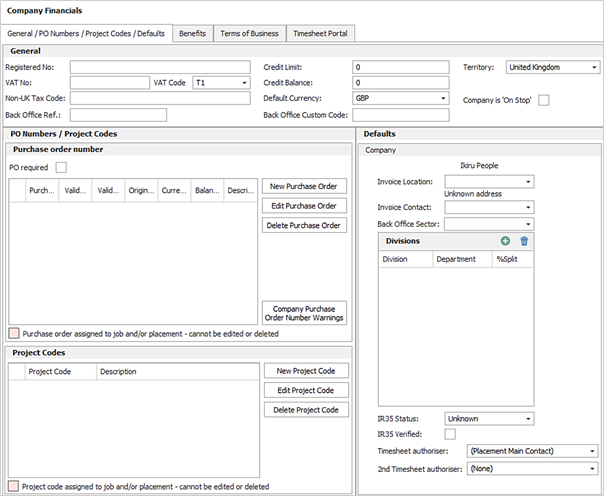
Company financials 
At the top of the dialogue box you can enter the appropriate Registration No., VAT No., VAT Code, Non-UK Tax Code and Credit information.

Company 'On Stop'
Tick to enable 'On Stop' across the company, this will display against the company, location(s) and all contacts within the company

This will also work in conjunction with business rules (Perm / Contract / Fixed Term) at CV submit stage, interview confirmation and placement confirmation stages, these can be configured to either warn or prevent users from completing these stages. For Temp jobs users can be warned or prevented as part of the compliance checks.
Infinity enables you add PO numbers to a company record that you can assign to a job, and call off as necessary. Infinity will tell you when you are getting close to the PO running out financially and / or in time frame.
There is also a setting to indicate if the company requires all placements to have a PO Number.
- Find the correct company
- Click the More hamburger button on the tool bar to access the dropdown with Financials:
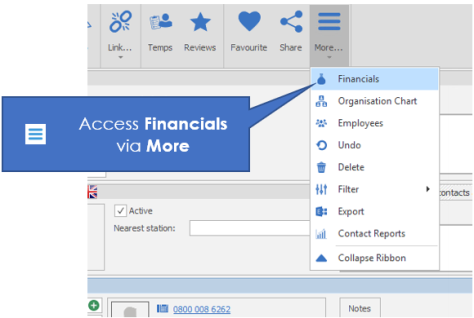
The full company financial's screen will open. We need to look for the PO Numbers / Project codes area
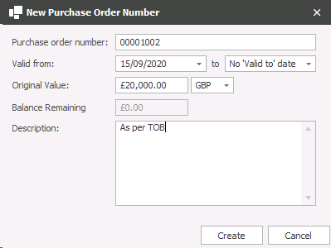
- To enter a new PO number click the New Purchase Order button
- Enter the information relating to the PO given to you by the client.
- Click Create
- To set / change the reminders for the PO, click the Company Purchase Order Number Warnings button on the company financials screen
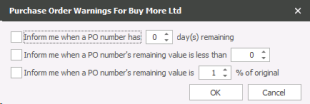
Choose the triggers that you would like Infinity to warn you when the PO is likely to expire.
Click OK
To make a change to a PO that you have already added to the record, click the company financial icon, via More, on the tool bar against the correct company.
Highlight the PO that you’d like to amend and click Edit Purchase Order in the PO Numbers / Project Codes area of the screen

This will reopen the purchase order number details. Make your changes and click Save or Cancel
- Find the correct company
- Click the financial Information icon on the toolbar
The full company financials screen will open. We need to look for the PO Numbers / Project codes area
Highlight the PO that you would like to delete and click Delete Purchase Order
The PO is immediately deleted. Click Save to close the box.
- Create the job as normal
- Click the green plus icon to the right of the PO number grid
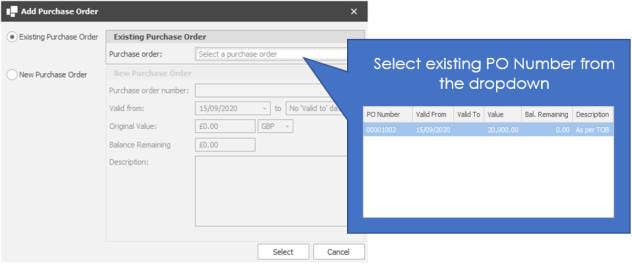
- Make sure that the radio button is in the existing purchase order option.
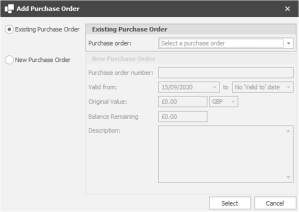
- From the drop down list choose the correct PO number
- If the PO is not already against the company, you are able to add new Purchase order details here. Click the New Purchase Order Number, the boxes will become active and you are able to enter the details.
For a PO against a single Job
- The PO has a number, but no dates or value.
- This will not expire or run out. There will be no action taken by Infinity
- The PO has no value, but has a date range.
- When the PO expires, Infinity will set a reminder for you to arrange another PO
- The PO has a monetary value and expiring dates.
- When the dates expire Infinity will set a reminder in the calendar to arrange another PO.
- The monetary value will be checked when the placement is made and you will be warned if there is not enough value on the PO
For a PO against multiple jobs
- The PO has a number, but no date or value
- This will not expire or run out. There will be no action taken by Infinity
- The PO has no value, but has a date range
- Infinity will warn if the dates of the PO have expired.
The PO has a value and a date range.
- When the dates expire Infinity will set a reminder in the calendar to arrange another PO
- The monetary value will be checked when the placements are made. The placement that ‘tips the scales’ will prompt a warning in Infinity to advise that the PO does not have enough monetary value.
This setting is to indicate if the company requires all placements to have a PO Number.

This is unticked as default.
A Perm / Cont/ Fixed Term Business rule and/or Temp Compliance check will need to be enabled for this setting to be enforced on placements.
Perm / Cont / Fixed Term Business Rule
In Administration / Business Rules tab there is a new mandatory field called 'Placement PO and required by Company' in the 'placement is awaiting confirmation' process.
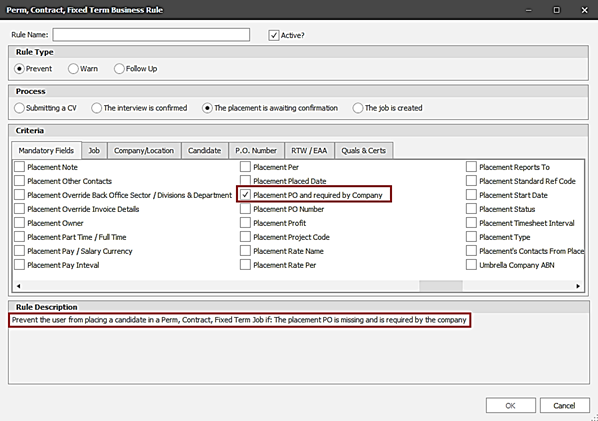
If the Company Financials ‘PO Required’ field is ticked, then Perm/Cont/Fixed Term placements are prevented/warned from being set as ‘awaiting confirmation’ status, unless the placement has a PO Number.
Temp Compliance Check
In Administration / Global Temp Settings / Compliance Checks there is a new setting called 'PO Missing and required by Company'.
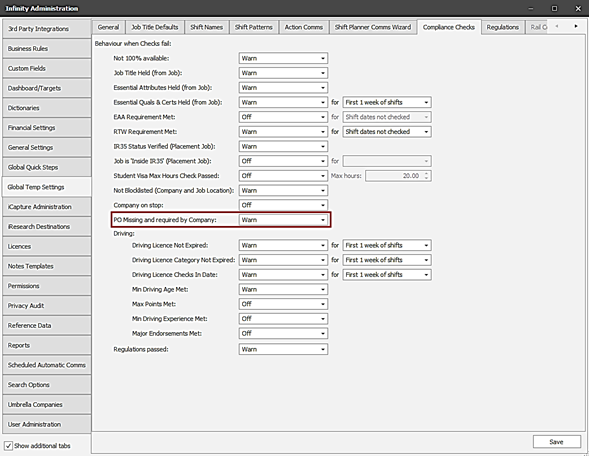
If the Company Financials ‘PO Required’ field is ticked, then Temp placements are prevented/warned from being created, unless the placement has a PO Number.
- If a new placement is to be created, the Job PO Number is checked, as that will be the default PO Number on the newly created placement.
- If a placement already exists, the PO Number is checked on the placement.
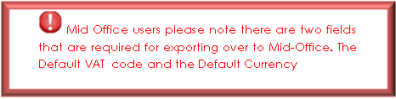
Project codes are primarily used for the Mid-Office package. They are used to group jobs together into a project and are mainly for grouping in MO.
- Go to the correct company record
- Click the Financial information icon
- Click the New Project Code button
- Enter the Project Code number and enter a Description
- Click Create
 NOTE – Project codes cannot be edited if it is assigned to a job
- Go to the appropriate company record
- Click the Financial information icon
- Choose the Project code to amend
- Click the Edit Project Code button
- Make your changes and click Save, or Cancel
NOTE – Project codes cannot be edited if it is assigned to a job
- Go to the correct company record
- Click the Financial information icon
- Choose the Project code to amend
- Click the Delete Project Code button
- The Project code will be immediately deleted.
- Go to the appropriate job record
Click the arrow next to the Project code and choose the correct project code.
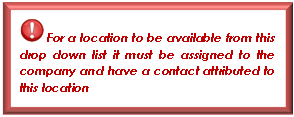
You are able to assign different addresses that invoices are sent to for a company. You do not have to have all invoices for all sites going to the same address. Infinity has the flexibility to set a default invoice address for a company and another specific invoice address per site if necessary.
 NOTE – This is likely to be controlled by your accounts department or an account manager responsible for the maintenance of client records.
To change the default invoice address for the whole company
- Find the correct company
- Click financial information
You are interested in the right hand side of the screen called Company Defaults
![]()
- Click on the Invoice location: and choose the correct location that you would like to send invoices to.
-
- Choose the correct contact in the Invoice Contact: field
- Click OK
To change the invoice address for a location
- Find the correct company
- Click financial information
![]()
You are interested in the right hand side of the screen called Location Defaults
- Click on the location: and choose the location that you would like to create an invoice address for.
- Enter a tick in the Override defaults area
- In the newly enables Invoice location: choose the address that you would like to send invoices to when a placement is made.
- Click OK, or Cancel
This is an area that enables you to identify where revenue for a placement for this company and / or location should be allocated in the Mid-Office and / or your accounts package.
NOTE - The Back office sector will be created by the System Administrator, and will be dictated by your back office processes. It will be available for you to choose and amend, but you are unlikely to change this very often.
To add a back office sector default to a company record
- Find the correct company
- Click financial information
- To change the Back Office Sector: click the drop down box next the field.
Divisions and departments are a continuation of the allocation of revenue within an accounts package. It is the way in which you will identify in Infinity where this revenue should be allocated.
The Divisions and Departments further split revenue from a placement made in your accounts package (via MO).
To specify the divisions and departments that placement revenue should be defaulted to when a placement is made
NOTE - The Divisions and departments will be created by the System Administrator, and will be dictated by your back office processes. It will be available for you to choose and amend, but you are unlikely to change this very often.
- Find the correct company
- Click financial information
- Click the green Plus button.
Click on the drop down by Division: and choose the relevant Department:, and the % split if there is more than division / department.
This information will be the default values that are pulled through to a placement when it is made. You will be able to change it at the placement record if necessary.
Click Add, or Cancel
Set up standard benefits which will auto-populate future job records against the company. Note you can set system wide settings for applying benefits to differing job type, so the system can populate Temp job benefits but not Perm jobs or vice versa.
When you have agreed Terms of Business with the company you should enter the agreed information into the Company financial's, Terms of Business tab. This will set the terms of business for the whole company. If different locations have different Terms of business, please see Enter different terms of business for different locations

Date Sent: Enter the date that the TOB was sent
By: Enter the name of the user that sent the TOB
Date received: Enter the date that the signed TOB were received back

Either enter a Margin percentage or a Markup percentage
Variable Fee %: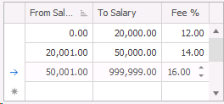
Enter the pay band and the fees associated.
Fixed Fee%: Enter the fixed fee amount

NOTE – You should choose which fee type you want. You are not able to choose both
Note: Enter any notes here
Cap Fee: Enter a tick in the box to cap the fee and enter the amount to cap at.
Enter different terms of business for different locations
Infinity allows you to set different terms of business for different locations within the same company.
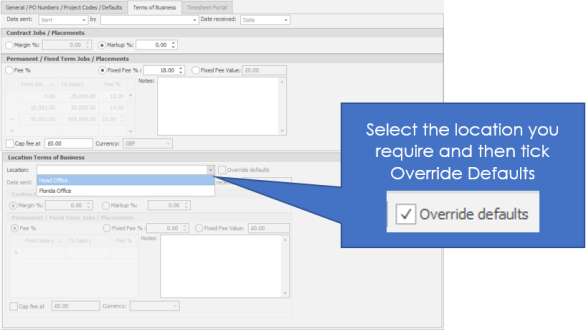
To set a terms of business against another location
- In the bottom half of the Company financial's / Terms of business screen choose the location that you would like to set the terms of business for
- If the terms of business are the same as the main company, click OK
- If the terms of business are different, click the Override defaults
- Once you have completed the new Terms of business, either continue with the other locations, or click OK
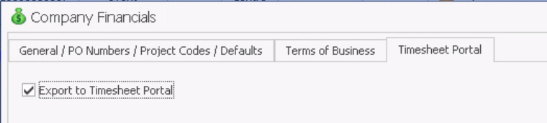
Ensure Export to Timesheet Portal is ticked for companies you wish to send placements to your Timesheet Portal Account
See Financial Settings for more information on setting up Timesheet Portal integration

If you require further assistance please contact Ikiru People using the details published on www.ikirupeople.com
Visit our Customer Portal at https://portal.ikirupeople.com/ for future events and clinics.
If you would like to make suggestions or have found any errors with this Help section please contact our Support team.
Version 4.87
Voyager Software is a brand of Ikiru People Ltd, a subsidiary of Dillistone Group Plc. The group is a leading global provider of software and services that enable recruitment agencies and in-house recruiters to better manage their selection process and address the training needs of individuals. Across its brands – which include Voyager Software (recruitment software UK & Australia), Dillistone FileFinder executive search software, GatedTalent, the global database of the world’s leading executives, Talentis.Global – the next generation of recruitment software and also ISV.Online, provider of online pre-employment skills testing and training tools. Dillistone Group serves thousands of clients worldwide. Ikiru People Ltd: Registration Number 02043300. Registered in England & Wales.
 |  |  |  |