Reference Data

General
Infinity Reference Data is used throughout the database to help build valid, consistent data. The Reference Data libraries need to be created and maintained in order to keep data valid and up-to-date.
 IMPORTANT - take some time to consider how you will structure your reference data to relate to your organisation’s sector and industry with particular attention to any customised data you wish to search upon.
Setting up Reference Data is straight forward as each type of Reference Data has its own section. Some entries are defined as “System Value” this definition means it is a default entry, although you may be able to inactivate or edit these it may have significant impact on the reports or the dashboards.

|
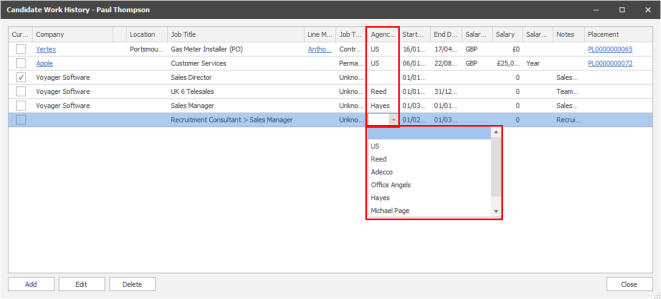
Agencies Used - Candidate current employment / Work history
|
|
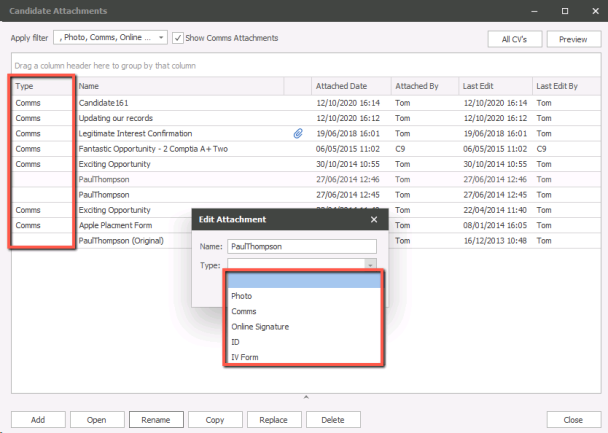
Attachment Types - in all records attachments areas
|
|
|
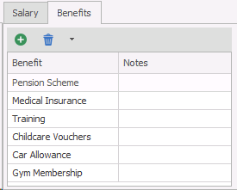
Benefits - selected within a job or placement record
|
|
|
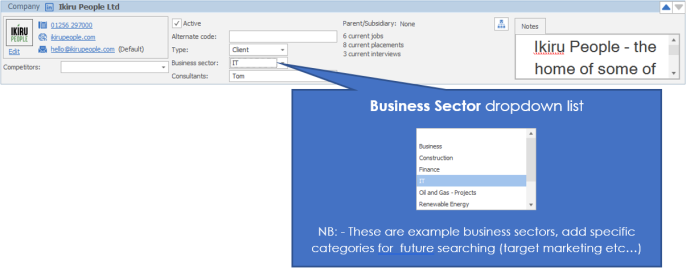
Business Sector - selected within Company records to facilitate searching for Companies / locations / contacts
|
|
|
Calendar / Task Categories - Categories within the Infinity calendar
|
|
|
Call Back Types - available when setting call backs for candidates and contacts
|
|
|
Candidate Address Types - available when adding addresses to candidate records
|
|
|
Candidate Statuses - available within candidate records
|
|
|
Company Competitors - available within Company records, used for recording either the clients competitors or other agencies who may be working with the client
|
|
Company Relationships -  Australian Version only Australian Version only |
|
|
Company Types - available within Company records
|
|
|
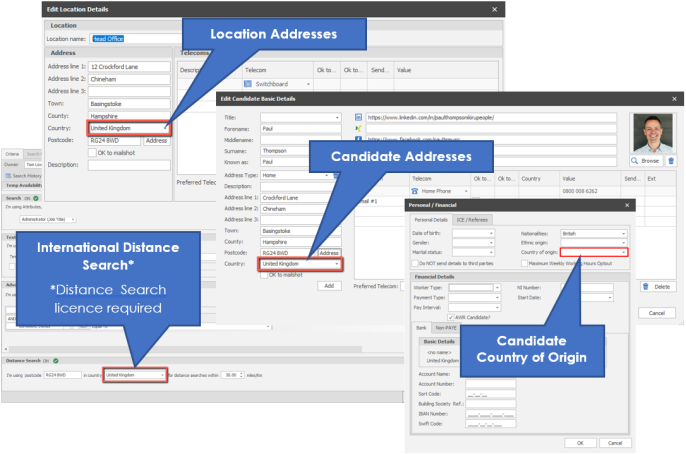
Countries - Used in addresses in all records, International distance searching* and within a candidates Country of Origin *International Distance Search licence required
|
|
|
Ethnic Origins - available within a candidates Personal Details
|
|
|
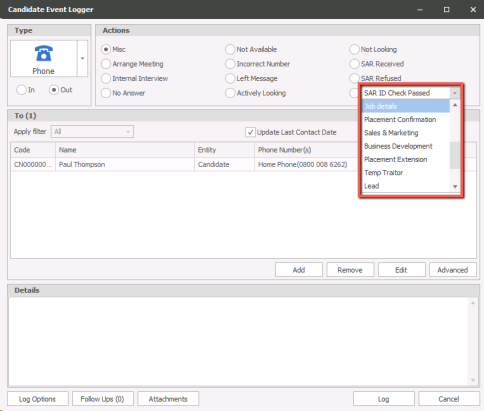
Event Actions - available within the Event Logger (Red Phone) enabling custom events
|
|
|
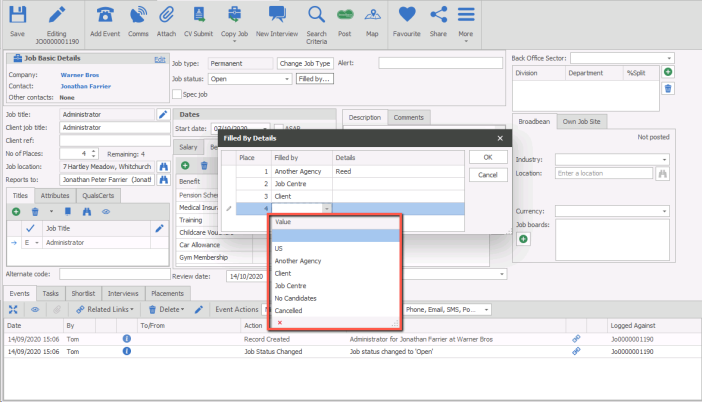
Filled By - available within Job records, US will automatically be recorded when making placements but you can record how places have been filled elsewhere
|
|
|
Gender - available within candidate records |
|
| Interview Levels - available within interview records | |
| Interview Methods - available within interview records | |
| Job Statuses - available within job records, will automatically change (Filled all places - job filled, Partially filled - still at least 1 place to fill, Open - default status when adding a job) | |
|
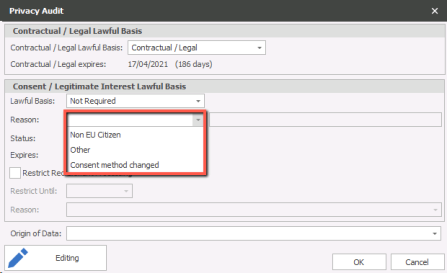
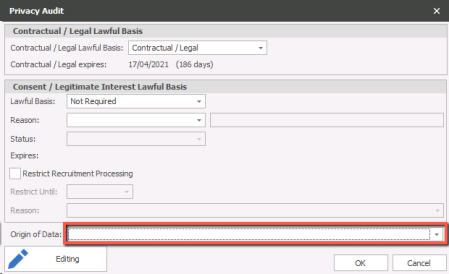
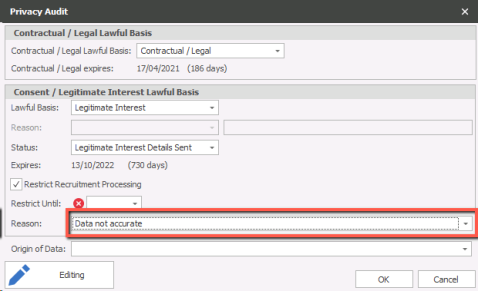
Lawful Basis Reasons - available when selecting Not Required within a candidates Privacy Audit
|
|
| Marital Statuses - available within candidate records | |
|
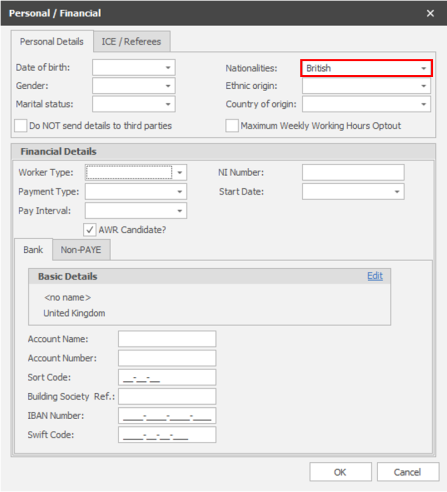
Nationality - available within candidate Personal Details area
|
|
|
Origin of Data - selected within the candidates Privacy Audit or within iCapture when processing a CV
|
|
|
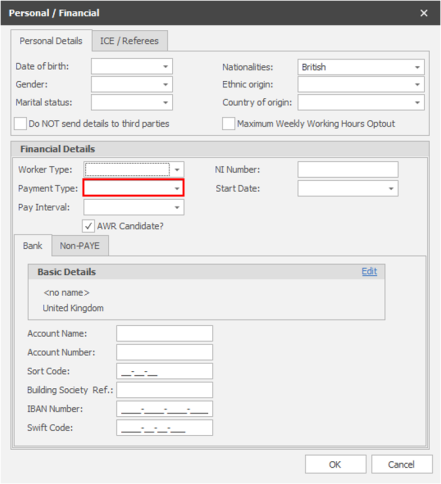
Payment Types - available within a candidates Financial Details
|
|
|
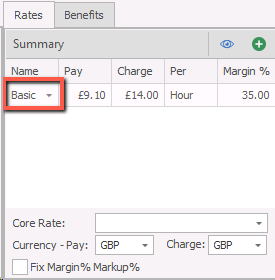
Rate Names - available within Job and Placement records Contract Job
Temp Job and Placement records
|
|
|
Restriction Reason - available within candidates Privacy Audit once ticked to Restrict Recruitment Processing
|
|
| Sales Area - Australian Version only |
|
|
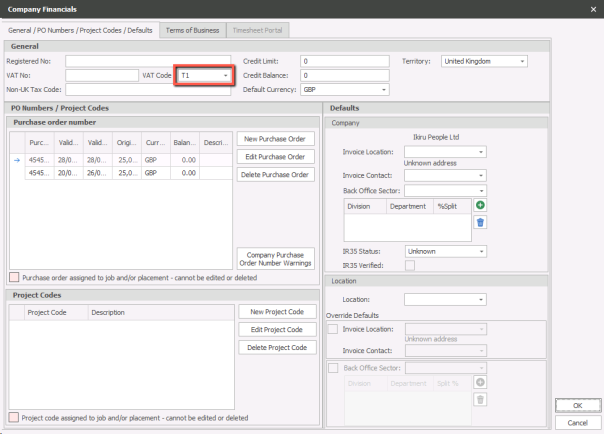
Sales Tax - Define tax percentages against VAT codes, which can then be selected within Company records (this is also used to calculate Fee VAT amounts when using VAT merge codes)
|
|
| Shift Removal Reason - available when cancelling or removing a candidate from a Temp shift | |
| Sources - available within candidate records | |
|
Telecoms - available within candidate, company, location and contact basic details |
|
| Titles - available within candidate and contact basic details | |
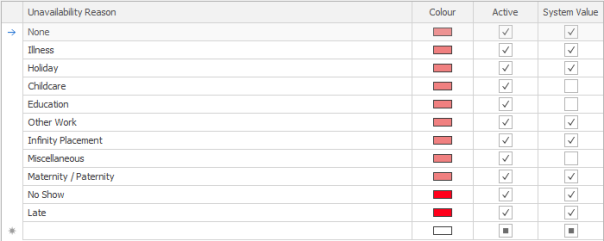
| Unavailability Reason - available within a candidates Temp calendar and the Temp Planner | |
| Worker Types - available within a candidates financial details, default can be set within General Settings. |


Need more information, click below:
Enter names of other Agencies. There is one system value – ‘US’ which is your organisation. The Agency Used field is found in Candidate Work History.
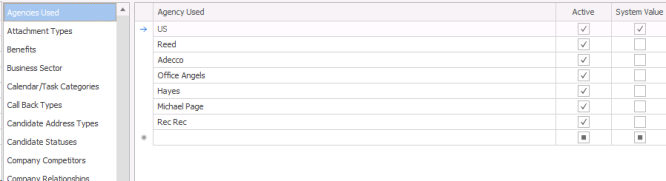
Add a new Agency
- Click into the next empty row in the grid and enter the Agency name.
- Tick the Active check box to make the option available to users.
- Click
 to save the new Reference Data.
 - Remove the tick from the Active check box if you do not wish the Agency to be available to users.
Attachment Types are assigned to Attachments added to records. There are four Attachment Types system values; Comms, Skype, Photo, Logo. Each Attachment Type is associated with at least one of the following; Candidates, Company, Location, Contact, Job, Interview or Placement. You can associate an Attachment types to multiple Infinity records.
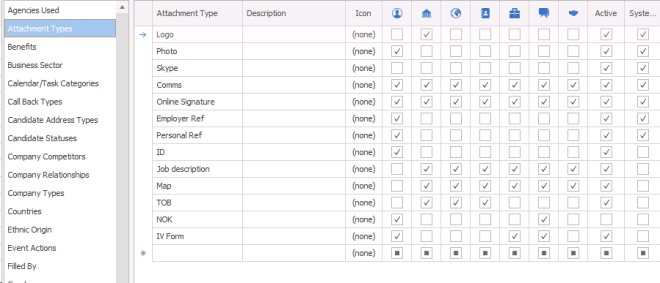
Add a new Attachment Type
- Click into the next empty row in the grid and enter a new Attachment Type.
- Enter a description
- Add an icon to the Attachment Type – this is not necessary. Right click in the icon column and select Load, select a suitable image.
- Tick the check boxes of each Infinity record where the Attachment Type should be displayed.
- Tick the Active check box to make the option available to users.
- Click to save the new Attachment Type Data.
- Remove the tick from the Active check box if you do not wish the Attachment Type to be available to users.
Benefits are available on Jobs and Placements.
Add a new Benefit
- Click into the next empty row in the grid and enter the Benefit name.
- Enter a description.
- Tick the Active check box to make the option available to users.
- Click to save the new Benefit.
- Remove the tick from the Active check box if you do not wish the Benefit to be available to users.
Business Sectors can be assigned to Companies and allow you to categorise and search by Business Sector.
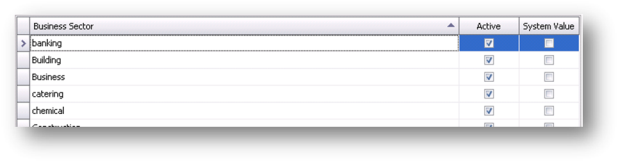
Add a new Business Sector
- Click into the next empty row in the grid and enter the Business Sector name.
- Enter a description.
- Tick the Active check box to make the option available to users.
- Click to save the new Business Sector.
- Remove the tick from the Active check box if you do not wish the Business Sector to be available to users.
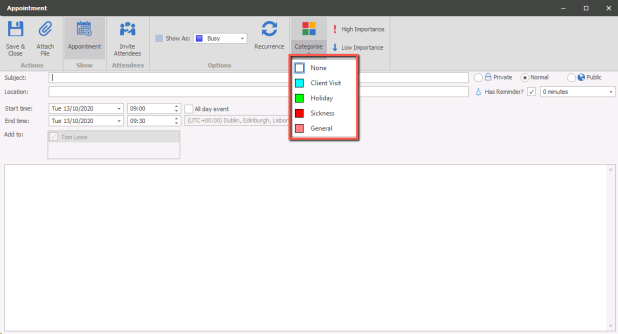
Each Calendar and Task can be assigned a Category type. There are three system values; Client Visit, Internal Interview and Interview. Calendar and Task Categories are available when creating and editing appointments, meetings and tasks throughout Infinity. Categories also clearly identified by the Category colour. You are able to edit the colours as desired.
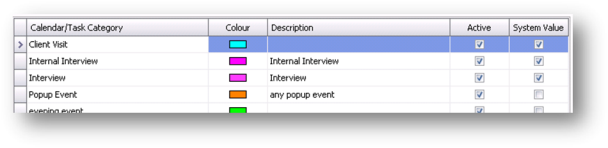
Add a new Calendar / Task Category
- Click into the next empty row in the grid and enter the Category name.
- Assign a colour to the Category.
- Enter a description.
- Tick the Active check box to make the option available to users.
- Click to save the new Calendar / Task Category.
- Remove the tick from the Active check box if you do not wish the Calendar / Task Category to be available to users.
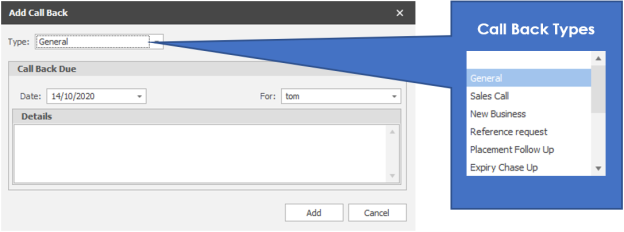
Call Backs are a key feature of Infinity. Call Back Types categories the call into the appropriate type. There is one system value; General.

Add a new Call Back Type
- Click into the next empty row in the grid and enter the Call Back Type name.
- Enter a description.
- Tick the Active check box to make the option available to users.
- Click to save the new Call Back Type.
- Remove the tick from the Active check box if you do not wish the Call Back Type to be available to users.
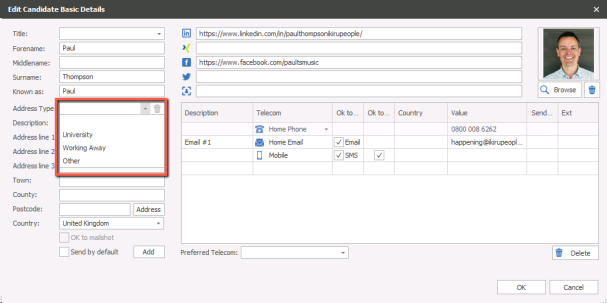
Infinity allows Candidates to have multiple addresses. There are four system value Address Types; Home, University, Working Away and Other. Candidate Address Types can be selected when adding addresses to Candidate records.
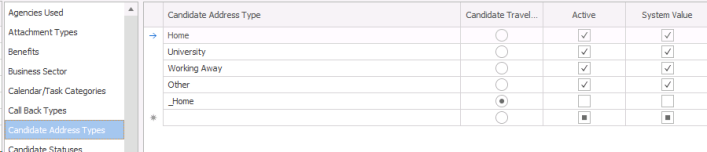
Add a new Address Type
- Click into the next empty row in the grid and enter the Address Type name.
- Add an icon to the Address Type – this is not necessary. Right click in the icon column and select Load, select a suitable image.
- If this is the Candidate Travel Default set the radio button to the selected Address Type.
- Tick the Active check box to make the option available to users.
- Click to save the new Address Type.
- Remove the tick from the Active check box if you do not wish the Address Type to be available to users.
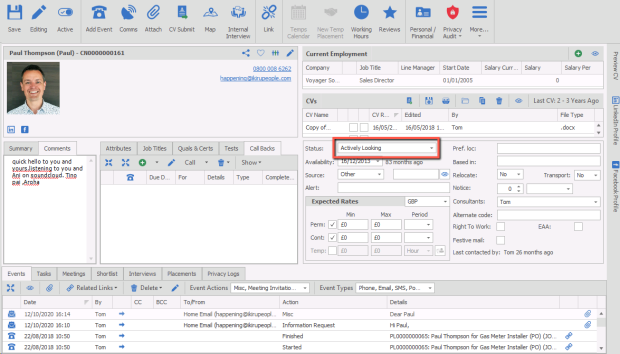
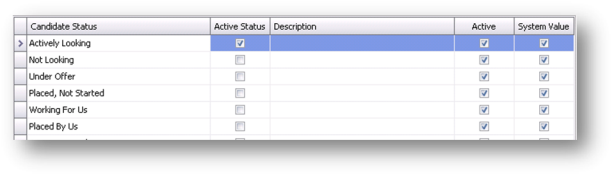
Candidate Status is a key indicator of a Candidate’s availability to work. There are six system values; Actively Looking, Not Looking, Under Offer, Placed, Not Started, Working for us and Placed by us.
Add a new Candidate Status
- Click into the next empty row in the grid and enter the Candidate Status name.
- Tick the Active Status ONLY if you wish to make this the default active status for Candidate records.
- Enter a description
- Tick the Active check box to make the option available to users.
- Click to save the new Candidate Status.
- Remove the tick from the Active check box if you do not wish the Candidate Status to be available to users.
 The statuses that you choose to be an Active Status will be returned in searches that include the ‘Available now’ search criteria.
Company Competitors are found on the Company page. Use Company Competitors to record other companies who may be in the same business sector and direct competitors.
Add a new Company Competitor
- Click into the next empty row in the grid and enter the Company Competitor.
- Tick the Active check box to make the option available to users.
- Click to save the new Company Competitor.
- Remove the tick from the Active check box if you do not wish the Company Competitor to be available to users.
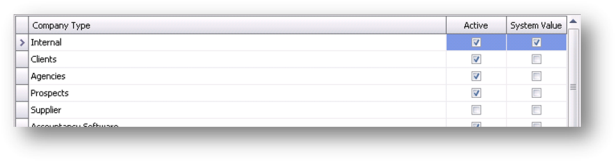
Each Company should be assigned a Company Type. There is one system value; internal [this is usually your own organisation].
Add a new Company Type
- Click into the next empty row in the grid and enter the Company Type.
- Tick the Active check box to make the option available to users.
- Click to save the new Company Type.
- Remove the tick from the Active check box if you do not wish the Company Type to be available to users.
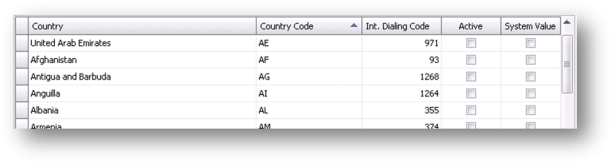
Infinity is an international application; it will be installed with a list of countries, county codes, and International dialling codes. However, additional countries can be added. Use CTRL or Shift key to multi-select entries.
Add a new Country
- Click into the next empty row in the grid and enter the Country.
- Tick the Active check box to make the option available to users.
- Click to save the new Country.
- Remove the tick from the Active check box if you do not wish the Country to be available to users.
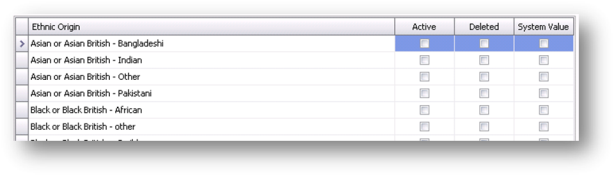
Infinity will also be installed with a list of ethnic origins. Use CTRL or Shift key to multi-select entries.
Add a new Ethnic Origin
- Click into the next empty row in the grid and enter the Ethnic Origin.
- Tick the Active check box to make the option available to users.
- Click to save the new Ethnic Origin.
- Remove the tick from the Active check box if you do not wish the Ethnic Origin to be available to users.
The Logging of Events is based upon different types of Event Action. Infinity will be installed with a full list of Event Actions such as Meeting Invitation, Offer Accepted, Started, Finished etc.
It is recommended not to make any system value entries inactive, these could cause process problems within Infinity
However, further Event Actions can be added if customized or Adhoc Event Actions are needed.
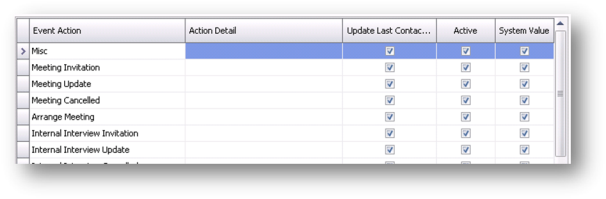
Add a new Event Action
- Click into the next empty row in the grid and enter the Event Action.
- Enter an Action Detail description
- Tick the Update Last Contacted check box if you wish for the Event Action to automatically update the Last Contacted date on the Infinity record.
- Tick the Active check box to make the option available to users.
- Click to save the new Event Action.
- Remove the tick from the Active check box if you do not wish the Event Action to be available to users.
When a Job is filled it is useful to how the Job was filled. There is one system value; ‘Us’ which refers to your organisation. The Filled By field is displayed on the Job page.

Add a new Filled By type
- Click into the next empty row in the grid and enter the Filled by type.
- Tick the Active check box to make the option available to users.
- Click to save the new Filled By type.
- Remove the tick from the Active check box if you do not wish the Filled By type to be available to users.
Infinity will be installed with two system value genders; Male and Female.

Add a new Gender
- Click into the next empty row in the grid and enter the new Gender.
- Tick the Active check box to make the option available to users.
- Click to save the new Gender.
- Remove the tick from the Active check box if you do not wish the Gender to be available to users.
Infinity will be installed with three system values 1st, 2nd and 3rd.
Infinity allows additional Interview Levels.
Add an Interview Level
- Click into the next empty row in the grid and enter the new Interview Level.
- Enter a description
- Tick the Active check box to make the option available to users.
- Click to save the new Interview Level.
- Remove the tick from the Active check box if you do not wish the Interview Level to be available to users.
Infinity will be installed with two system values Face to Face and Telephone.
Infinity allows additional Interview Methods.
Add a new Interview Method
- Click into the next empty row in the grid and enter the new Interview Method.
- Enter a description
- Tick in either ‘Has Telecom’ or ‘Has Location’ check box.
- Tick the Active check box to make the option available to users.
- Click to save the new Interview Method.
- Remove the tick from the Active check box if you do not wish the Interview Method to be available to users.
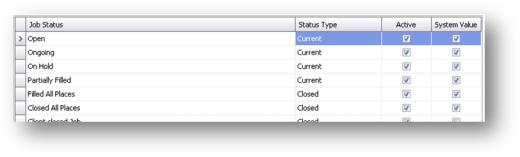
Job Status is a key indicator of Job availability. There are six system values; Open, On-going, On Hold, Partially Filled, Filled All Places and Closed All Places.
Add a new Job Status
- Click into the next empty row in the grid and enter the new Job Status.
- Select the Status Type; either Current or Closed
- Tick the Active check box to make the option available to users.
- Click to save the new Job Status.
- Remove the tick from the Active check box if you do not wish the Job Status to be available to users.
 Set the variety of Lawful Basis you require for processing the candidates details, these are accessed within the candidate Privacy Audit area to record the Reason, see candidate Privacy Audit for more details
Marital Status field is displayed in the Candidate Personal Details.
Add a new Marital Status
- Click into the next empty row in the grid and enter the new Marital Status.
- Enter a description
- Tick the Active check box to make the option available to users.
- Click to save the new Marital Status.
- Remove the tick from the Active check box if you do not wish the Marital Status to be available to users.
Infinity will be installed with a list of Nationalities.
![]()
Add a new Nationality
- Click into the next empty row in the grid and enter the new Nationality.
- Enter a description
- Tick the Active check box to make the option available to users.
- Click to save the new Nationality.
- Remove the tick from the Active check box if you do not wish the Nationality to be available to users.
Add all Origins of the candidate information, this can then be recorded within the Privacy Audit area on candidate records, or set as default within iCapture data sources
Infinity will be installed with two system values BACS and Direct BACS.
Payment Types are displayed in the Candidate Financial Details, the Payment Type indicates the Candidate’s preferred method of payment.
Add a new Payment Type
- Click into the next empty row in the grid and enter the new Payment Type.
- Tick the Active check box to make the option available to users.
- Click to save the new Payment Type.
- Remove the tick from the Active check box if you do not wish the Payment Type to be available to users.
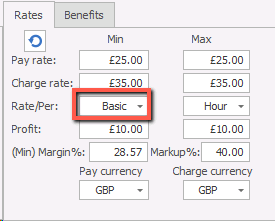
Infinity will be installed with two system values, a blank and Basic, both applying Holiday and NI.
Contract and Temporary Placements can be assigned with a variety of Rates depending on the Placement requirements.
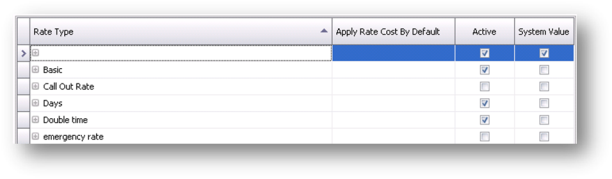
Add a new Rate Type
- Click into the next empty row in the grid and enter the new Rate Type.
- Tick the Active check box to make the option available to users.
- Click to save the new Rate Type.
- Remove the tick from the Active check box if you do not wish the Rate Type to be available to users.
Additional reasons for restricting access to a candidate can be added, this is designed as part of the Privacy Audit process, for example, if a candidate were to contest that they have given permission to keep their data, as part of GDPR. Although you may wish to add your own customised reason.
Australian Version only
Sales Tax, otherwise known as VAT or the Sales Tax relative to your organisations’ VAT equivalent appears in Company Financials.
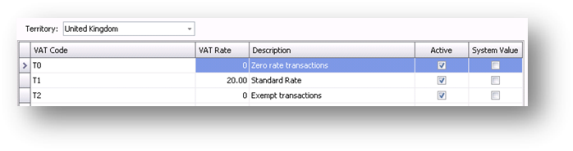
Add a Sales Tax Area
- Click into the next empty row in the grid and enter the new Sales Tax.
- Enter a Short name code.
- Tick the Active check box to make the option available to users.
- Click to save the new Sales Tax.
- Remove the tick from the Active check box if you do not wish the Sales Tax to be available to users.
Users have an optional column that can add to shortlist tabs, they can then use shortlist progress to record custom points in the management of the shortlist.
Add customisable reason(s) for removing shifts for Temp shifts
Candidate Sources are assigned on the Candidate page. There are three system values; Referral, Company, Other.
![]()
Add a Source
- Click into the next empty row in the grid and enter the new Source.
- Enter a Source Type.
- Enter an Identifier. (This will enable iCapture to scan for the source within the CV)
- If the Source is Job Related, such as an advert, tick the Include Job Field check box.
- Tick the Active check box to make the option available to users.
- Click to save the new Source.
- Remove the tick from the Active check box if you do not wish the Source to be available to users.
Infinity allows multiple Telecoms per Candidate, Company, Location and Contact.
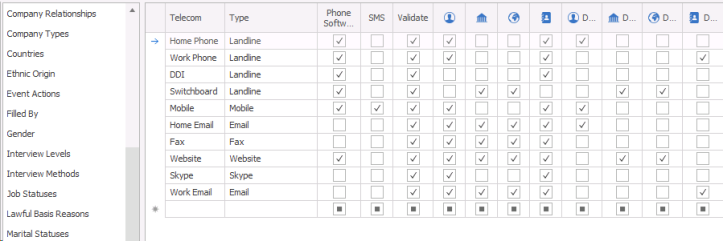
To add a new Telecom
- Click into the next empty row in the grid and enter the new Telecom.
- Enter a Telecom Type, select from the list of Telecom Types.
- If the Telecom can be used with TAPI then tick the TAPI check box.
- If the Telecom can be used with SMS then tick the SMS check box.
- If the Telecom format should be validated then tick the Validate check box.
- Add an icon to the Telecom Type – this is not necessary. Right click in the icon column and select Load, select a suitable image.
- Tick the check boxes of each Infinity record where the Telecom Type should be displayed.
- Tick the Default check boxes if you wish to make the Telecom Type a default value.
- Tick the Active check box to make the option available to users.
- Click to save the new Telecom.
Titles are used in the basic details fields for Candidate and Contact.
Add a new Title
- Click into the next empty row in the grid and enter the new Title.
- Select a default gender.
- Tick the Active check box to make the option available to users.
- Click to save the new Title.
- Remove the tick from the Active check box if you do not wish the Title to be available to users.
Add custom reason(s) for marking candidates unavailability within their Temp calendars.
Infinity will be installed with three system value PAYE, Self Employed (rename as Limited Company if preferred) and Umbrella.
Worker Types are assigned in Candidate Financial details. They also appear in Contract and Temporary Placement Rates.
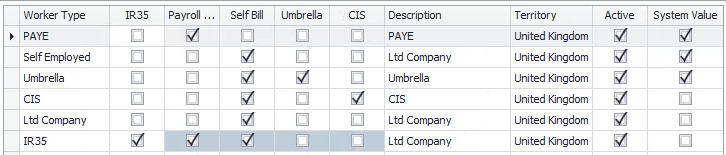
IR35 - When you tick the ‘IR35’ tick box and tab to the next cell, the ‘Payroll Tax’ and ‘Self Bill’ columns are automatically ticked, and the ‘Umbrella’ and ‘CIS’ columns are automatically un-ticked. These tick boxes are greyed out, so you cannot change the tick boxes once ‘IR35’ has been ticked.
Add a New Worker Type
- Click into the next empty row in the grid and enter the new Worker Type.
- Tick in the relevant Payment Type tick box, selecting one or more as necessary.
- Enter a description.
- Select a Territory for where the Worker Type will apply from the selection.
- Tick the Active check box to make the option available to users.
- Click to save the new Worker Type.
- Remove the tick from the Active check box if you do not wish the Worker Type to be available to users.


If you require further assistance please contact Ikiru People using the details published on www.ikirupeople.com
Visit our Customer Portal at https://portal.ikirupeople.com/ for future events and clinics.
If you would like to make suggestions or have found any errors with this Help section please contact our Support team.
Version 4.87
Voyager Software is a brand of Ikiru People Ltd, a subsidiary of Dillistone Group Plc. The group is a leading global provider of software and services that enable recruitment agencies and in-house recruiters to better manage their selection process and address the training needs of individuals. Across its brands – which include Voyager Software (recruitment software UK & Australia), Dillistone FileFinder executive search software, GatedTalent, the global database of the world’s leading executives, Talentis.Global – the next generation of recruitment software and also ISV.Online, provider of online pre-employment skills testing and training tools. Dillistone Group serves thousands of clients worldwide. Ikiru People Ltd: Registration Number 02043300. Registered in England & Wales.
 |  |  |  |