Leads

Overview Video
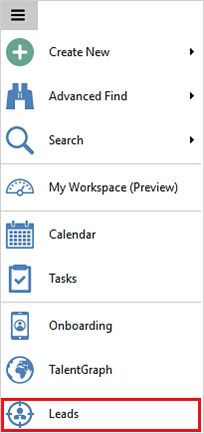
Leads is accessible via the main app menu and is where you can process potential new business through to qualifying, at which point a wizard will enable you to create company, location and contact in 4 clicks. It includes the ability to import CSV data into the grid, send from TalentGraph as well as manually record data into it.
TalentGraph Leads
We can offer the ability to simply import leads from TalentGraph searching, this can be completed individually or in bulk, in seconds. See the TalentGraph integration section for more details
Importing Leads
Leads includes the option to import data into the Leads area via an import button or it can be done via the API.
There is a ‘Leads' menu in the Application menu
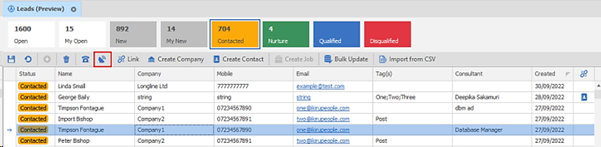
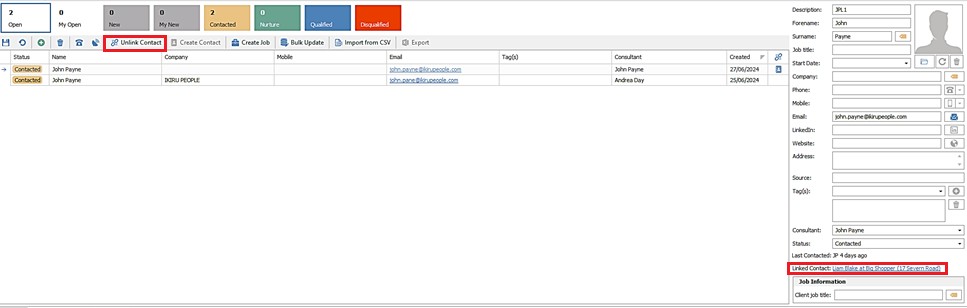
This launches the Leads tab defaulting the filter tile to show ‘Open’ leads (new, contacted, nurture status) on the system. The leads are displayed in a grid on the left hand side with the lead page data entry screen showing on the right hand side when a lead record is selected.

There is a colour coded Tile Bar at the top to show the numbers, filter and navigate around the lead records

The tiles are:
- Open (white) – all ‘Open’ leads (new, contacted and nurture status) and is the default
- My Open (white) – ‘Open’ leads the user is the owning consultant of
- New (grey) – all leads at a status of ‘New’
- My New (grey) – ‘New’ leads the user is the owning consultant of
- Contacted (amber) – all leads at a status of ‘Contacted’
- Nurture (green) – all leads at a status of ‘Nurture’
- Qualified (blue) – all leads at a status of ‘Qualified’ (numbers are not shown on this tile)
- Disqualified (red) – all leads at a status of ‘Qualified’ (numbers are not shown on this tile)
Clicking on a tile will display the matching leads in the grid
The left-hand side grid lists all the leads in the selected tile filter . The grid is not editable but is customisable, with column chooser / save layout, sorting / filtering, and Ctrl + F (find)

- Leads of status ‘Contacted’, ‘Nurture’, ‘Qualified’ and ‘Disqualified’ are colour coded in line with the tile colour

- Leads of status 'New' are prefixed with a yellow star

- The default order is created date, with newest at the top
- Leads cannot be filtered by the ‘Status’ column and is instead done via the Tile Bar
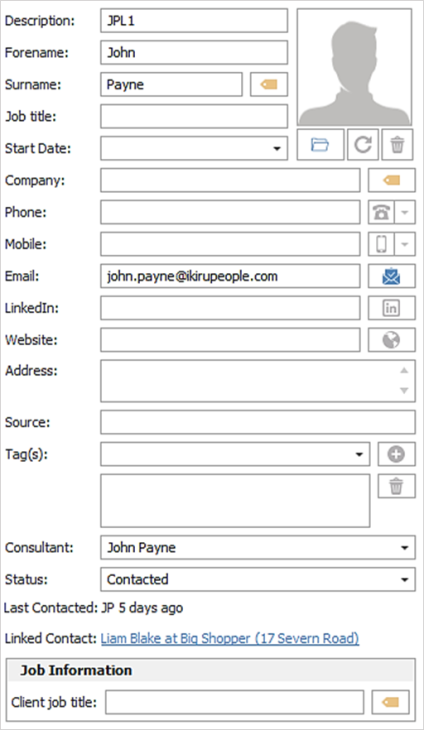
The right-hand side is a page that lists all fields for the selected lead. All fields are editable except ‘Last Contacted’ and ‘Linked Contact record’ at the bottom
The bottom section displays the events and call backs tab for the selected lead. If the lead is linked to a contact on the Infinity database a Linked Contact Events tab is also displayed.

There is a toolbar along the top to manage your leads

- Save
- Refresh
- Add Lead
- Delete Lead (permission required)
- Log Event
- Comms Centre
- Link / Unlink to Contact
- Create Contact
- Create Job
- Bulk Update
- Import from CSV
- Export ( permission required)
Clicking the ‘Add Lead’ button on the toolbar creates a new row in the grid
The user can complete the fields in the lead page as required

When creating a new lead, the following defaults are applied:
- ‘Status’ set to ‘New’
- ‘Created Date’ set to current date/ time
- ‘Owning consultant’ set to currently logged in user
The fields available on the lead page to update are as follows; all of which are free text except for ‘Status’ and ‘Owning consultant’ and none are mandatory:
- Description (e.g. website lead from XXXX)
- Forename
- Surname and Notes (accessed via the yellow note button)
- Photo
- Job title
- Start Date (at the company)
- Company and Notes (accessed via the yellow note button)
- Phone number (multiples allowed separated by comma)
- Mobile number (multiples allowed separated by comma)
- Email address (multiples allowed separated by comma)
- LinkedIn URL
- Website URL
- Address
- Source
- Tag(s)

- assign a tag by manually typing to create a new one or selecting an existing one, in the tag drop down field. Click the ‘green plus’ button to add to the grid
- remove a tag by selecting it in the grid then clicking the ‘bin’ button
- Owning consultant
- Status – Statuses are manually changed and cannot be blank
- New (ready to be reviewed)
- Contacted (picked up, but not progressed to the next stage, e.g., attempted contact)
- Nurture (qualified but not ready yet – keep as a lead for now)
- Qualified (qualified and in a potential buying/ recruiting position)
- Disqualified (not going to be an opportunity ever)
- Job Information - Client Job Title and Job Notes / Description (accessrf via the yellow note button)
Changes made to the fields in the lead page are reflected immediately in the grid columns. The user must save the changes by the ‘Save’ button on the toolbar
The user can navigate to different lead pages making changes / editing without having to save each page each time and instead save all changes at the end. If the Leads window is closed by the cross, and unsaved changes found in any lead, the user is prompted to save all changes
If a lead is changed to ‘Qualified/Disqualified’ status or assigned to a different ‘Owning Consultant’ it will disappear when saved
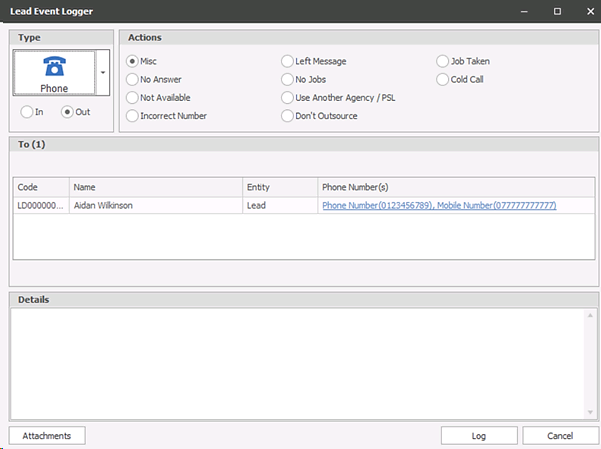
An event can be logged against the selected lead by the ‘Log Event’ button on the toolbar. The ‘Lead ‘event logger loads and functions like the existing Infinity event loggers with applicable defaults applied
Event actions can be assigned to the ‘Lead’ event logger in Administration / Reference Data / Event Actions
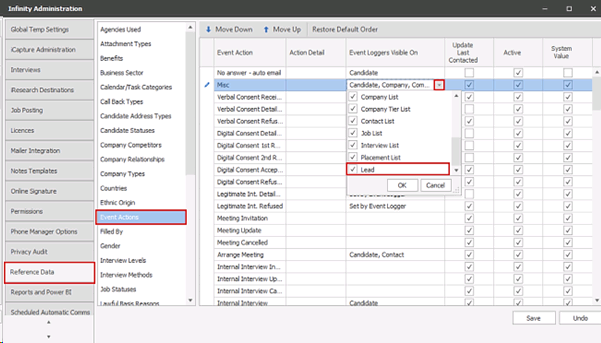
As default, the following event actions are assigned to the ‘Lead’ event logger upon upgrade:
- Misc
- No Answer
- Not available
- Incorrect Number
- Left message
- No jobs
- Use Another Agency / PSL
- Don't Outsource
- Jobs Taken
- Cold Call
The following functionality is not available in the ‘Lead’ event logger
- Log Options
- Follow Ups - tasks
- Right click menu of ‘WhatsApp’ in the phone number column
Attachments can be added to the event by clicking the ‘Attachments’ button at the bottom of the event logger screen. This allows a file to be selected from Windows Explorer
The user can complete the details in the event logger as required. When logged, the event will show in the events tab
Template administration
In Comms Centre Template Administration, there is a Comms Centre for leads.
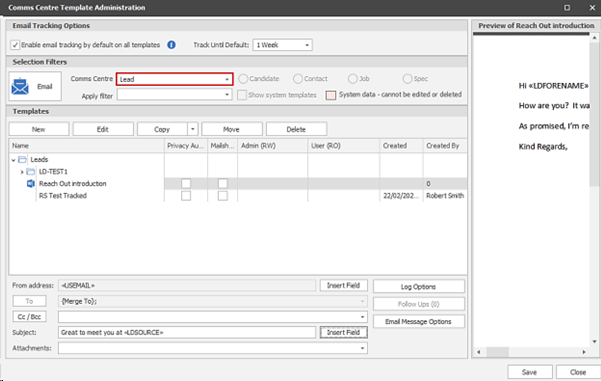
Templates can be created for Email, Post and SMS communications. Leads templates work as per existing Comms Centre functionality except ‘Follow Ups’ and Update Last Contacted are not available.
All lead fields except for the linked contact/company information can be merged. These can be inserted into your template by selecting the ‘Lead’ merge group.

Sending from the Comms Centre
There is a Comms Centre button on the lead’s toolbar.
Lead records can be selected and sent to the Comms Centre. Multiple records can be selected by standard methods of Ctrl & A (select all), Ctrl & mouse click, Shift & mouse click etc...
The Comms Centre will default to Email and works as per existing functionality except ‘Follow Ups’, Update Last Contacted, ‘Merge To’ section Add and Advanced buttons are not available. For email templates the CC/BCC is only available to send to colleagues.

- The lead records selected are shown in the ‘Merge To’ section with their telecoms, if valid
- The lead ID, Name, Entity and {Email/Mobile/Address} columns are shown
- Multiple email addresses are accepted if comma separated. This will send one email to the record with all addresses in the To field
- The Edit button allows the lead’s email address to be edited for this send only (not stored to the lead page itself)
When the comms are sent (using Just Send or via Edit First), an event is logged on the leads page (if set in the template Log Options to do so).

The email address in the leads grid is displayed as a hyperlink

Clicking on the hyperlink will create an email, to that address, in the user’s default Windows mail client ready for the user to complete and send
The ‘Lead’ event logger will automatically load, defaulting to an outgoing email ready for the user to complete the details and log manually
There is a ‘Link to Contact’ button on the toolbar that links the selected lead to an existing contact on the Infinity database
The button is available only if the lead is not already linked
This opens the ‘Find Company / Contact’ window, where the user can find and double click on the required contact in the results grid to link.
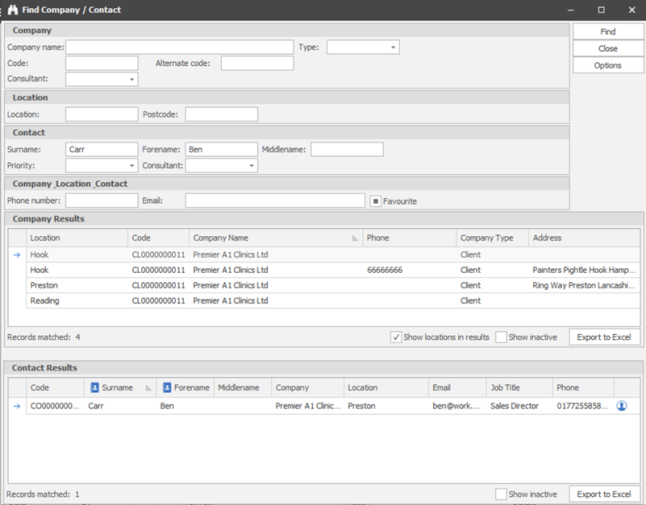
If a contact is selected, the lead will be linked to their specific company location on the Infinity database.
When a lead is linked:
- The ‘Link (chain icon)’ column in the grid will show the contact icon and is a clickable hyperlink to launch the linked page
- The linked record field in the page displays the contact name, company and location and is a hyperlink to launch the linked page
- The contact linked events tab enables at the bottom of the screen showing the events from the Infinity contact record
- The button on the toolbar will change to ‘Unlink Contact’ so the user can remove the link if required

There is a ‘Create Contact’ button on the toolbar that launches the ‘Link to New Contact’ wizard. This allows the selected lead to be linked to a newly created contact on the Infinity database
The button is available only if the lead is not already linked
Step 1 – Select Contact
Step 1 of the wizard allows the contact details to be completed by the user. The field values are defaulted if the data is populated on the lead record

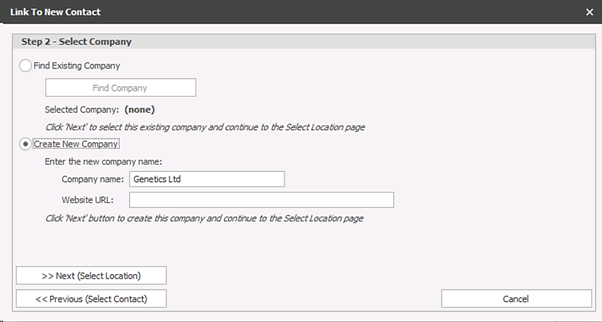
Step 2 – Select Company
Step 2 of the wizard allows the user to either:
- Select and find an existing company on the Infinity database
- Create a new company. User can complete the details and the field data will be defaulted if populated on the lead record
Step 3 – Select Location
Step 3 of the wizard allows the user to either:
- Select and find a location at the existing company on the Infinity database. This option enables only if the ‘Find Existing Company’ option was selected in Step 2
- Create a new location. This will be at a new company or existing company depending on the option chosen in Step 2. User can complete the location name and the address will be automatically populated from the lead page

The rules used to populate the address fields are as follows:
- Ignore blank lines
- Treat comma-delimited addresses as if they are on multiple lines
• Map to the location name and address as follows:
- If only one line in address field that contains data - use data for location name and town of address
- If two lines in address field and one is a postcode - use the non-postcode as the location name and town. Use postcode as postcode
- If two lines in address field and none are a postcode - use the first one as name and town and second as county
- If more than two lines in address field - if one is a postcode, add to postcode field. Add other lines to address starting with address line 1
When the user clicks on ‘Finish & Create Linked Contact’, the new contact is created accordingly on the Infinity database with the fields populated and linked to the lead record
All emails/phone/mobile numbers that are comma delimited are split out into separate fields when added to the contact page.
- Emails are added as a 'work email' telecom
- Numbers starting 07 are added as a 'mobile' telecom, else added as a 'work phone' telecom (taking into account that some may have +44 or 0044 on the front)
- Two telecoms of the same type are not allowed without a description, so the description labels them as #1, #2 etc.
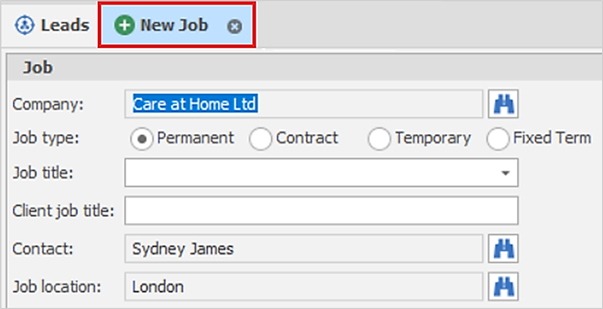
There is a ‘Create Job’ button on the lead’s toolbar. The lead must be saved and linked to an Infinity contact for a job to be created.
This opens the Infinity 'New Job' find screen, pre-populated with company and contact. The user can create the job as per standard functionality.
When the created job is saved, the lead ID is stored against job in the back-end database only and is not visible in the front end. This is for future reporting requirements.
There is a ‘Bulk Update’ button on the leads toolbar. Multiple leads can be selected, and bulk updated.
This opens a window allowing the following fields to be updated as per updating on the lead page. The field(s) must be ticked to update
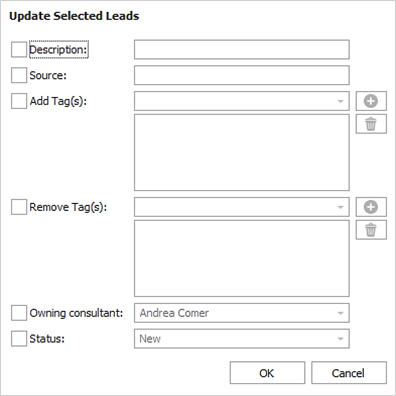
- Add Tag(s) - can create a new tag (by manually typing in the tag field), or select ones that have previously been added to another lead
- Remove Tag(s) - can select ones that have previously been added to another lead only
- ‘Owning consultant’ defaults to the logged-on user
- ‘Status’ cannot be changed to ‘Qualified’
When ‘OK’ is pressed, the ticked fields only are updated on the selected leads. Leads may disappear when the grid is refreshed if a Tile / filter is applied, and they don’t match its criteria
User can click the ‘Save’ button to store the bulk update changes permanently or click the ‘Undo’ button to lose all the bulk update changes
There is an ‘Import from CSV’ button on the lead’s toolbar, to import leads from a CSV file. Users are prompted to save changes when they click 'Import from CSV'
This opens a window allowing the CSV file to be selected from Windows File Explorer via the ‘Browse’ button

There is an option to download an example CSV file. The correct format must be used in the file to ensure data is imported correctly.

There are two options available in the import screen:
- ‘CSV file has header row’ tick box - when ticked the first row of the CSV file is ignored when imported, this is unticked as default
- ‘Automatically link to active Infinity contacts’ - when ticked and a match is found to a single active Infinity contact, the lead is linked to the record (i.e. one completely different record in Infinity)
- automatic contact linking only occurs if both LinkedCompanyId and LinkedContactId are not supplied (i.e. are set to zero)
- at least one of the criteria below needs to match with the lead record
- Mobile
- First name + surname + phone number
- If there is only one match found (across all 4 criteria above), the record is linked
- If the lead matches more than one contact record, the first one found in the priority order of the criteria above is linked (i.e. LinkedIn first, followed by Email etc.)
- If there are two matches in the criteria, e.g. two LinkedIn matches, the most recently updated record is used
- A match against a contact at multiple locations/companies is defined as 'one' match, and the latest updated contact company tier is used
- This auto-linking setting is ticked as default
When clicking on the ‘Import Leads’ button, verification will be done on the data; if it’s not in the correct format a warning is given with the details
- The ‘owning consultant’ field in the CSV file must match a ‘short name’ of an active Infinity user to import but can be blank
- A lead can be linked to an existing Infinity company OR contact by providing the ID in either LInkedCommpanyID OR LinkcedCompanyTierContactId columns respectively
- The row is rejected if both linked ID fields are populated
- If a lead is not being linked the IDs must be set to 0
- If one row fails, none get imported
- The imported lead’s status will always default to ‘New’
When a CSV file is successfully imported, the user is notified and can close the window and return to the ‘Leads ’ tab
The leads screen will be refreshed automatically, and the imported leads shown if the user is on a tile that displays new leads
There is an ‘Export’ button on the Leads toolbar.
- Users with the ‘Exportgrid’ permission can export the leads grid to Excel.
- It prompts the user to save to a Windows File Explorer location
- The default file name is ‘Leads.xlsx’
- Once saved, Infinity opens the file in Excel automatically
- All columns and rows are exported that are shown in the user’s grid

Refresh
Refreshes the leads grid with the latest changes
Delete Lead
Lead(s) can be highlighted in the list and deleted. The leads grid must be saved afterwards for the deletion to be permanent as otherwise changes are lost / reverted, including any deletions
When a lead is linked:
- The ‘Link (chain icon)’ column in the grid will show the contact icon and is a clickable hyperlink to launch the linked page
- The linked record field in the page displays the contact name, company and location and is a hyperlink to launch the linked page
- The contact linked events tab enables at the bottom of the screen showing the events from the Infinity contact record
- The button on the toolbar will change to ‘Unlink Contact’ so the user can remove the link if required
When setting the status to Qualified, if the lead is not already linked to a company or contact record, the system will prompt you to
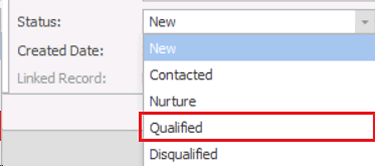
If the lead is not linked, the linking process is initiated when the user changes the status to ‘Qualified’. This opens the ‘Find Company / Contact’ window, where the user can find and double click on the required company or contact in the results grid to link. Cancelling the process will reset the status to what it was before
When the status changes to ‘Qualified’ a ‘Lead Qualified’ Event is logged on the lead page and linked Infinity record
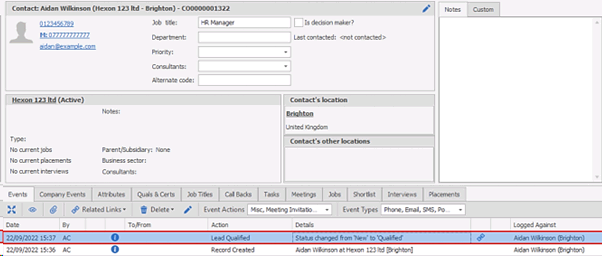
Note: A lead of status ‘Qualified’ is essentially ‘closed’ and further work flow should be done from the company or contact record in Infinity
There is an option in Administration / General Settings / Leads to automatically link manually entered leads to contacts.
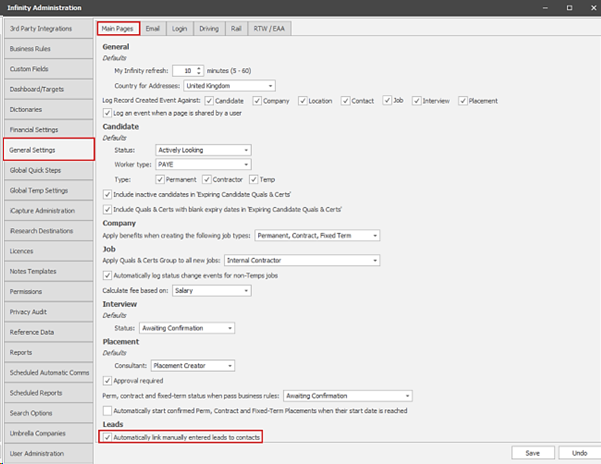
This setting is on as default.
When this setting is on, the lead automatically links to the contact when the user is creating a lead by the following methods if a single match is found:
- On the lead page and saves the page
- From Outlook and single match is found
A single match is found if any of the following criteria match:
- Linkedin address match
- email address match
- mobile number match
- firstname + surname + phone number match
When leads are automatically linked by Infinity to a contact record, an Info event is logged on both pages.

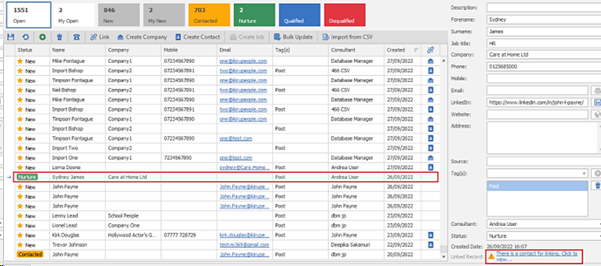
If a selected lead is not already linked to a contact. Infinity will automatically check for matches on the Infinity database. At least one criteria below needs to match with the lead record
• Mobile
• First name + surname + phone number
If matches are found, the ‘Linked Record’ field on the lead page displays a warning and hyperlink.
Clicking on the hyperlink will launch a window displaying the matched contacts. The four columns at the end will display a green tick if the criteria matched
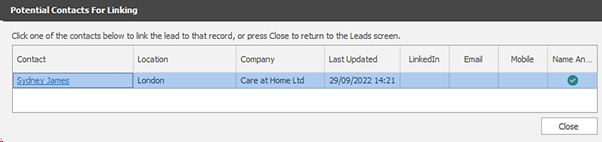
Users can link the lead to a matched contact by clicking in the ‘Contact’ column or close and return to the leads window
There is a ‘Call Backs’ tab on the lead page.

This allows the user to manage the lead’s call back as per existing call back functionality on other main pages.
Grid
The call backs are ordered by latest due date at the top and the column chooser is available and grid layout can be saved, along with filtering and sorting.
Toolbar
The functionality on the toolbar is as follows:
- Collapse All - collapse all linked event rows in the call back grid
- Expand All - expand all linked event rows in the call back grid
- Add Call Back - opens the add call back screen and the user can add a call back against the lead.
- Type defaults to general
- Date defaults to tomorrow
- For defaults to currently logged in user
- Add Call Back drop down menu options available, that default the date in the add call back screen are as follows:
- Call back today
- Call back in Work Days (1-7)
- Call back in Weeks (1-4)
- Call back in Months (1-12)
- Call back in Years (1-2)
- Edit - edit the selected call back if permissions allow
- Call Button - if permissions allow - when the 'Call’ button is pressed, the top telecom on the lead page is used if exists (phone, mobile or email); this will launch the comms method and autodial the number if applicable and is configured on the DB.
- The ‘Call’ button has a drop-down menu allowing the user to choose the telecom to call and the communication method.
- Delete button - to delete selected call back if permissions allow
- Delete button drop down - to delete all call backs in the grid if permissions allow
- Show button - to change the callbacks shown in the grid - default is Active
- Active (Overdue and Today onwards)
- Completed – show completed call backs
- All – show all call backs
Call Back Follows ups
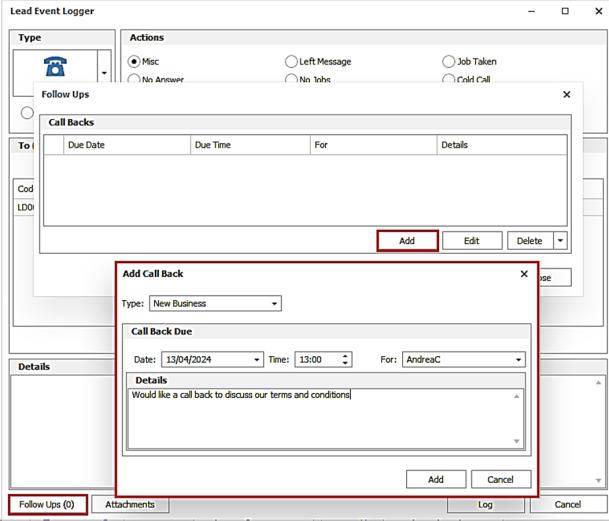
The ‘Follow Ups’ button is available on the Lead Event Logger screen to add a future call back for the lead.
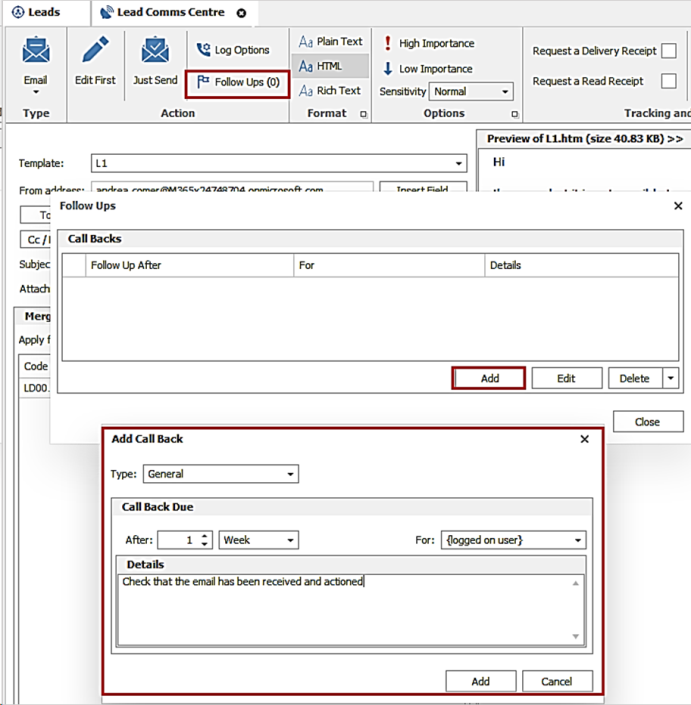
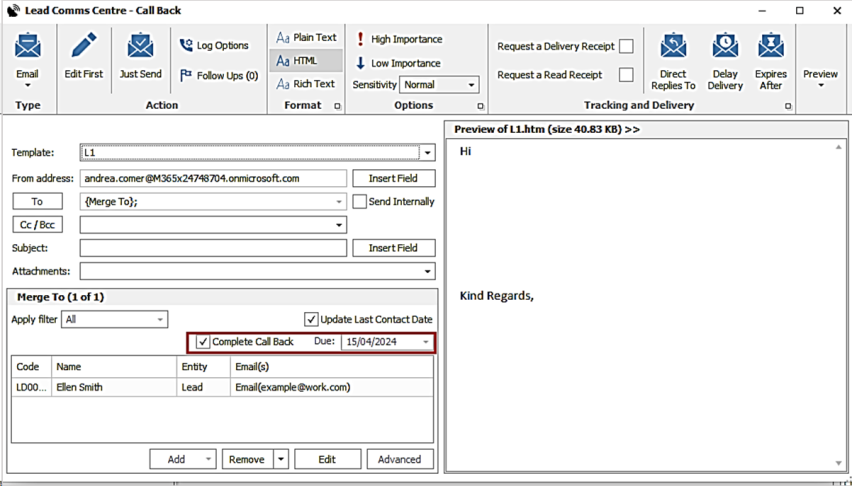
The ‘Follow Ups’ button is available on the Lead Comms Centre screen to add a future call back for the lead.
As per existing functionality, the user can only create call backs for users they have permission to do so for.
When the lead call back is created it will appear in My Infinity for that user. A new section has been added called ‘Lead Call Backs’ and this section will appear as default for new and upgraded users.
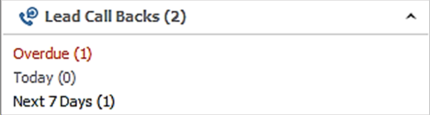
The user can see which call backs are:
- Overdue
- Due today
- Due in the next 7 days
The user can click each hyperlink to display the list of lead call backs.
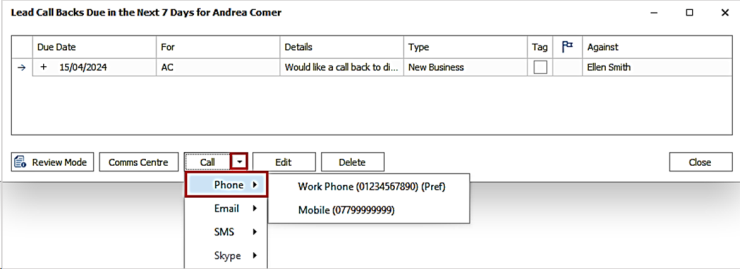
Leads do not have a ‘Preferred telecom’ field, like candidate and contact pages. This column is not displayed in the grid and when the ‘Call’ button is pressed, the top telecom on the lead page is used if exists (phone, mobile or email). Alternatively, the ‘Call’ button has a drop-down menu allowing the user to choose the telecom to call and the communication method.
The Lead Event Logger Call back screens allow the call back to be completed or rescheduled.
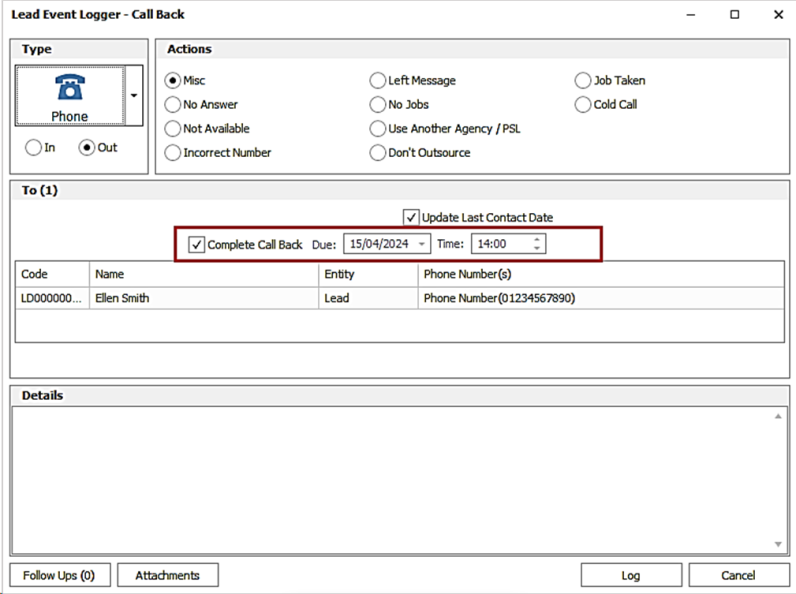
The Lead Comms Centre Call back screens allow the call back to be completed or rescheduled.
As per existing call back functionality, there are other buttons on the toolbar to help manage the call backs.
Review Mode
- When review mode is turned on and the leads grid is not already open - it opens it and goes to the correct record and status
- When review mode is turned off - it closes the whole page
- When review mode is turned on and the leads grid is already open - it activates the existing open screen and selects the correct record
- When review mode is turned off - it leaves it open
Comms Centre
- The lead records in the call back list can be multiselected and sent to the lead Comms Centre
Edit and Delete
- • The lead records in the call back list can be multiselected and edited or deleted, if permissions allow
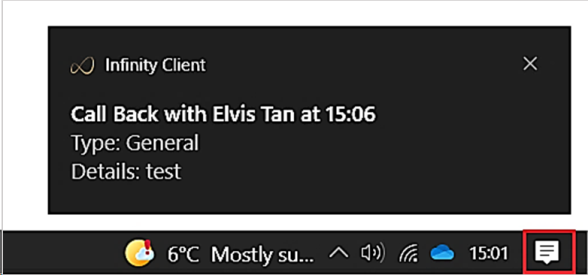
Call back notifications can be configured in User Options / General / Notifications / Reminders tab as per existing functionality and will now work for lead call backs.

If enabled a Windows notification will pop up at the reminder time, for incomplete lead call backs with a time, for the logged in Infinity user.
Lead tags can be deleted in Administration / Reference Data / Leads Tags tab.
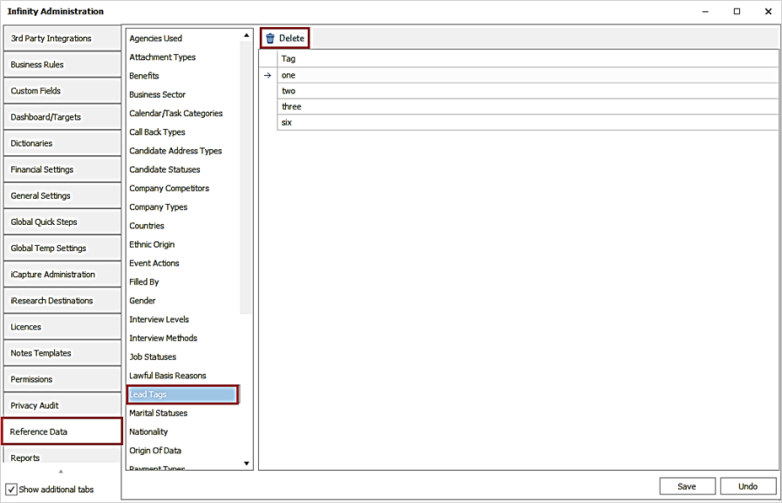
Multiple tags can be selected and deleted.
The user is given a warning and must click ‘Yes’ to delete the tags.
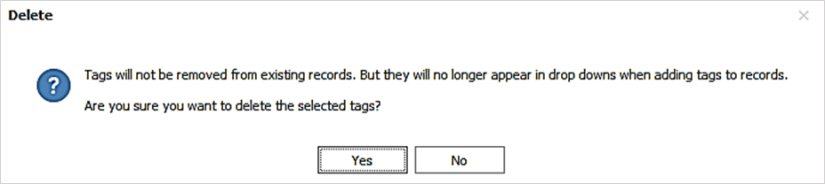
- Tags are not removed from existing records
- Tags will no longer appear in the drop-down list, when adding to lead records

If you require further assistance please contact Ikiru People using the details published on www.ikirupeople.com
Visit our Customer Portal at https://portal.ikirupeople.com/ for future events and clinics.
If you would like to make suggestions or have found any errors with this Help section please contact our Support team.
Version 4.87
Voyager Software is a brand of Ikiru People Ltd, a subsidiary of Dillistone Group Plc. The group is a leading global provider of software and services that enable recruitment agencies and in-house recruiters to better manage their selection process and address the training needs of individuals. Across its brands – which include Voyager Software (recruitment software UK & Australia), Dillistone FileFinder executive search software, GatedTalent, the global database of the world’s leading executives, Talentis.Global – the next generation of recruitment software and also ISV.Online, provider of online pre-employment skills testing and training tools. Dillistone Group serves thousands of clients worldwide. Ikiru People Ltd: Registration Number 02043300. Registered in England & Wales.
 |  |  |  |