Dictionary Administration
 Dictionary Walkthrough available click here
General
There are three dictionaries within Infinity, the Attribute dictionary, the job title dictionary and the qualifications and certifications dictionary. Adding keywords to the dictionaries allows users to tag candidates, companies and contacts with these keywords so when completing searches you can quickly and easily bring up a relevant list of candidates, companies or contacts for a multitude of purposes, including bulk emailing, shortlisting for jobs etc...
The keywords added to the dictionaries can be set to automatically add to candidates when being processed through iCapture and therefore it is important to build the dictionary to allow for it to pick up all the key skills and job titles you would wish to search at a later date.
What are Attributes?
We use Attributes in Infinity to categorise Candidates, Companies, Location, Contact and Jobs. The Infinity Dictionary allows you to maintain Categories and Attributes which relate to your business. Once a candidate or contact is tagged as having a particular skill they can easily be searched for on the database.
Take some time to plan the structure of the Dictionaries. Consider the grouping of Attributes within logical Categories e.g. Languages, software, Industries, skills, IT packages. This will make managing data a simpler task.
Let’s explore the Dictionary and explain how it all works.
 It’s worth noting that users will need permission to maintain the Infinity Dictionary.
Dictionary Screens and Toolbar - Attributes
The Dictionary is divided into 4 tabbed screens: Attributes, Score Types, Job Titles and Quals & Certs.
Attributes
|
Toolbar options
|
|
|
|
Collapse All – quick option to collapse all Attribute Category Groups |
|
|
Expand All – quick option to expand all Attribute Category Groups |
|
|
Delete |
|
|
Add a new Category to the Dictionary |
|
|
Add a new Attribute to the Dictionary – Attributes belong to Categories |
|
|
Add a new Child Attribute to an existing Attribute |
|
|
Re-index All Attributes – mark all attributes to be re-indexed – once confirmed it will then assign attributes when the attribute or synonym is found within the CV |
|
|
Transfer existing data records with the selected Attribute to another Attribute in the Dictionary |
|
|
Move Attribute to another Category (You can also move to the Job Title Dictionary*) * moving attributes to the job title dictionary is irreversible |
|
|
Find Attribute in the Dictionary |


 Category


Creating a new Category
- Adding a new Category is straightforward, just click on
 .
. - The cursor will move to the end of the Category grid and a new, blank row will be inserted, ready for the new Category name to be entered.
- Enter the Category name; it must not exceed 35 characters.
- Enter a description for the new Category
- A tick will be placed in the Active check box by default; this means that the Category is active and available to users within Infinity. If you would prefer to make the Category inactive and therefore not available to users remove the tick from the Active check box.
- Click
 and the new Category will be added.
![MC900434757[1]](../resources/images/infinity_admin_manual_2.1.19/creating_a_new_category_2_34x34.png) My new Category won’t save!
My new Category won’t save!
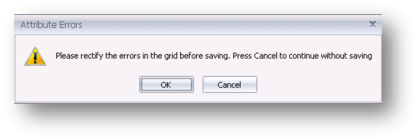
If there is a problem with the new Category you may see this message when trying to save:
Look at the new Category entry and you may see a small symbol,  next to the Category name. Hover over the symbol and a tooltip will tell you the cause of the problem.
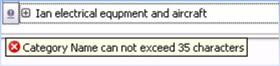
Example of an error in the Category grid when saving
You may also see other tool-tips such as . This message tells you that you are trying to save a new Category but haven’t entered a Category name. Just type a name into the field to resolve the problem.
Creating a new Attribute
- Select the Category you wish to add the Attribute to and click on
 .
. - The cursor will move to the end of the Attribute grid and a new, blank row will be inserted, ready for the new Attribute name to be entered.
- Enter the Attribute name; it must not exceed 35 characters.
- Enter any Synonyms for the Attribute. A Synonym is used for attributes that may have different spellings, abbreviation or a word that is closely associated with the Attribute. Learn more about Synonyms here.
- Enter a description for the new Attribute. (This is not essential but might be useful to new starters in your industry)
- The Sector will be automatically populated, if necessary this can be overridden.
- Assign a Score Type to the Attribute. Learn more about Score Types here.
- Assign a Default Score to the Attribute. Learn more about Default Scores here.
- A tick will be placed in the Active check box by default; this means that the Attribute is active and available to users within Infinity. If you would prefer to make the Attribute inactive and therefore not available to users remove the tick from the Active check box.
- Re-Index will NOT be ticked, if you wish to check existing candidate’s for this attribute and to automatically add this attribute to appropriate records then tick this, once the re-index service runs (usually every 60 minutes)
- Click and the new Attribute will be added.
- Continue to add as many Attributes as required.
- Next, add any Child Attributes to the Attribute.
My new Attribute won’t save!
If there is a problem with the new Attribute you may see this message when trying to save:

Look at the new Attribute entry and you may see a small symbol, next to the Attribute name. Hover over the symbol and a tooltip will tell you the cause of the problem.
 This message tells you that you are trying to save a new Attribute but haven’t entered an Attribute name. Just type a name into the field to resolve the problem.
If you enter an Attribute that already exists you will see this message:
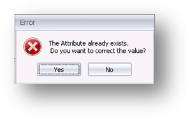
You must correct the entry before you will be allowed to save.
Adding Synonyms to Attributes
If you have previously used a Voyager product then synonyms were previously called Aliases.
A Synonym is used for attributes that may have different spellings, abbreviation or a word that is closely associated with the Attribute. For example, you may have added an Attribute, Microsoft Office but Candidate CV’s may contain MS Office or M.S Office. This is where you would use Synonyms. Another example may be where you wish to associate words to an Attribute, such as Instructor, Teacher, could be added as Synonyms to the Attribute of Trainer.
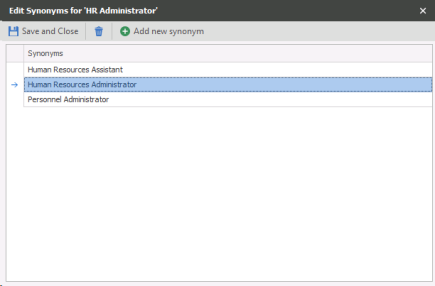
- Select
 Add new synonym and a new, blank row will be inserted, ready for the new Synonym to be entered.
 - Type the Synonym and click
 Save and Close to save the new Synonym.
 - Use this screen if you need to edit existing Synonyms.
- To delete existing Synonyms, select the Synonym and click
 . The Synonym will be removed from the list and will no longer be associated with the Attribute.
 - This means now that searches and CV parsing will also look for the synonyms as well as the main attribute.
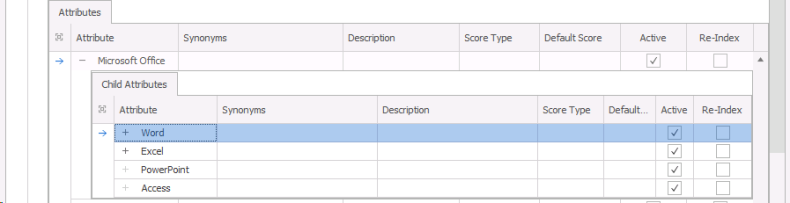
Adding Child Attributes
Here’s an example of when you might use Child Attributes. Child Attributes would be used if you had candidates skilled with Word and Excel [the Child Attributes of MS Office]. When you search you can just enter the Attribute MS Office and Infinity search would pick up the candidates automatically.
Child Attributes are created in exactly the same way as Attributes and can have Synonyms, Score Types and Default Scores associated with them.
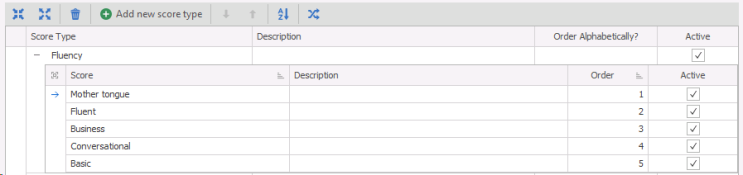
Adding Score Types
- Score Types can add a further dimension to your Attributes each Attribute can be assigned a Score Type to give further Search Criteria options. For example against languages
- Select the Score Types tab where you will see a list of existing Score Types and click on Add new score type. A new, blank row will be inserted, ready for the new Score Type to be entered.
- Type the Score Type, a Description and tick the Active check box to make the Score Type active.
- Next, enter in the Score, for example if you are creating a Secretarial Score Type, you may use Typing Speed WPM as the associated Score.
- Ensure that the tick is removed from the order alphabetically by clicking on
 . This removes the tick. You can re-add by re-clicking this icon.
 - Next we need to check the order. Highlight the lines and use the up and down arrows on the tool bar to move the list into the correct order.
-
Finally, ensure that all the scores are marked as active (otherwise they won’t show), and click save.
- You can now select the Score Type when you creating or editing attributes. This means that the user will be able to choose the level of competency of the Attribute when they assign it to a Candidate. Score Types can be assigned to each Attribute or Child Attribute.
Default Scores
If required you can assign a Default Score to an Attribute using the Default Score column in the Attribute grid.
There is a relationship between the Score and Score Types and you should be aware that if you assign a default score to an Attribute it will assign the Score to every Candidate, Company, and Job that uses that Attribute.
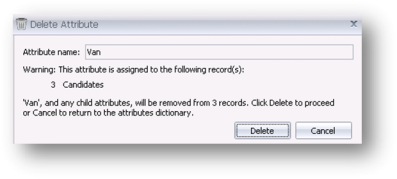
Deleting Attributes
It is not recommended that you delete an attribute; instead you should mark it as inactive using the Active tick box.
- If you do delete any Attributes then a delete confirmation screen will appear with details of where the Attribute is being used. By deleting the Attribute in the Dictionary you will also remove it from any Attribute grids within Infinity.
- If the Attribute has any Child Attributes then these will also be removed.
- To delete an attribute, highlight the correct attribute and click the Delete icon.
Marking an Attribute as inactive
- Simply click into the Active tick box of the corresponding Attribute and it will become inactive and will not be available in Infinity.
- If you make the Attribute inactive it will still remain in any Attribute grids if it was previously assigned to any records.
Re-Index Attributes
You are able to re-index (auto skill) an attribute by ticking then Re-Index box against the appropriate attribute. The indexing service runs regularly throughout the day, usually every 60 minutes, once it has run it will check any attribute marked for re-indexing against all candidate CV’s and assign the attribute to those it finds with the attribute.
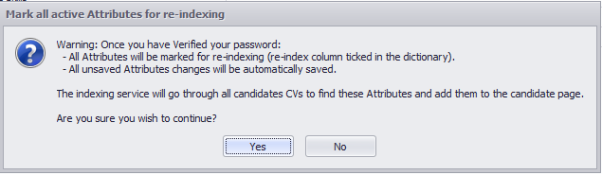
If you wish to Re-Index All Attributes then you can click on the Re-Index button in the toolbar  , this will mark all attributes for re-indexing and once saved is not reversible, click on Undo if you wish to cancel this.
Transfer Attributes
Maintaining the Dictionary may involve transferring Attributes to other Attributes.
- Begin by selecting the Attribute you wish to transfer, then click the Transfer icon
 and a Transfer Attribute popup will be displayed.
![]()
- A warning will be displayed only if the Attribute has been assigned to any records.
- Select the name of the Attribute to transfer to. The details of the transfer will be displayed.
- Finally, click Transfer to complete the action.
Moving Attributes
You may find that you need to move an Attribute from one category to another:
- Select the appropriate Attribute
- Click on Move button

- The Move Attribute dialogue box will appear and you can use the New Category dropdown to select the category you wish to move that attribute to
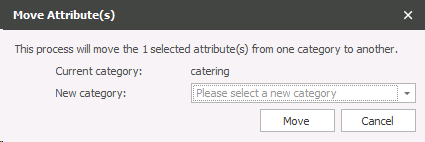
- Click on Move
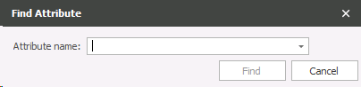
Finding Attributes
As your Dictionaries start to build up you may need to look for a particular Attribute.
- Use the Find on the toolbar to look through the Dictionaries.
- Enter the name of the Attribute and click on Find.
- You will be taken to the Category which contains the Attribute and the Attribute will be highlighted.
We use Job Titles in Infinity to categorise Candidates, Companies, Location, Contact and Jobs. The Infinity Dictionary allows you to maintain Job Titles which relate to your business.
Let’s explore the Dictionary and explain how it all works. Please ensure that you take time to plan the Job Titles dictionary as it can drastically improve the searching and filtering of information within Infinity.
It’s worth noting that users will need permission to maintain the Infinity Dictionary.
Dictionary Screens and Toolbar – Job Titles
|
Toolbar options
|
|
|
|
Collapse All – quick option to collapse all Job Title Category Groups |
|
|
Expand All – quick option to expand all Job Title Category Groups |
|
|
Delete |
|
|
Add a new Category to the Dictionary |
|
|
Add a new Job Title |
|
|
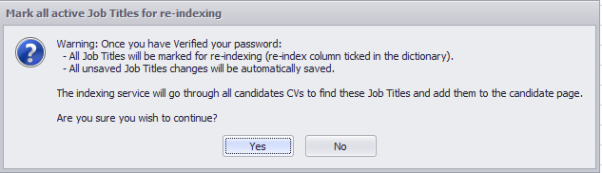
Re-index All Job Titles – mark all job titles to be re-indexed – once confirmed it will then assign job titles when the job title or synonym is found within the CV |
|
|
Transfer existing data records with the selected Job Title to another Job Title in the Dictionary |
|
|
Move Job Title to another Category |
|
|
Find Job Title in the Dictionary |

 Category
Adding a new Job Title
- Begin by selecting the Job Title tab
- All existing Job Titles will be displayed, click on

- The cursor will move to the end of the Job Title grid and a new, blank row will be inserted, ready for the new Job Title to be entered
- Enter any associated Synonyms. Find out how to add Synonyms here
- Enter a description for the new Job Title
- Tick if you require this job title to be available for Temps jobs
- A tick will be placed in the Active check box by default; this means that the Job Title is active and available to users within Infinity. If you would prefer to make the Job Title inactive and therefore not available to users remove the tick from the Active check box
- Click and the new Job Title will be added
Adding Synonyms to Job Titles
- You can add Synonyms to the Job Title by clicking on the
 in the Synonym column
- Click
 Type the Synonym and click Save and Close to save the new Synonym
- Use this screen if you need to edit existing Synonyms
- To delete existing Synonyms, select the Synonym and click. The Synonym will be removed from the list and will no longer be associated with the Job Title
Delete Job Titles
It is not recommended that you delete a Job Title; instead you should mark it as inactive using the Active tick box.
- If you do delete any Job Titles then a delete confirmation screen will appear with details of where the Job Title is being used. By deleting the Job Title in the Dictionary you will also remove it from any Job Title grids within Infinity
- To delete a Job Title, highlight it and click the Delete icon
Marking a Job Title as inactive
- Simply click into the Active tick box of the corresponding Job Title and it will become inactive and will not be available in Infinity
- If you make the Job Title inactive it will still remain in any Job Title grids if it was previously assigned to any records
Re-Index Job Titles
You are able to re-index (auto skill) a job title by ticking then Re-Index box against the appropriate Job Title. The indexing service runs regularly throughout the day, usually every 60 minutes, once it has run it will check any Job Title marked for re-indexing against all candidate CV’s and assign the Job Title to those it finds with the Job Title.
Transfer Job Titles
Maintaining the Dictionary may involve transferring Job Titles to other Job Titles.
- Use the Transfer Job Titles icon on the toolbar
- Begin by selecting the Job Titles you wish to transfer, then click the Transfer icon and a Transfer Job Titles popup will be displayed
![]()
- A warning will be displayed only if the Job Titles has been assigned to any records.
- Select the name of the Job Titles to transfer to. The details of the transfer will be displayed.
- Finally, click Transfer to complete the action.
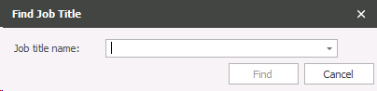
Finding Job Titles
- Use the Find icon
 on the toolbar to look through the Dictionaries.
 - Enter the name of the Job Title and click on Find.
- You will be taken to the Job Title which will be highlighted.
The Infinity Dictionary allows you to maintain Quals & Certs which relate to your business.
Let’s explore the Dictionary and explain how it all works. Please ensure that you take time to plan the Quals & Certs dictionary as it can drastically improve the searching and filtering of information within Infinity.
It’s worth noting that users will need permission to maintain the Infinity Dictionary.
Dictionary Screens and Toolbar – Quals & Certs
|
Toolbar options
|
|
|
|
Collapse All – quick option to collapse all Quals & Certs Category Groups
|
|
|
Expand All – quick option to expand all Quals & Certs Category Groups
|
|
|
Delete |
|
|
Add a new Category to the Dictionary |
|
|
Add a new Qualification to the Dictionary – Qualifications belong to Categories |
|
|
Re-index All Quals & Certs – mark all Quals & Certs to be re-indexed – once confirmed it will then assign Quals and Certs when the Qual & Cert or synonym is found within the CV |
|
|
Transfer existing data records with the selected Attribute to another Attribute in the Dictionary |

|
Quick Copy Qualification will create a new Qualification with the same Expiry settings as the selected Qual or Cert |
|
|
Move Attribute to another Category (You can also move to the Job Title Dictionary*) * moving attributes to the job title dictionary is irreversible |
| Edit Types & Levels | Manage Types & Levels of the selected Qual or Cert |
|
|
Find Attribute in the Dictionary |


- Firstly, Qualification and certificates are split into Categories, Qualifications, with Types and Levels.
- Categories allow you to group Qualifications of the same type together, such as academic or technical.
- Qualifications are the individual qualification within a Category e.g. Degree, A level, or GCSE.
- Types are the different types of qualification. E.g. subjects or particular knowledge area.
- Levels are the grades or achievement level which can be assigned to Types, E.g. A, B, Distinction.
Although Default levels and types can be assigned here, we suggest that you leave this for the consultant to select the relevant level and type for the qualification or certificate when adding to Candidates, Companies, Location and Job.
Adding Quals & Certs Categories
- Begin by selecting the Quals & Certs tab.
- All existing Quals & Certs will be displayed, click on
 .
. - The cursor will move to the end of the Quals & Certs grid and a new, blank row will be inserted, ready for the new Category to be entered.
- Enter a description for the new Category.
- A tick will be placed in the Active check box by default; this means that the Category is active and available to users within Infinity. If you would prefer to make the Category inactive and therefore not available to users remove the tick from the Active check box.
- Click and the new Quals & Certs Category will be added.
- Next, add the Qualifications & Certificates to the Category.

Adding Qualifications
- Select the Category you wish to add the Quals & Certs to and click on
 .
. - The cursor will move to the end of the grid and a new, blank row will be inserted, ready for the new Qualification to be entered.
- Enter the Qualification name; it must not exceed 35 characters.
- Enter any Synonyms for the Qualification. A Synonym is used for Qualifications that may have different spellings, abbreviation or a word that is closely associated with the Qualification. Learn more about Synonyms here.
- Enter a description for the new Qualification.
- Assign a Type to the Qualification. Learn more about Types here.
- Assign a Level to the Qualification. Learn more about Levels here.
- If the Qualification or Certificate has an expiry date, such as a Passport or Work Permit tick the Expires tick box. Expiring Quals & Certs appear in Expiring Items in My Infinity.
- Expiry Days - set the number of days from the Issued Date you would like to default to (if a Qual or Cert has a standard lifespan, for example 1 year you can input 365, do when inputting issued date it will autofill 1 year from this date)
- If the Qualification or Certificate needs to have a review date set against it, enter a number in the Review Date column.
- A tick will be placed in the Active check box by default; this means that the Qualification is active and available to users within Infinity. If you would prefer to make the Qualification inactive and therefore not available to users remove the tick from the Active check box.
- Click and the new Qualification will be added.
Adding Synonyms to Qualifications & Certificates
- You can add Synonyms to the Qualification by clicking on the in the Synonym column.
- Click Type the Synonym and click Save and Close to save the new Synonym.
- Use this screen if you need to edit existing Synonyms.
-
To delete existing Synonyms, select the Synonym and click
. The Synonym will be removed from the list and will no longer be associated with the Qualification.
Delete Quals & Certs
It is not recommended that you delete a Quals & Cert Category or Qualification; instead you should mark it as inactive using the Active tick box.
- If you do delete any Quals & Cert Category or Qualification then a delete confirmation screen will appear with details of where the Quals & Cert Category or Qualification is being used. By deleting the Quals & Cert Category or Qualification in the Dictionary you will also remove it from any Quals & Certs grids within Infinity.
- To delete a Quals & Cert Category or Qualification, highlight it and click the Delete icon.
Marking a Quals & Certs Category or Qualification as inactive
- Simply click into the Active tick box of the corresponding Quals & Cert Category or Qualification and it will become inactive and will not be available in Infinity.
- If you make the Quals & Cert Category or Qualification inactive it will still remain in any Quals & Certs grids if it was previously assigned to any records.
Copy Quals & Certs
- Copy any existing Qualification by selecting the Quals or Cert and click on Copy icon
 .
. - Enter the a name for the copied Quals or Cert and click

Re-Index Quals & Certs
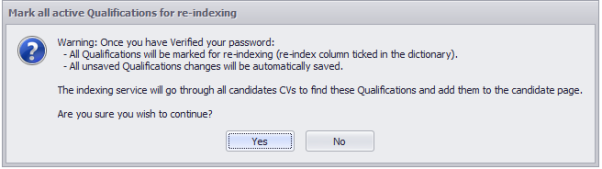
You are able to re-index (auto skill) a Qual or Cert by ticking then Re-Index box against the appropriate Qual or Cert. The indexing service runs regularly throughout the day, usually every 60 minutes, once it has run it will check any Qual or Cert marked for re-indexing against all candidate CV’s and assign the Qual or Cert to those it finds with the Qual or Cert within their CV.
If you wish to Re-Index All Quals and Certs then you can click on the Re-Index button in the toolbar, this will mark all Quals and Certs for re-indexing and once saved is not reversible, click on Undo if you wish to cancel this.
Managing Types & levels
- Types and Levels can be assigned to Qualifications and Certificates.
- Select the Quals or Cert and click

- Enter Types and description, tick the Active check box.
- Save and Close when all Types have been added.
- Add further Levels to the Qualification or Cert if required. Remember to use the Sort Order option if required to set the order within the list of Levels.
- Use the Transfer and Delete options to manage existing Types and Levels as necessary. Please note that we don’t recommend deleting and suggest that you mark as inactive instead by removing the tick from the Active tick box.


If you require further assistance please contact Ikiru People using the details published on www.ikirupeople.com
Visit our Customer Portal at https://portal.ikirupeople.com/ for future events and clinics.
If you would like to make suggestions or have found any errors with this Help section please contact our Support team.
Version 4.87
Voyager Software is a brand of Ikiru People Ltd, a subsidiary of Dillistone Group Plc. The group is a leading global provider of software and services that enable recruitment agencies and in-house recruiters to better manage their selection process and address the training needs of individuals. Across its brands – which include Voyager Software (recruitment software UK & Australia), Dillistone FileFinder executive search software, GatedTalent, the global database of the world’s leading executives, Talentis.Global – the next generation of recruitment software and also ISV.Online, provider of online pre-employment skills testing and training tools. Dillistone Group serves thousands of clients worldwide. Ikiru People Ltd: Registration Number 02043300. Registered in England & Wales.
 |  |  |  |