Voyager Infinity – Release Notes
Version: 5.5
Release Date: 21st February 2025
What have we released?
- Infinity 5.5 has been released
Release overview
Here’s a snapshot of what we’ve delivered in this release:
- Suitable companies panel on the candidate page
- Record a candidate left a temp shift early
- Portal
- Invite all types of candidates
- Bulk invite and onboard candidates
- Reject documents
- ‘Per Shift’ availability
- Rail module
Feedback please
We are continuously looking to improve Voyager Infinity and are keen to hear your thoughts. Please email suggestions@ikirupeople.com with any feedback on existing functionality or ideas for new functionality.
Enhancements
Enhancement 131640 Suitable companies panel on the candidate page
A right-hand side tab called ‘Suitable Companies’ has been added to the candidate page, after the ‘Suitable Jobs…’ tab.
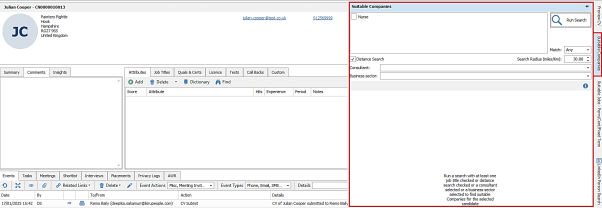
This displays a panel that allows the user to search and return company contacts that are suitable for the candidate to be speculatively submitted to.
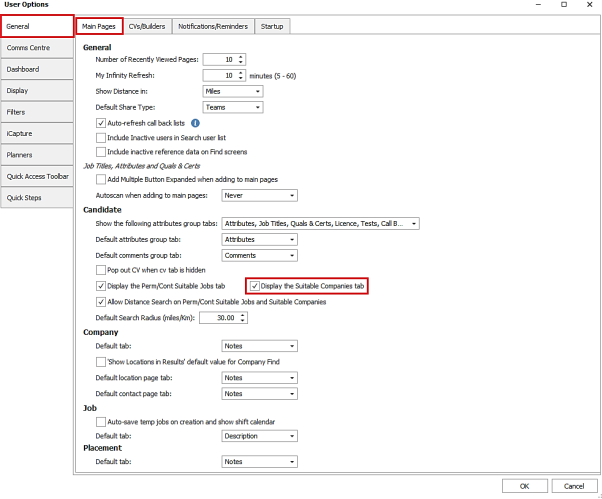
The tab is displayed as default and there is a setting in User Options / General tab to switch the tab on/off as default.
The panel can be resized, docked/auto-hidden and last position is remembered as per standard behaviour.
Searching
At the top of the panel the user can select the criteria to search for active company contacts.
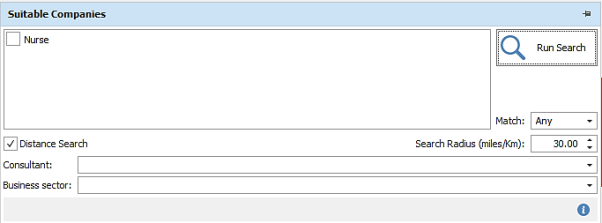
The ‘info’ button on the toolbar gives further details about how the search works.
At least one of ‘Job titles’, ‘Distance Search’, ‘Contact consultant’ and ‘Business’ Sector’ must be selected to run the search. The criteria are combined using ‘AND’ when the search is run. Only active contacts are returned.
Candidate Job Titles
- The candidate’s job titles will automatically display
- The user can tick the job titles to search
- These are matched against the contact job titles
- Company and Location job titles are also matched if the Administration / Search Options / General tab setting to ‘Search contacts with skills (job titles, attributes, quals and certs) that are against the contact and not inherited from company / location above’ is unticked
- When multiple job titles are selected, the ‘Match’ field is available to return contacts with ‘All’ job titles ticked or ‘Any’ of the job titles ticked. As default this is set to ‘Any’
- If any changes are made to candidate page job titles and the page saved, the job title list is refreshed and search results cleared
- The panel shows when in candidate review mode, if the user moves to a different candidate the panel refreshes with job titles updated and results cleared.
Distance Searching

If the user has a postcode distance searching licence, distance searching is enabled in the panel and can be switched off/on per search and the radius set as required.
The default can be set in User Options / General tab.
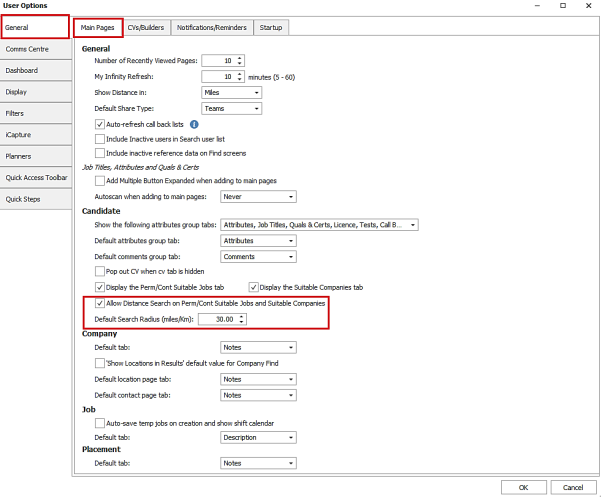
As default, distance searching is ticked and a radius of 30 (miles/Km) set, regardless of licence or not.
Company / contact search fields
- The user can search the Contact consultant field by selecting from a drop-down list of teams/consultants. This returns active contacts that have an owning consultant assigned in the selected team or as per the consultant selected
- The user can search the Company business sector field by selecting from the drop-down list. Active contacts are returned at the companies that are set to that business sector
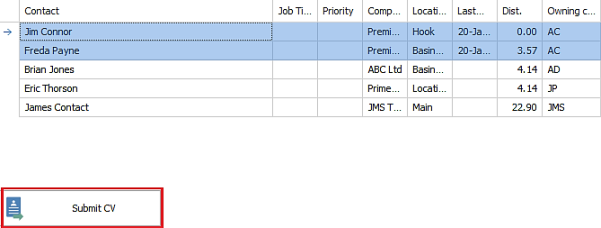
Contact results grid
Search returns active contact results in a grid, ordered by contact code unless distance search is used, with sort / filter / column chooser / save layout functionality available.

The following fields are shown as default:
- Contact name
- Job Title
- Priority
- Company
- Location
- Last Contacted
- Distance (if searched)
- Owning Consultants
User can double click on a contact row to open the contact page.
When a distance search is run, contacts are returned that are at a location within the set radius of any of the candidate’s addresses and the distance column shows in the grid.

- Distance value is shown in miles/kilometres as per the user option
- Distance is calculated, from closest candidate address postcode to contact location address postcode
- Requires candidate and contact locations to have a postcode to return results
- Order is by distance, closest at the top
Speculative CV Submit
The candidate can be speculatively submitted to selected contact(s) by clicking the ‘Submit CV’ button at the bottom of the grid.
This launches the Submit CV screen defaulting to ‘Speculative’ and behaves as per existing functionality.
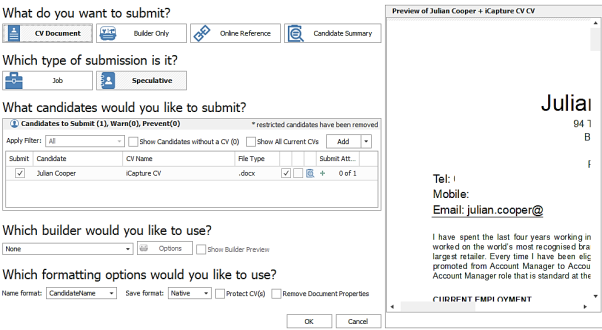
The candidate is added as default in the ‘CV Select’ screen (candidates to submit), and the selected contacts in the Comms Centre screen ‘Merge to’ section.
When submitted the user is returned to the candidate page.
Enhancement 131562 Default the owner when creating interviews
In Administration / General Settings / Main Pages tab there is as setting to default the owning consultants of the interview page.
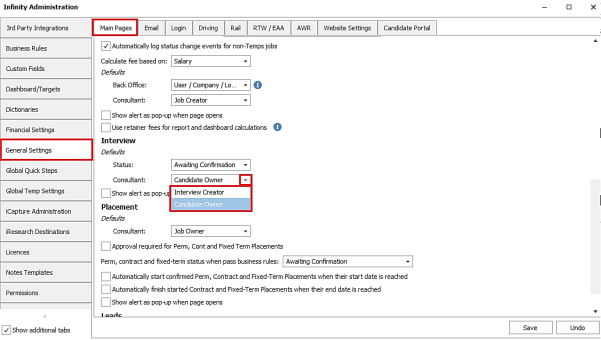
This can be set to ‘Candidate Owner’ or ‘Interview Creator’.
‘Interview Creator’ is the default and works as per existing functionality.
When an interview is created, the owners are pulled to the interview page ‘Consultants’ field as per the setting.

Enhancement 131561 Candidate search results/list report change to type field
The ‘Type’ column on the Candidate Search Results/List (Excel) Report shows the value of 'Temp' if the candidate is ticked as Temp.

This displays as the last value in the column separated by a forward slash if the candidate is also ticked as Contract and/or Perm.
Enhancement 131451 Company name length increased
The company name field is set to 100 characters in the following areas of Infinity:
- Company page
- Candidate / contact work history
- Candidate referee
- Lead page
- Find company screen
- Company search criteria screen
- Work history advanced searching
- iCapture work history
- Integrated Data Services search / imports
- Portal application forms
- Contact linking wizard
- API:
- GET/Entity/Candidate - EmploymentHistory – CompanyName
- POST/Entity/Candidate - EmploymentHistory – CompanyName
- PUT/Entity/Candidate - EmploymentHistory - CompanyName
- GET/Entity/Companies - Name
GET/Entity/Company - Name - POST/Entity/Company - Name
- PUSH/Entity/Company – Name
- GET/Entity/Contact - Company: Name
GET/Entity/Contacts - Company: Name - POST/Entity/ICaptureCandidate - EmploymentHistory: CompanyName
- GET/Entity/Job - Company: Name
GET/Entity/Lead - Company - POST/Entity/Lead - Company
- GET/Entity/Leads - Company
- GET/Entity/Placement - Company: Name
- GET/Entity/Referee – Company
- POST/Entity/Referee – Company
- GET/Entity/Referees - Company
Note: Quick Find Company will stay limited to 50 chars as the search field is used for contacts and candidates too.
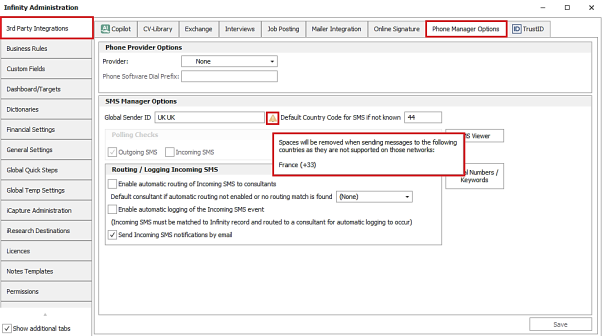
Enhancement 131392 SMS sender IDs with spaces restricted on French networks
SMS messages sent from Infinity that contain a space character in the sender ID and sent to a French country code (+33), will have the space stripped out automatically when sending.
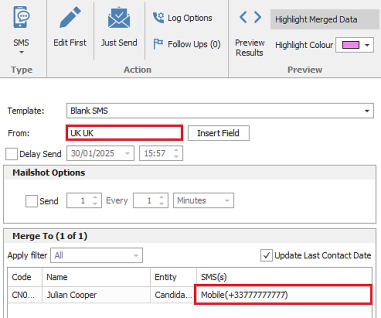
The space character is no longer accepted on French networks and would result in the message being rejected. Other international networks are not affected, and the message is sent as normal with the space character.
In Administration / 3rd Party Integrations / Phone Manager Options tab the Global Sender ID field has a warning if a space is entered.
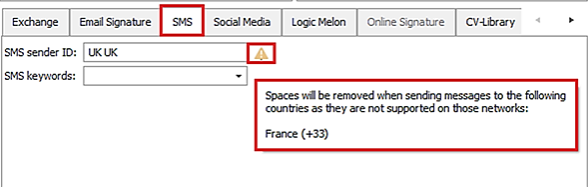
In Administration / User Administration / Edit User screen, the SMS sender ID field has a warning.
Enhancement 131540 Prevent creating meetings / adding attendees if no email address
Creating a meeting in Infinity is prevented if the entity doesn't have an email address ticked as ‘Send by default’.
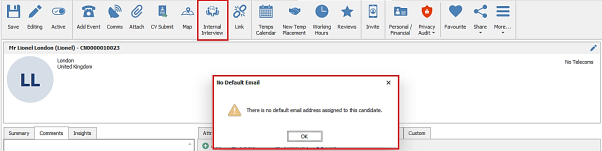
The user is notified in a pop-up window. This is the same functionality as per previous versions when on the candidate and contact meeting tab. This has been applied to the following meeting functionality:
- Creating an internal interview on the candidate page
- Creating a meeting from the candidate event logger using ‘log and book meeting’
- Creating a meeting from the contact event logger using ‘log and book meeting’
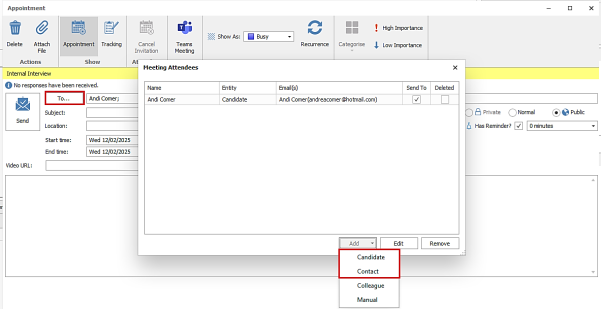
Adding candidates / contacts to a meeting via the 'To' button is prevented if the entity doesn't have an email address ticked as ‘Send by default’ and the user is notified.
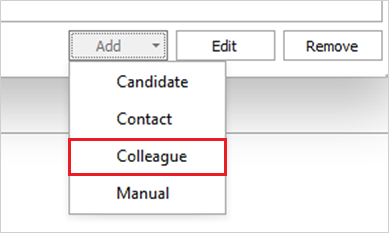
Consultants are excluded from the drop down ‘Colleague’ list if they are not syncing their mailboxes or are synching but have no email address in the ‘Email’ or ‘Email other’ field in the User Administration screen.
Enhancement 131742 Control the name of the CV sent in the Email Comms Centres
The attachment option ‘Attach default CV on send’ in Comms Centres with an associated candidate, uses the Submit CV ‘CV Name Format’ user setting for the filename.
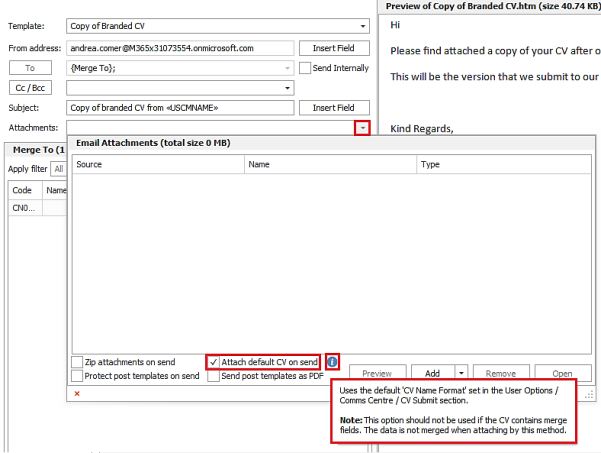
An information button has been added to explain this. A note has also been added that the CV is not merged when sending by this method so should not be used for CVs that contain merge fields.
The candidate’s default CV that is attached to the email sent is named as per the setting in User Options / Comms Centre / Submit CV section.
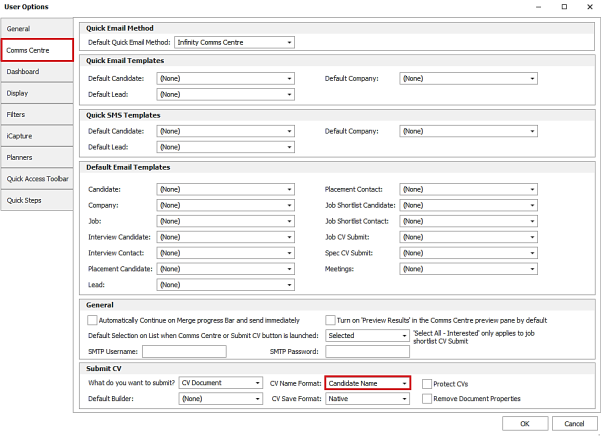
This can be set to ‘Candidate Name’ or ‘Candidate Code’.
Enhancement 132004 Quick find 5.1 change reverted and applied to 5.3
The following enhancement delivered in Infinity version 5.1 has been reversed and also applied to Infinity version 5.3:
- Enhancement 131045 Quick Find to search on alternative forenames like Advanced Find
The Quick Find functionality now works as per versions prior to 5.1.
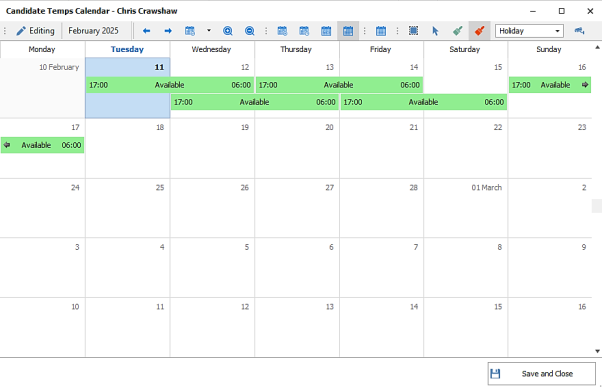
Enhancement 131970 Temps - record a candidate left a shift early
The user can right click on a single placement shift and mark as 'Left early'.
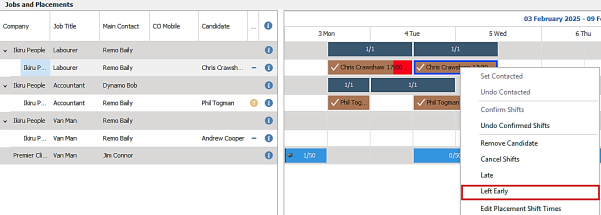
This is available in placement calendar, Temp planner and Shift planner.
When selected a window prompts the user to enter an earlier end time for the shift.
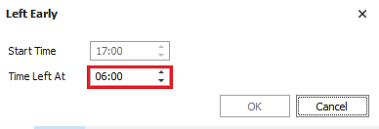
This ends the shift at the earlier end time and creates a 'Left early' unavailability period from the new end time to the old end time.

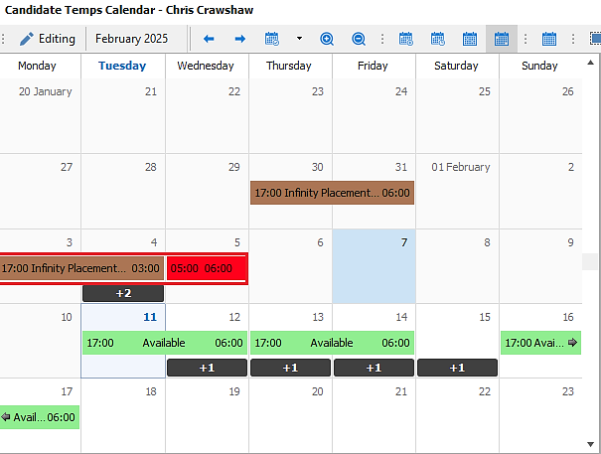
This is shown as red as default, and the shift info tooltip displays the period.
Note: the candidate will not get paid for the ‘Left Early’ period as the placement shift is shortened accordingly and is what gets exported / reported to Back Office.
In Administration / Reference Data / Unavailability reasons tab, the ‘Left Early’ system entry is listed. This cannot be made inactive, but the colour can be configured.
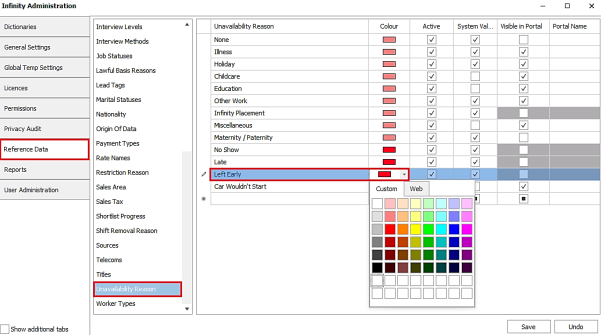
‘Left early’ cannot be chosen manually as an unavailability reason in Infinity e.g. when painting unavailability in the temp calendar.
The Left early unavailability entry appears in the candidate’s Temp Calendar after the shift.
The user can right click on a shift with a ‘Left early’ entry and undo.
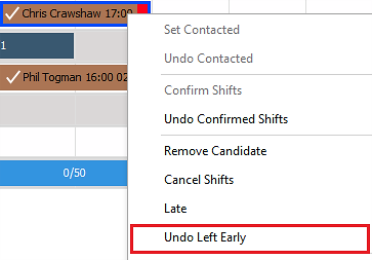
This removes the unavailability and returns the shift back to its original end time.

‘Left Early’ and ‘Undo Left Early ‘entries are audited in the placement shift audit.
![]()
‘Left Early’ entries appear on the ‘Temps Cancelled Shifts, Removed Candidates, Lates and Left Early’ report. The report name has been updated accordingly.

Enhancement 131442 Portal 'Application Form' renamed to 'Form'
Portal document type 'Application Form' is renamed 'Form'.
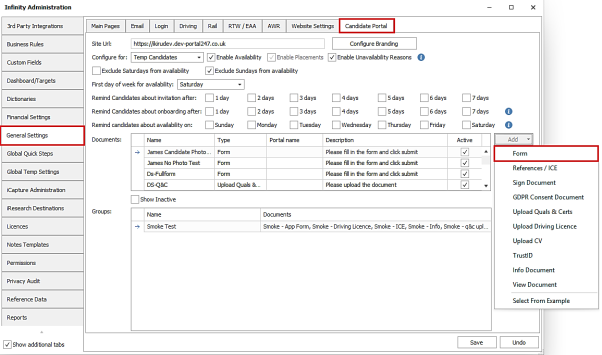
This is reflected in the following areas:
- Infinity Administration / General Settings / Candidate Portal tab / ‘Add’ Document menu
- Candidate page portal screen
- Apps Menu / Onboarding screen
- My Infinity Candidate Portal section
Application forms created prior to this change, continue to work in the new version.
Enhancement 131621 Portal ‘This Week’ button changes on the availability calendar
On the Portal availability screen, 'This Week' button has been renamed to 'Today' and the navigation buttons moved to appear after it.
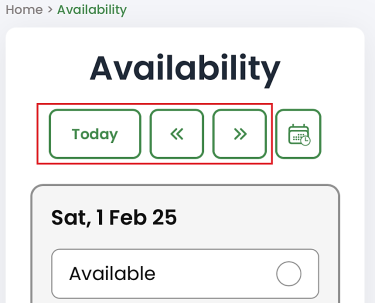
The ‘Today’ button will take the candidate back to this week and scroll to today.
Enhancement 131557/131558 Portal - control the week displays in availability calendar
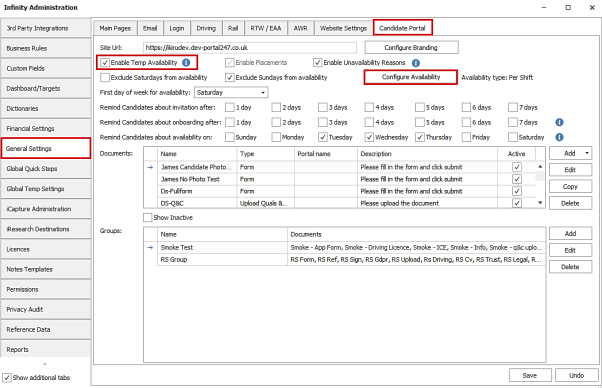
On databases enabled for Portal availability, there are settings in Administration / General Settings / Candidate Portal tab to control whether Saturday and Sunday are shown and what the first day of week is on the Portal availability calendar.
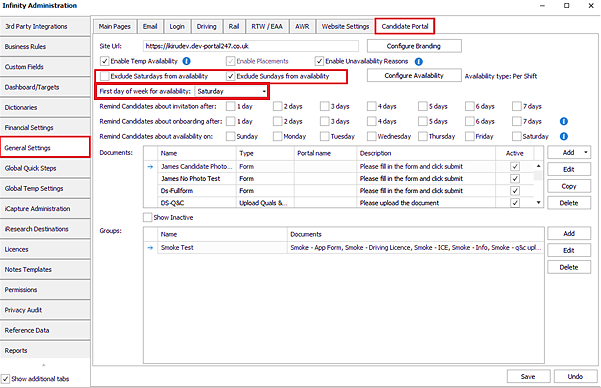
The ‘First day of week for availability’ is set to ‘Monday’ as default.
The ‘Exclude Saturdays from availability’ and ‘Exclude Sundays from availability’ are unticked as default.
The first day of the week cannot be set to Saturday or Sunday if they are ticked to be excluded and on the reverse the settings cannot be unticked if they are set as the first day of week.
The Portal availability calendar displays one week at a time, and Saturdays and Sundays are not shown if ticked as excluded, with the first day of week, set as per the admin setting.
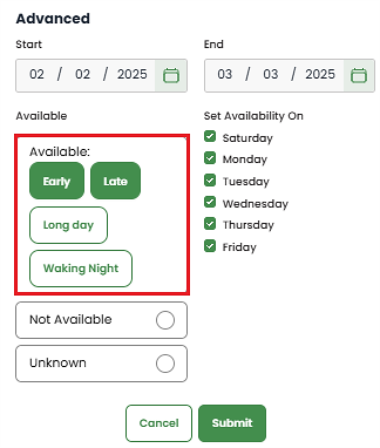
Enhancement 131555/131556 Portal - enter availability for a date range and weekly pattern
There is a button on the Portal availability calendar to enter availability for a date range and weekly pattern.
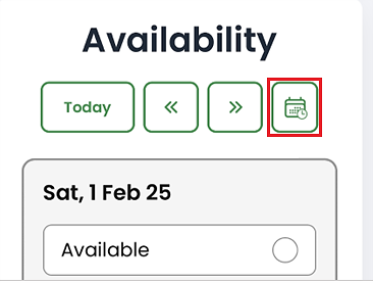
This displays the ‘Advanced’ window where a start and end date can be selected.
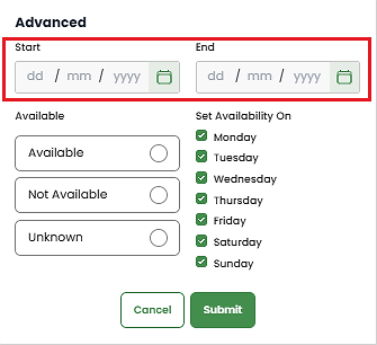
This displays the days of the week using the ‘First Day of Week’ and ‘Exclude Saturday/Sundays’ settings.
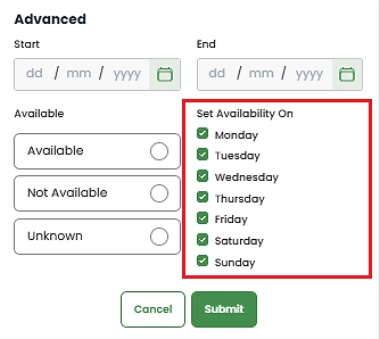
All days are ticked as default. The candidate can select the days to apply their availability to in the date range.
Availability can be set to:
- Available
- Unavailable (with reason, if required by admin screen setting)
- Unknown
The date range can be up until the end of the following year.
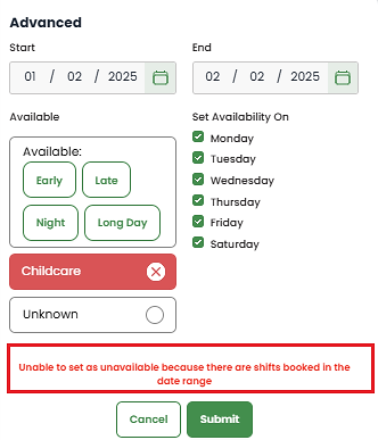
The candidate cannot mark themselves as unavailable on a day they have a shift. They are told they cannot add unavailability when they have a shift and must manually change the date range to not include the shift, before they can submit the availability.
Enhancement 131714 Portal - invite all types of candidates to onboard
Perm candidates can now be invited to the Portal in addition to contract and temp.
Infinity no longer insists that the candidate must be temp and/or contract when they are invited to the Portal.
Candidates ticked as 'Temp':
- Have access to 'Availability' on the Portal (if licensed)
- Receive availability reminders
Candidates that are not ticked as 'Temp':
- Do not have access to 'Availability' on the Portal (if licensed)
- Do not receive availability reminders
Changes have been made to the Administration / General Settings / Candidate Portal tab screen.
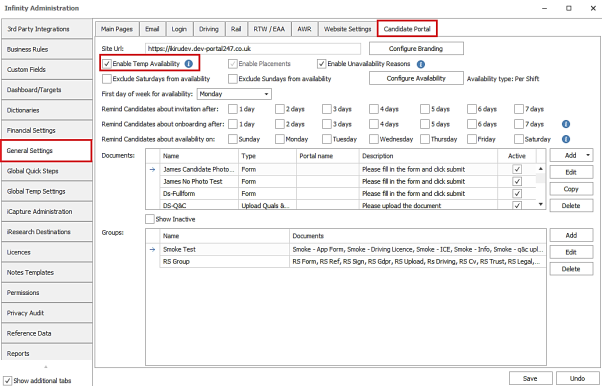
- The 'Configure for' field has been removed
- 'Enable Availability' has been renamed to 'Enable Temp Availability' - databases require the Availability feature as per existing functionality
- An 'information' button has been added immediately after the 'Enable Temp Availability' to advise that all Portal candidates who are ticked as temp have access to the Availability module and only temp candidates receive the reminders
Candidates who are ticked/unticked as temp in Infinity, are not required to logout/in for the change to be seen on the Portal.
Candidates who were previously ticked as temp but are no longer, will receive a ‘404 Not Found’ if manually typing the availability page or clicking an old reminder link.
Enhancement 131792/131551 Portal – bulk invite and onboard Infinity candidates
The user can search for candidates who have/haven't already been invited to the Portal.
There is a new search field called ‘Portal Invitation’ in the candidate menu of the ‘Search’ section in re:job and candidate search criteria screens.
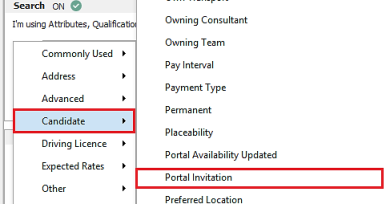
To search for candidates not invited to the Portal the ‘Not’ operand must be ticked on the field.

When search results are returned, multiple candidates can be invited to use the Portal. This is available on the Bulk Update menu on the search results toolbar. Users require the ‘BulkUpdateGeneral’ general permission to use this functionality.
The user can tick individual results to invite or send all results an invitation.
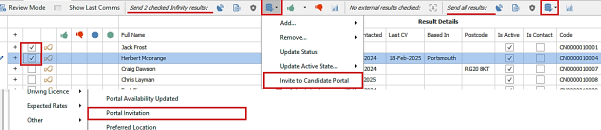
When selected the ‘Bulk Invite Candidates to Candidate Portal’ window is displayed.

Users require the ‘PortalInvite’ permission to use the ‘Invite’ functionality.
The user can click on the ‘Invite’ button to invite only and not add any documents to onboard. The Status and Results section will show the progress.
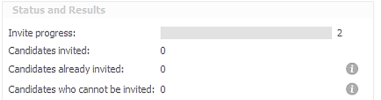
Information is displayed on the following:
- How many candidates are selected in the search results and are to be invited (Invite progress bar)
- How many candidates were invited
- How many are already invited, this is where the candidate or email address have already been invited and is shown on the adjacent Info tip. Only candidates not currently invited to the portal, can be invited in bulk.
- How many couldn’t be invited, if the candidate has multiple ‘Send by default’ email addresses, they cannot be bulk invited and it must be done manually from the candidate page and is shown on the adjacent Info tip.
Candidates can be invited and onboarded at the same time. The ‘Documents’ section has a toolbar to add document / document group / remove.
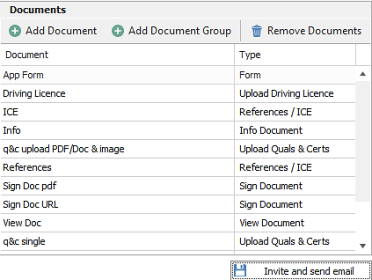
The candidates need to be onboarded with the same documents and of any type:
- Application Form (Form)
- References / ICE
- Sign Document
- GDR Consent Document
- Upload Quals & Certs
- Upload Driving Licence
- Upload CV
- TrustID
- Only users configured with the ‘TrustIDRTWChecks’ permission can add a TrustID document to the candidate via a document or a document group.
- Legalesign
- Only users configured for Legalesign in the Infinity user admin screen can add a Legalesign document to the candidate via a document or a document group.
- View Document
When documents are added, the user can click on the ‘Invite and send email’ button to invite and onboard.
If TrustID and Legalesign documents are sent, the Status and Results section show if there are any failures with an adjacent Info tip, e.g. candidate doesn't have a name.

Bulk Invite and Onboarding works the same as if it had been done one at a time from the candidate page as per existing functionality.
Enhancement 131972/131887 Portal - reject a document not completed correctly
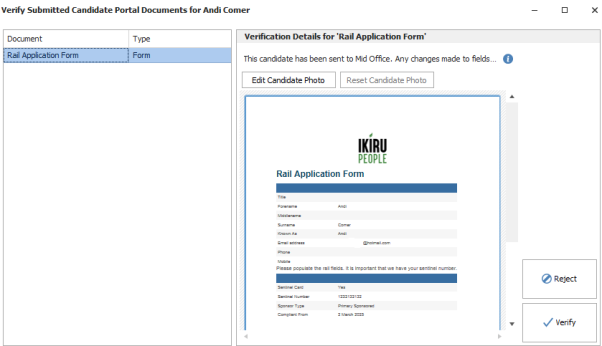
Documents submitted by candidates, can now be rejected. A rejection reason must be added which is seen by the candidate. Rejection reasons are ‘per document’. Once the candidate makes the changes and submit them, they can be verified or rejected again as appropriate.
Infinity Verification
There is a ‘Reject’ button in the verify screen if it’s a document type that can be rejected.
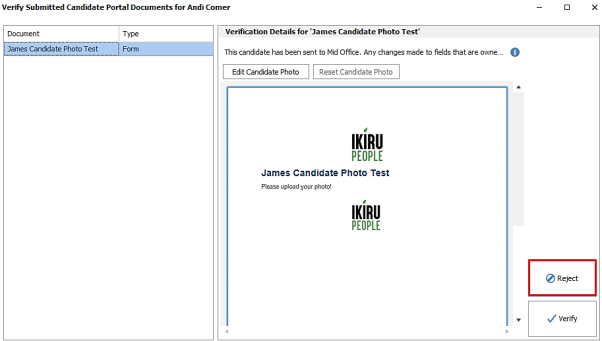
- Documents must be submitted before they can be rejected
- Verified documents cannot be rejected
The following documents can be rejected:
- Form
- References / ICE
- Upload Quals & Certs
- Upload Driving Licence
- Upload CV
- Sign Document
- GDPR Consent Document
The following documents cannot be rejected:
- TrustID
- Legalesign
- Info Document
- View Document
In a Upload Q&C doc, if the consultant populates the various fields in the Upload Q&C verify screen (e.g. issues date, expiry date), the changes are not kept if the document is then rejected.
When a document is rejected, the user is prompted to enter a reason why.
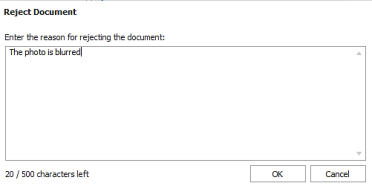
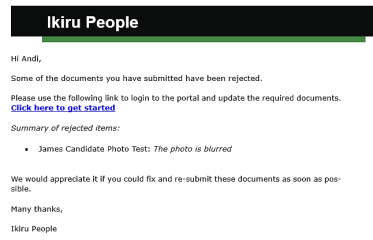
The candidate is sent an email when a document is rejected, including the reason why.
The original submitted documents are stored in the candidate attachments area and prefixed with ‘REJECTED’ with the original submitted date. The candidate page is not updated with any of the fields from the document.
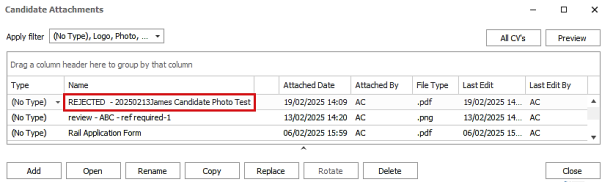
For most document types this is a pdf, for the upload documents e.g. if Q&C, it is the files themselves.
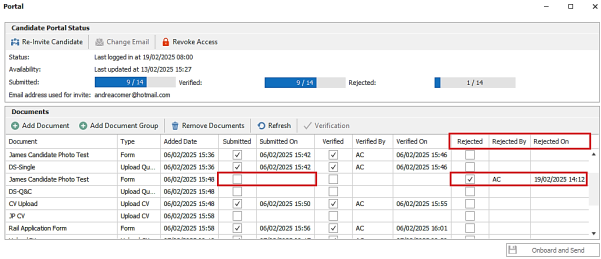
The following new columns have been added to the onboarding grid and are populated:
- Rejected
- Rejected By
- Rejected On
The existing fields 'Submitted' and 'Submitted on' fields are blanked out.
The ‘Rejected Reason’ field is available to add to the grid and layout can be saved via the right click column chooser.
The Candidate Portal Status information display on this screen is changed as below:
- Submitted x of y - excludes rejected documents
- Verified x of y - stays the same
- Rejected x of y -this is a new statistic that shows the number of documents currently in a rejected state

Portal
Rejected document contains all the data input by the candidate when it's returned to the Portal.
The candidate sees the rejected documents in the list of documents with a warning triangle and the rejected document's description is the reason they were rejected.
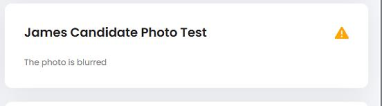
When the candidate opens a rejected document:
- The description at the top of the document, is the reason they were rejected
- All fields populated when the file was last submitted are displayed populated
- The candidate can change any fields
- Changed fields must conform to the same rules as the original submission
- E.g. Mandatory fields
- E.g. Employment history - no gaps, must not have gaps
- The candidate can submit the changed document
- Once the document has been submitted it is no longer editable
- Once the document is submitted, the document is marked with a green tick
- The submitted / submitted date fields are populated in Infinity
- When the 'show completed' slider is off or on, rejected documents are displayed
Infinity - verifying rejected documents
Rejected documents that are resubmitted can be verified as per existing functionality.
This will blank the rejected date / by fields.
Infinity - rejecting rejected documents
Rejected documents that are resubmitted can be rejected as per existing functionality.
The same process is followed as per the original rejection, except for the following:
- The existing rejected reason can be edited before being sent to the candidate
- The new rejected date / by overwrites the old one
Note: Users are prevented from rejecting documents that were submitted before the latest upgrade. The user is told the document cannot be rejected because it was submitted before the new rejection functionality was added and does not contain all the required information to return it to the candidate. The document must be sent to the candidate again to complete.
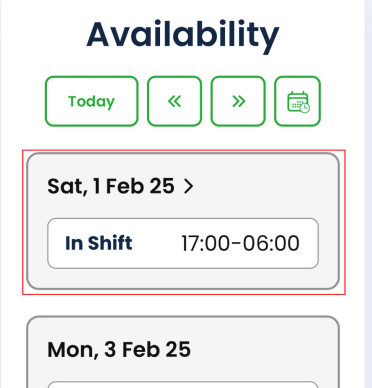
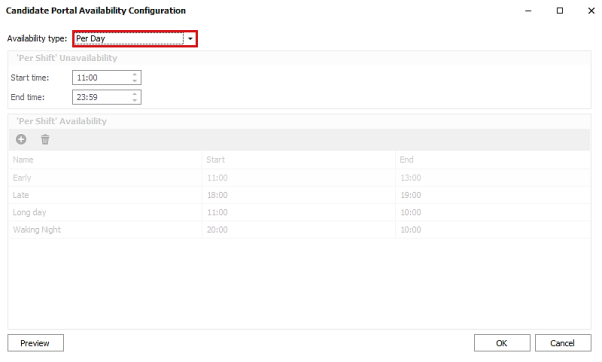
Enhancement 128150 Portal - availability ‘Per Shift’
Availability can be configured 'Per Day' or 'Per Shift'
- Availability 'Per Day' allows candidates to indicate if they are available or unavailable for each day
- Availability 'Per Shift' allows candidates to indicate which shifts they are available for e.g. Early, Late, Night, Long Day. If they are unavailable, they indicate this 'per day'
- Per Shift' availability would typically only be used by certain industries e.g. Care, Teaching etc.
Infinity Portal Administration
On databases enabled for Temp Availability, in Administration / General Settings / Candidate Portal tab, there is a new button to configure whether candidates add their availability on the Portal ‘Per Day’ or ‘Per Shift’.
‘Per Day’ works as per existing functionality.
This is the default when first enabled.
‘Per Shift’ is new functionality.

When configured 'Per Shift' at least 2 shifts must be created e.g. Early, Late, Night, Long Day.
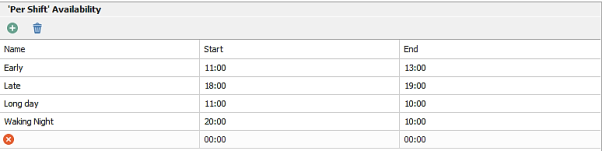
- Each shift must be given a name, start time and end time
- The start time can be later than the end time, which indicates an overnight shift
- Shifts can overlap e.g. early, late, night, long day
Note:Shifts are configured in the Portal administration screen separately and are not taken from the Administration / Global Temp Settings / Shift Names tab, but configuration is the same.
‘Per Shift’ Unavailability also has a start time and end time.

This defaults to 24-hour unavailability.
If you have availability configured for overnight shifts, it is recommended that 'unavailability' is configured to start after the night shift would have finished e.g. If an overnight shift finishes at 10am, unavailability starts at 11am.
Note: It is not recommended that 'Per Shift' availability / unavailability times are changed once set and in use. If you are unsure, please contact the training team on training@ikirupeople.com.
An 'info' button is available when ‘Per Shift’ is selected.
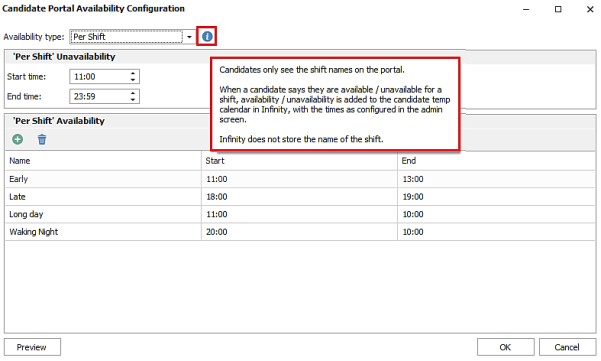
This advises that candidates only see the shift names on the Portal e.g. Early, Late, Long Day. When a candidate says they are available / unavailable for a shift, the entry is added to the candidate’s Temp Calendar in Infinity, using the times as configured in the Portal Administration screen. Infinity does not store the name of the shift.
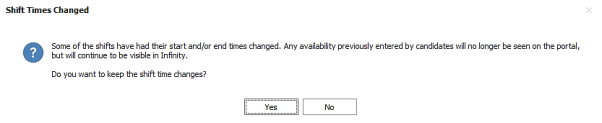
If shift availability times are edited or shifts deleted in the Portal Administration screen, the user is warned that any availability previously entered by candidates will no longer be seen on the Portal but will continue to be visible in Infinity.
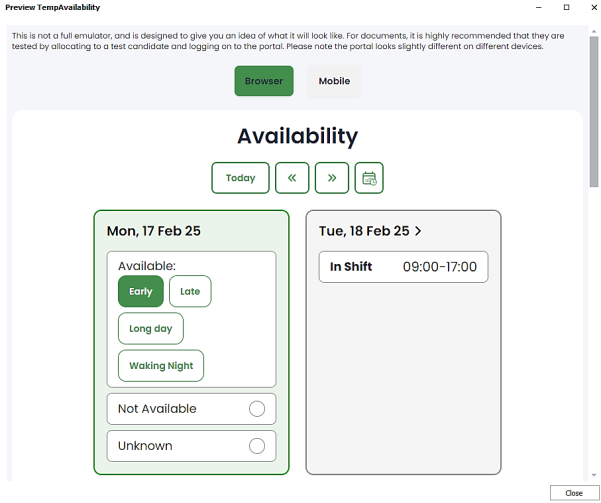
A preview button is available for both 'Daily' and 'Per Shift' Availability.
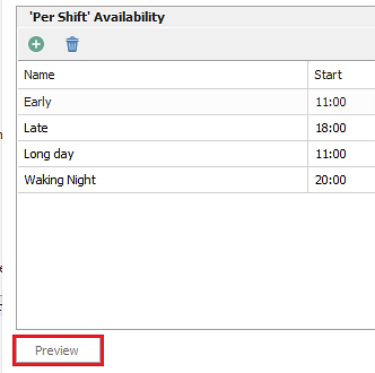
This shows how the Availability screen will look on the Portal with the chosen setting and includes a placement shift.
Candidate Portal
When configured 'Per Shift' the candidate can mark themselves as available on the Portal for each of the shifts e.g. Early, Late, Night, Long Day.
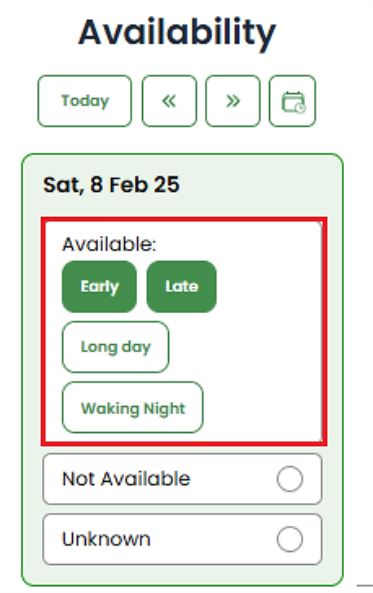
- Candidate can unmark themselves as ‘available’ for each of the shifts e.g. Early, late, night, long day (this just removes the availability for that shift)
- Candidate cannot mark themselves as ’unavailable’ for each of the shifts e.g. Early, late, night, long day
- Candidate can mark themselves a ’unavailable’ per day
- Candidate can mark their availability as ‘unknown’ per day
- If reasons are enabled, the candidate must enter a reason for all days they are unavailable for
- The candidate does not see times associated with the shift
- If the candidate has availability in their temp calendar that match the availability shift times configured in the Portal administration screen, they are displayed as available for that shift.
- If the candidate is on a shift for any day, they see the shift(s), rather than the availability
The Advanced Availability screen allows the same functionality as the weekly view, but for the date range and weekly pattern.
Infinity Candidate Page
The candidate’s Temp Calendar in Infinity is updated when the candidate adds availability / unavailability on the Portal.
- When a candidate is marked as available for a shift, availability is added to their Temp calendar using the times configured in the Portal Administration screen
- When a candidate is marked as unavailable, unavailability is added to their temp calendar using the times configured in the Portal Administration screen
- If the candidate adds Availability for any shift, any unavailability that starts on the day the availability starts is removed
- If the candidate adds Unavailability for any day, any availability that starts on the day the unavailability starts is removed
- When a candidate is marked as unknown, all availability and unavailability is removed from their temp calendar which starts on the day the unavailability starts
- If a candidate has been marked as available for multiple shifts, and some (not all) of them are unmarked, the unmarked shifts are removed from their Temp Calendar. No other availability / placement shifts are changed.
Enhancement 131545 Portal - URL increased to 255 characters
Form and Info Document URLs can now be up to 255 characters.
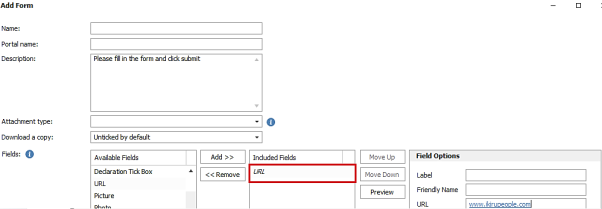
Form and Info Documents created prior to this version, continue to work in the new version.
Enhancement 131443 Portal – candidate rail fields added
Infinity Administration
On databases enabled for Rail, in Administration / General Settings / Portal tab candidate rail fields are available to add to a form.
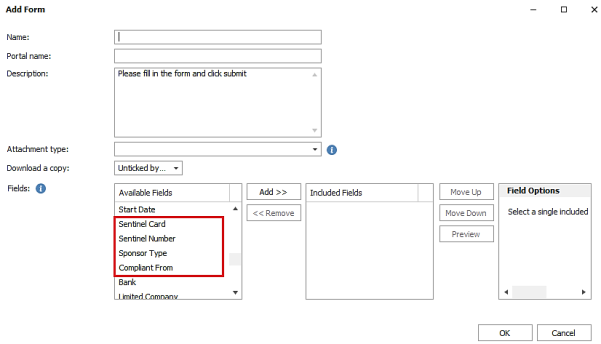
The following fields can be added:
- Sentinel Card
- Sentinel Number
- Sponsor Type
- Compliant From - can only be added, if sponsor type is added (check is done on document save)
Each field can be set as mandatory.
Each field is a separate item in the list of fields, so that instructions/notes can be added in between if required.
The fields are visible on the PDF.
If they are already on an application form and Rail is disabled, the form is not changed.
Portal
The candidate can populate these field on the Portal.
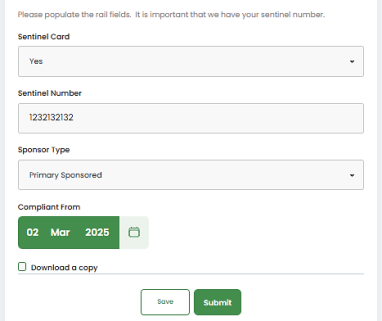
- Sentinel Card is a drop down yes/no value
- Sentinel Number is max 10 digits
- Sponsor type has a fixed drop-down list of options
- Compliant From - enables only when the sponsor type is entered.
- The Date drop down list is ordered with the latest at top
- The Date drop down displays a date range from one year in future, to 50 years in past.
If they are configured as mandatory, the candidate must populate them before the form can be submitted.
Verify
The consultant can verify the fields and add them to the candidate page.
Users require the permission ‘RailSetSponsorFields’ to set the ‘Sponsor Type’ and ‘Compliant from’ fields if those fields exist in the form, even if they are empty.
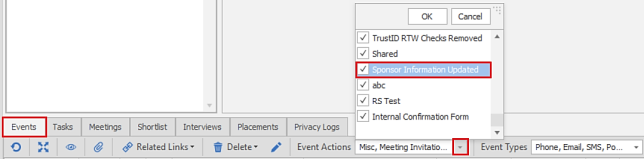
All changes to the ‘Sponsor type’ and ‘Compliant from’ are logged as an ‘Info’ event on the candidate page that cannot be deleted. (Sponsor Information Updated).
If a form is created, and then rail disabled, the form will still verify without issue (even though the fields will not be visible on the candidate page).
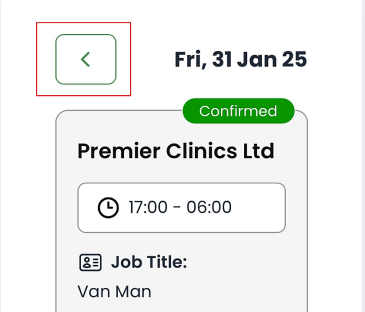
Enhancement 131627 Portal - candidate returned to same shift after viewing
On the Availability calendar, after clicking a shift and then clicking 'back', the candidate is taken back to the selected shift.
Enhancement 131667 Portal - open problem Q&C and CV docs
There is a way for the document to be opened outside of Infinity, if it has failed.
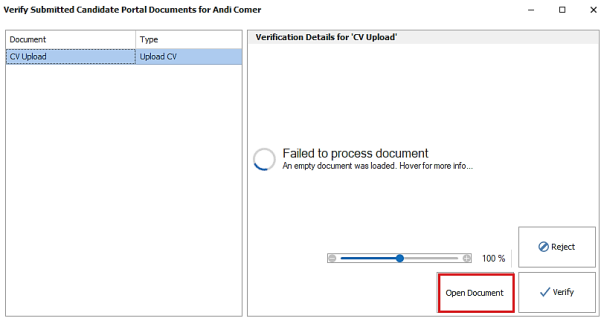
This is relevant to Q&C and CV upload documents if corrupted or password protected.
Clicking ‘Open Document’ will download the document to the local machine and attempt to open it.
Enhancement 131831 Portal - conditional question fields on forms
Infinity Portal Administration
In Administration / General Settings / Candidate Portal tab / Add Form menu, forms can be built with conditional questions, so that multiple fields can be skipped, based on the answer to a question.
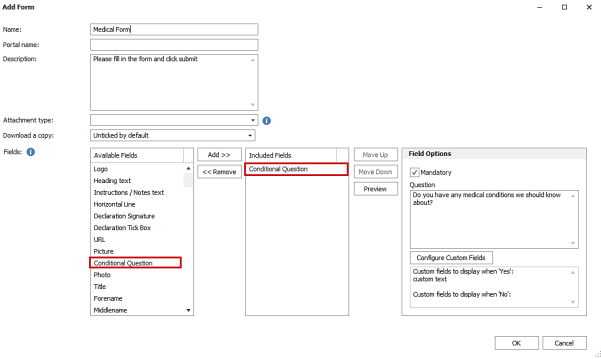
In the ‘Field Options’ screen, the conditional question can be set as mandatory if required and the question can be 500 characters maximum.
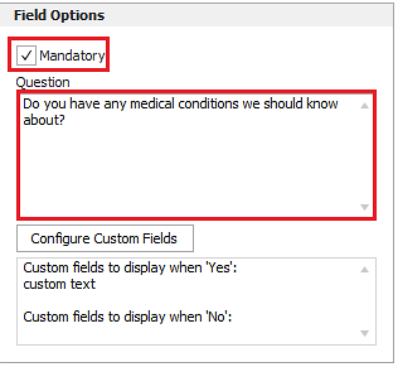
Custom fields that are required for the conditional question are configured by clicking the ‘Configure Custom Fields’ button.
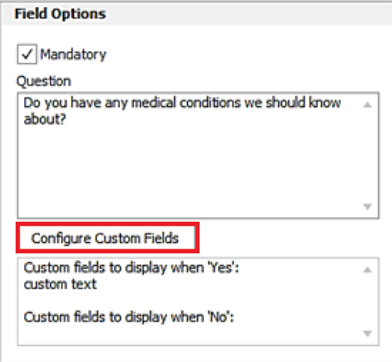
This displays the ‘Conditional Fields Selection’ screen.
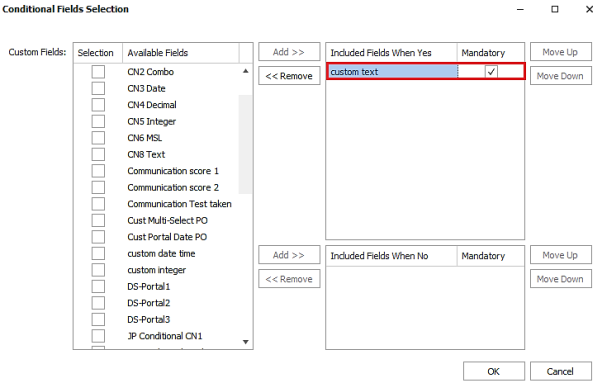
- Custom fields can be added for when the candidate answers ‘Yes’ and / or ‘No’ to the question
- Each field that appears based on the condition can be set to mandatory if required
- A custom field can only be added once to a form
Candidate Portal
The question is displayed, and the custom fields are displayed as configured depending on whether the candidate answered ‘Yes’ or ‘No’.
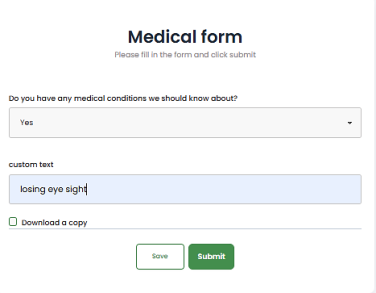
- If they swap between yes/no, the appropriate custom fields are displayed.
- Some yes/no answers may not have additional fields.
- Fields that appear based on the question, can be mandatory (as per the admin setting)
- They are only mandatory, if they are visible based on the answer to the question.
- The PDF displays all the relevant questions and answers i.e. if they aren't shown to the candidate, they're not on the pdf.
Infinity Verification
- If the custom fields are on the candidate page, the fields are populated
- If the custom fields are Portal only, the answers only appear on the pdf document
Enhancement 131841 Portal – reference number field added to Quals & Certs
Infinity Portal Administration
In Administration / General Settings / Candidate Portal tab, Quals & Certs 'Reference Number' field can be configured as 'required' in documents.
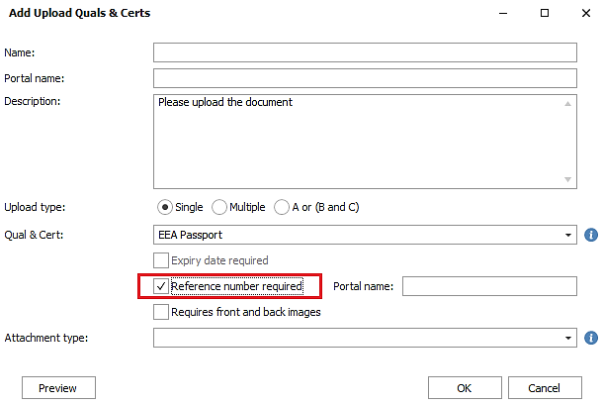
The field defaults to off and is available in the following documents only and is not relevant for multiple:
- 'Single Upload Quals & Certs' document
- 'A or B &C' Upload Quals & Certs' document per quals & cert
The field can have a different 'Portal name' compared to the field name in Infinity. If a portal name is not populated the infinity name is used.
It cannot be edited once the document has been allocated to a candidate.
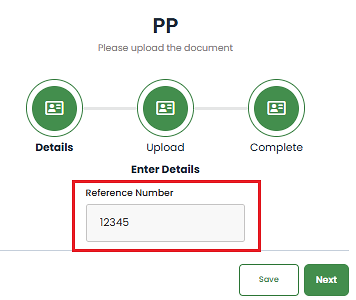
Candidate Portal
If configured, the candidate must populate this field when uploading the Quals & Cert document.
Infinity Verification
- When the document is verified the 'Reference No. field is populated against the relevant Qual & Cert on the candidate page.
- The document can be rejected and then verified.
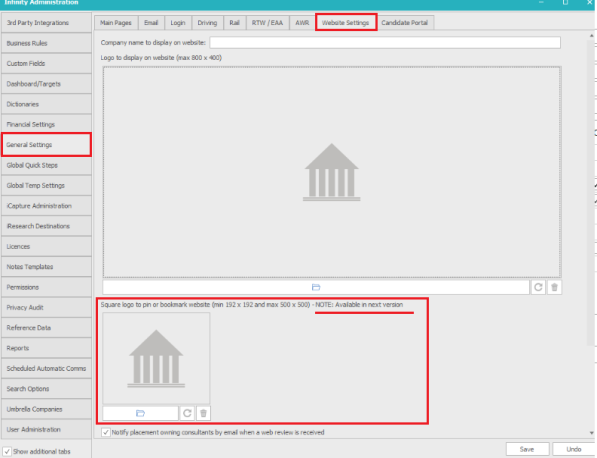
Enhancement 131874 Portal - new logo for pining the home page on a mobile
Note: this setting is for use in the next version of the Portal and there is a note on screen. If configured now it will not show. Functionality continues to work as per previous versions.
In Administration / General Settings / Website Settings tab, there is a new field to store a square logo that is used when pinning the Portal website on a mobile.
Enhancement 120546 - Infinity Rail
Overview
The Infinity rail module is available from Infinity 4.95 onwards and is a chargeable extra. If you are interested in this functionality, please contact your account manager.
Enabling Rail functionality
There is a tick box in the Administration screen to enable ‘Rail’ functionality on the Infinity database.
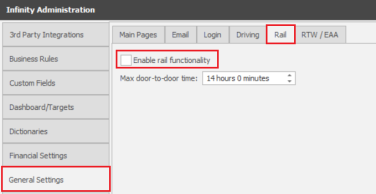
This enables:
- 'Rail' tab on the Candidate page
- ‘Rail’ tab on the Company page
- ‘Rail’ tab on the Location page
- ‘Rail tab on the Job page
- ‘Approval Log’ menu item on the placement page
- ‘Rail Compliance Checks’ in the administration screen.
Candidate page fields
Existing users must tick the ‘Rail’ option in the ‘Show the following tabs’ section of the ‘User Options’ screen, for the Rail tab to be visible.
For new users it will be ticked as default.
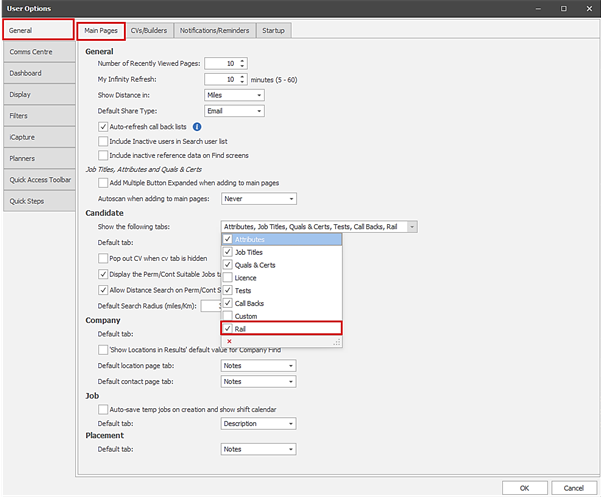
On the candidate page, the rail tab shows the ‘Sentinel’ and ‘Sponsor type’ fields.
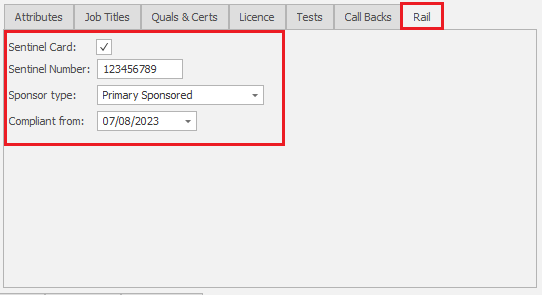
User can tick if a candidate has a Sentinel card.
User can enter a Sentinel number (Max 10 digits).
The Sentinel number is sent to Mid-Office, if configured on the Infinity database.
‘Sponsor type’ has 5 options:
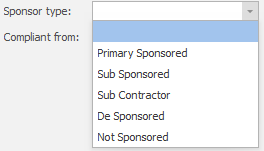
Primary Sponsored = Candidate is Primary Sponsored.
Sub Sponsored = Candidate is Primary Sponsored by another company, and you have their authorisation to place them on specific shifts.
Sub Contractor = Candidates are supplied on a sub-contractor basis by another company. A dummy candidate is created in Infinity.
De Sponsored = Candidate was formerly Primary Sponsored, but sponsorship has been removed.
Not Sponsored = Candidate does not have any sponsorship.
‘Compliant from’ enables only when the sponsor type is entered.
Users require the permission ‘RailSetSponsorFields’ to set the ‘Sponsor Type’ and ‘Compliant from’ fields.
No permissions are required to edit ‘Sentinel card’ and ‘Sentinel Number’.
All changes to the ‘Sponsor type’ and ‘Compliant from’ are logged as an ‘Info’ event on the candidate page that cannot be deleted.
Changes to ‘Sentinel Card’ and ‘Sentinel Number’ are not logged.

Users must add this event action to their ‘Event Actions’ filter to view these events.
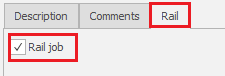
Job page fields
On the Job page the ‘Rail job’ tick box indicates whether it’s a rail job or not. Rail jobs need to be identified so rail-related temp compliance checks can run.
Users require the permission ‘RailEditJobRailSetting’ to change the ‘Rail job’ field.
Company page fields
On the Company page the ‘Rail job’ field can be defaulted per company.
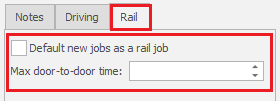
Users require the permission ‘RailEditCompanyLocationFields’ to change the ‘Rail job’ defaults, and the ‘Max door-to-door time’.
Location page fields
On the Location page, the ‘Rail job’ field can be defaulted per location, which overrides the company default.
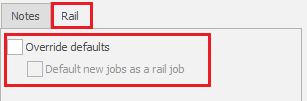
The company default is shown until the user ticks the ‘Override defaults’ tick box and sets the required value for that location.
Users require the permission ‘RailEditCompanyLocationFields’ to change the ‘Rail job’ defaults.
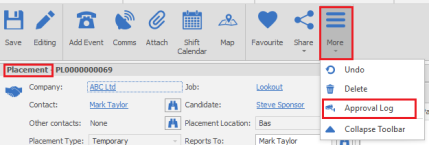
Placement page fields
On the Placement page, the ‘Approval Log’ menu item, displays a log of any Compliance Checks, that require approval if they fail.
Setting the rail tab as default
You can set Infinity to view the Rail tab by default when the candidate, company, location, or job pages are opened.

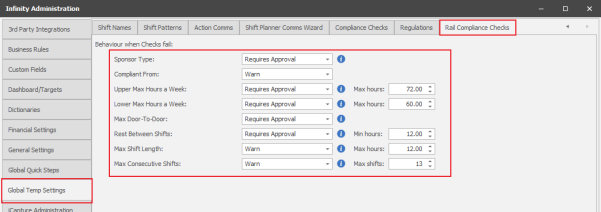
Rail Compliance Checks Overview
Rail specific compliance checks can be enabled in the Administration screen.
- They run for Temp Jobs only.
- They run for jobs ticked as ‘Rail Job’ on the ‘Rail’ tab of the job.
- They are off by default.
- The ‘i’ icon after each check provides further details.
- All methods of placing a candidate on a Temp Job run the checks.
Some of the Rail Compliance Checks have ‘Off / Warn / Prevent’ options, in a similar way to the Non-Rail Compliance Checks.
- Warn – allows candidates who fail the check to be placed (subject to any permissions required).
- Prevent – does not allow candidates who fail the check to be placed.
Some of the Rail Compliance Checks have ‘Off / Requires Approval’ options, which is new functionality.
- Requires approval – If a candidate fails the check, the user is warned, and an additional ‘Approval’ process is run before the candidate can be placed.
- Candidate who pass the check, do not require the ‘Approval’ process.
- The additional ‘Approval’ process is specific to the check being run.
- All approvals are stored in the Approval Log on the placement page.
- An Approval report lists all Approvals within a specific date range.
- Bulk Placing and Extending does not allow the placing of candidates who fail the check and require Approval.
- The Door-to-Door check is slightly different from the other checks, because a check that initially fails can be changed to a check that passes (subject to permissions) e.g. because they are staying in accommodation.
- Door-to-Door checks that initially fail are included in the approval log, even if they are changed to pass.
The default settings are:
- Upper Max Hours a Week = 72 hours
- Lower Max Hours a Week = 60 hours
- Rest Between Shifts = 12 hours
- Max Shift Length = 12 hours
- Max Consecutive Shifts = 13 shifts
For ease, this document will assume that the default settings are used.
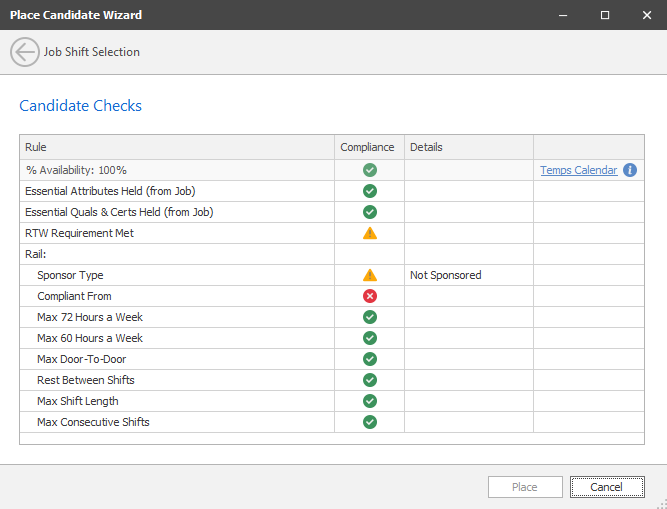
When the candidate is placed, the Checks screen indicates if they pass the check  , have a warning
  , or are prevented
  from being placed.
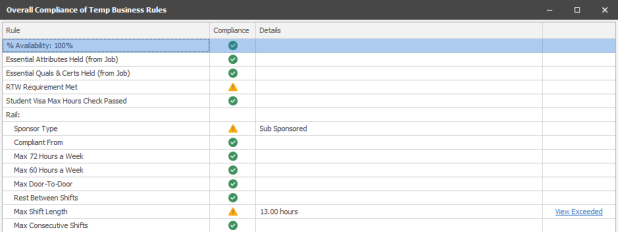
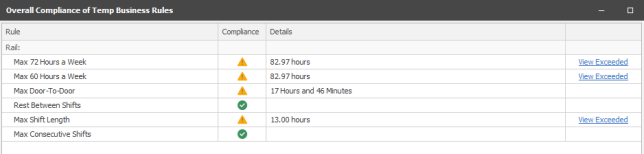
From the Shift Planner results tooltip, double-clicking in the ‘Overall compliance’ column, displays all failure details:
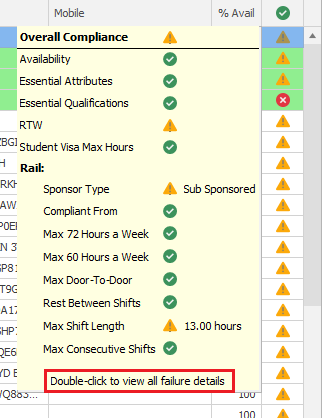
This allows you to view the ‘View Exceeded’ options, so you can see the details of the checks that have failed prior to placing the candidate.
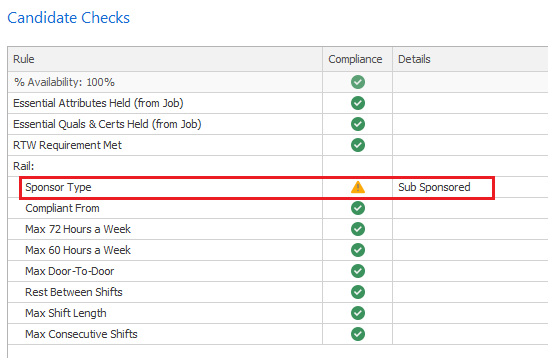
‘Sponsor Type’ temp compliance check
When placing/extending a candidate on shifts on temp rail jobs, with the ‘sponsor type’ check enabled, the candidate’s ‘Sponsor type is checked.
Primary Sponsored Candidates
- Primary Sponsored Candidates pass the check and do not require approval.
Sub Sponsored Candidates
- Sub Sponsored Candidates fail the check with a warning and require approval.
- Only users with permission ‘RailPlaceSubSponsoredCandidate’ can approve a ‘Sub Sponsored’ candidate.
- Users without permission will fail the check with the reason ‘Requires permission to place Sub Sponsored candidates’, and the candidate is prevented from being placed.
- Users with permission will be warned with the reason ‘Sub Sponsored’ and can place the candidate if they complete the Approval process.
- Bulk Placing and Extending does not allow the placing of candidates who fail the check and require Approval.
Not Sponsored Candidates
- Not Sponsored Candidates fail the check with a warning and require approval.
- Only users with permission ‘RailPlaceNotSponsoredCandidate’ can approve a ‘Not Sponsored’ candidate.
- Users without permission will fail the check with the reason ‘Requires permission to place Not Sponsored candidates’, and the candidate is prevented from being placed.
- Users with permission will be warned with the reason ‘Not Sponsored’ and can place the candidate if they complete the Approval process.
- Bulk Placing and Extending does not allow the placing of candidates who fail the check and require Approval.
Sub Contractor
- Sub Contractor Candidates pass the check and do not require approval.
De Sponsored
- De Sponsored Candidates fail the check and are prevented from being placed.
Candidates with a blank sponsor type
- Candidates with a blank sponsor type fail the check and are prevented from being placed. The reason given is ‘Sponsor Type is blank’.
When the user places a Sub Sponsored or Not Sponsored candidate, the ‘Sponsor Type Approval’ window is displayed, and the user must confirm ‘Yes’.
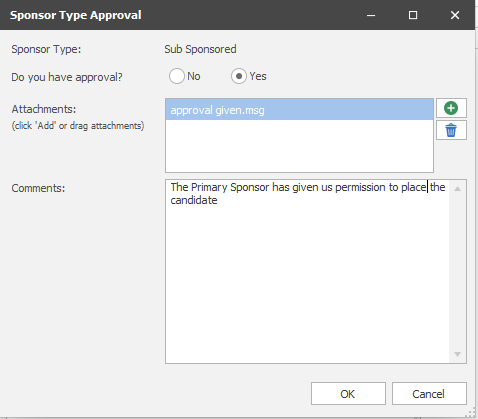
- The user must add at least one attachment.
- The user can either browse to a file or drag and drop.
- The user can optionally add comments.
- A copy of the details is stored in the ‘Approval Log (See ‘Approval Log’ section below)
‘Compliant From’ temp compliance check
When placing/extending a candidate on shifts on temp rail jobs, with the ‘Complaint from’ check enabled, the candidate’s ‘Compliant from’, date is checked.
The ‘Compliant From’ date is the date the sponsor type was confirmed as compliant.
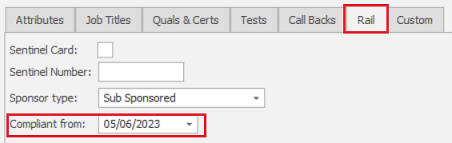
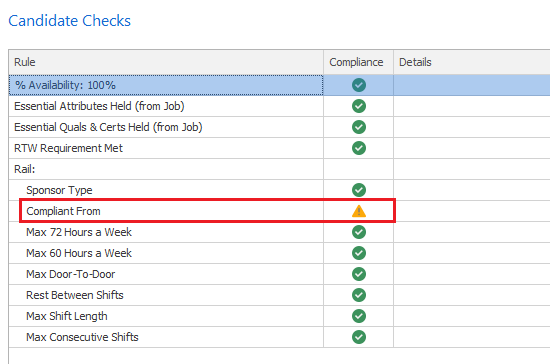
- To pass the check, the ‘earliest shift’ that they are being placed on must be on or after the candidate’s Compliant From’ date.
- If the check fails, and is configured in the administration screen to warn, the candidate can be placed.
- If the check fails, and is configured in the administration screen to prevent, the candidate cannot be placed.
- A blank ‘Compliant From’ date will fail the check.
‘Max 60 & 72 hours a week’ temp compliance checks
When placing/extending a candidate on shifts on temp rail jobs, with the ‘Upper Max Hours a Week’ and/or ‘Lower Max Hours a Week’ checks enabled, the candidate’s ‘Hours per week’ is checked.
- By Default, the ‘Upper Max Hours a Week’ check is 72 hours.
- By Default, the ‘Lower Max Hours a Week’ check is 60 hours.
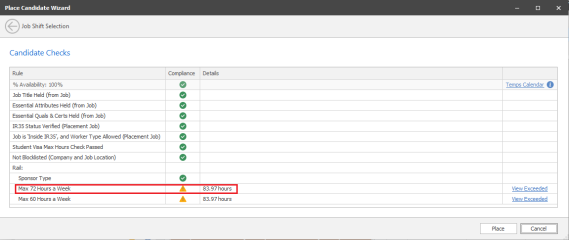
- Candidate who work more than 60 hours in any of the weeks they are being placed on, fail the check with a warning and require approval.
- Candidates who work up to a maximum of 60 hours in any of the weeks they are being placed on, pass the ‘Max 60 Hours a Week’ check, and do not require approval.
- Candidates who work more than 72 hours in any of the weeks they are being placed on, fail the check with a warning and require approval.
- Candidates who work up to a maximum of 72 hours in any of the weeks they are being placed on, pass the ‘Max 72 Hours a Week’ check, and do not require approval.
- If both ‘Max 72 Hours a Week’ and ‘Max 60 Hours a Week’ checks are enabled, only one Approval process will run.
- If the candidate fails the 60 hours a week check, but passes the 72 hours a week check, the 60 hours a week Approval process is run.
- If the candidate fails both checks, the 72 hours a week Approval process is run.
- Only users with permission ‘RailPlaceOverUpperHoursAWeek’ can approve a candidate who fails the 72 Hours a Week check.
- Only users with permission ‘RailPlaceOverLowerHoursAWeek’ can approve a candidate who fails the 60 Hours a Week check.
- Users without permission will fail the check with the reason ‘Requires permission to place candidate for x hours’ (x is the calculated hours/week), and the candidate is prevented from being placed.
- Users with permission will be warned with the ‘calculated hours per week’ displayed and can place the candidate if they complete the Approval process.
- Bulk Placing and Extending does not allow the placing of candidates who fail the check and require Approval.
When the user places a candidate who fails the check, the ‘Max x Hours Approval’ window is displayed, and the user must confirm ‘Yes’. (Example below is for ‘Max 72 Hours Approval’)

- The user must add at least one attachment.
- The user can either browse to a file or drag and drop.
- The user can optionally add comments.
- A copy of the details is stored in the ‘Approval Log (See ‘Approval Log’ section below)
- The ‘view exceeded’ hyperlink, displays the ‘7 Day Periods’ that exceed 60/72 hours a week.
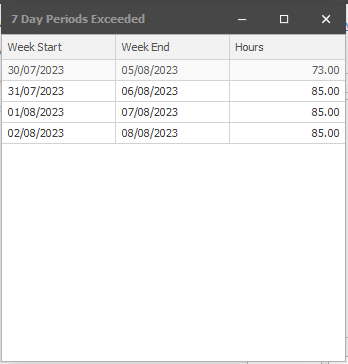
How ‘Hours Per Week’ is calculated
When a candidate is placed on one shift, a check is done, for every 7-day period that the shift is in.
- All calculations are midnight to midnight.
- The calculation includes ALL shifts for the candidate including the ones they’re being placed on.
- ‘Other work’ is also included in the check. (Other work is an entry that can be added to the candidates’ calendar to indicate they are working through another company e.g. They are sub-sponsored to another agency for some shifts.)
- If part of a shift is in the week, then only the hours within the week are used.
Example 1: If a candidate is placed 9.00am to 9.00pm on Friday 21st Oct the following checks are done
- Sat 15 – Fri 21 Oct
- Sun 16 – Sat 22 Oct
- Mon 17 – Sun 23 Oct
- Tue 18 – Mon 24 Oct
- Wed 19 – Tue 25 Oct
- Thu 20 – Wed 26 Oct
- Fri 21 – Thu 27 Oct
Example 2: If a candidate is placed overnight 9.00pm on Friday 21st Oct to 9.00 am on Saturday 22nd Oct, the following checks are done
- Sat 15 – Fri 21 Oct
- Sun 16 – Sat 22 Oct
- Mon 17 – Sun 23 Oct
- Tue 18 – Mon 24 Oct
- Wed 19 – Tue 25 Oct
- Thu 20 – Wed 26 Oct
- Fri 21 – Thu 27 Oct
- Sat 22 – Fri 28 Oct
Example 3: If a candidate was placed on 5 consecutive Shifts 9.00am to 9.00pm on Friday 21st Oct to Tuesday 25th Oct, the following checks are done
- Sat 15 – Fri 21 Oct
- Sun 16 – Sat 22 Oct
- Mon 17 – Sun 23 Oct
- Tue 18 – Mon 24 Oct
- Wed 19 – Tue 25 Oct
- Thu 20 – Wed 26 Oct
- Fri 21 – Thu 27 Oct
- Sat 22 – Fri 28 Oct
- Sun 23 – Sat 29 Oct
- Mon 24 – Sun 30 Oct
- Tue 25 – Mon 31 Oct
Example 4: If a candidate was placed on Non-consecutive Shifts, for each shift the checks as per Example 1 are run.
- If the consecutive shifts are within the same week, only one check on each day is required.
‘Max Door-to-Door’ temp compliance check
When placing/extending a candidate on shifts on temp rail jobs, with the ‘Max Door-to-Door’ check enabled, the candidate’s Door-to-Door time is checked.

- Candidate whose Door-to-Door time is over the allowed maximum, fail the check with a warning and require approval.
- Candidates whose Door-to-Door time is equal or lower than the allowed maximum, pass the check, and do not require approval.
- If the candidate and/or job doesn’t have a valid address, the check fails, and requires approval.
- Only users with permission ‘RailPlaceOverMaxDoorToDoor’ can approve a candidate who fails the check.
- Users without permission will not be able to Approve the candidate if they fail the check.
- Users without permission will be taken into the approval screen, as there are scenarios where a candidate who initially fails can then go on to pass e.g., candidates/ jobs without a valid address.
- Users with permission will be warned with the ‘calculated Max Door-to-Door’ displayed and can place the candidate if they complete the Approval process.
- Bulk Placing and Extending does not allow the placing of candidates who fail the check and require Approval.
- ‘Travel Time’ can only be calculated on databases that have the Mapping Feature. (To receive the Mapping Feature, all users must have either a Distance Search or Address Lookup licence).
- Databases without the Mapping Feature will not be able to enable the ‘Max Door-to-Door’ check.
When the user places a candidate who fails the check, the ‘Max Door-to-Door Approval’ window is displayed, and the user must confirm ‘Yes’.
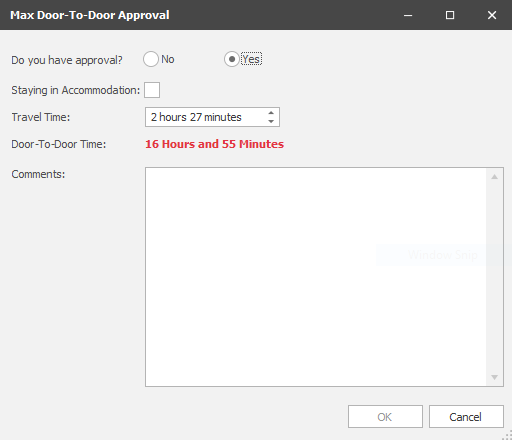
- Users with the ‘RailPlaceEditAccommodation’ permission can edit the ‘Staying in Accommodation’ tick box.
- Users with the ‘RailPlaceEditTravelTime’ permission can edit the Travel time.
- The user must add comments.
- When the Door-to-Door time is greater than the ‘Max Door-to-Door time’, the Door-to-Door time is displayed red and bold.
- The Door-to-Door time is recalculated when ‘Staying in Accommodation’ or ‘Travel Time’ are edited.
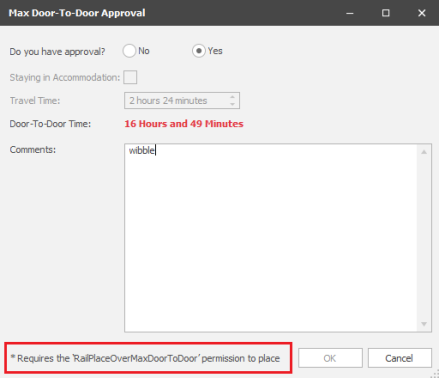
- Only users with permission ‘RailPlaceOverMaxDoorToDoor’ can approve a candidate whose ‘Door-to-Door time’ is greater than the ‘Max Door-to-Door time’.
- If the candidate and/or job doesn’t have a valid address, users with the ‘RailPlaceEditTravelTime’ permission can manually enter/edit the travel time.
- A copy of the details is stored in the ‘Approval Log’ every time the Approval screen is populated. (See ‘Approval Log’ section below)
- Travel Time is stored in the database for candidates who pass the Door-to-Door check, to allow for reporting.
- When extending a placement, the Approval details need to be re-entered, and no previously entered information is re-loaded.
- Users without the ‘RailPlaceOverMaxDoorToDoor’ permission cannot place a candidate if the ‘Door-to-Door time’ continues to be over the ‘Max Door-to-Door time’, when the Approval screen has been populated:
How ‘Door-to-Door time’ is calculated
- ‘Door-to-door time’ is calculated as follows:
- (travel time * 2) + longest shift (all shifts on the placement inc. those being placed on)
- ‘travel time’ is automatically calculated from the candidates’ home address to the jobs location address when travelling by car.
- A ‘Staying in Accommodation’ tick box allows the user to indicate that the candidate will not be travelling to and from site each day.
- When ‘Staying in Accommodation’ is un-ticked, ‘Door-to-door time’ = (travel time * 2) +longest shift (all shifts on the placement inc. those being placed on)
- When ‘Staying in Accommodation’ is ticked, ‘Door-to-door time’ = travel time
- ‘Staying in Accommodation’ is un-ticked by default.
How ‘Max Door-to-Door time’ is calculated
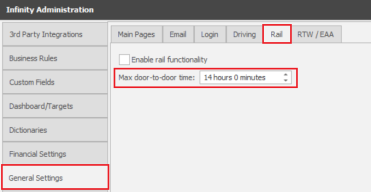
‘Max Door-to-Door time’ can be configured globally, and defaults to 14 hours:
- Only Database Managers can change this setting.
‘Max Door-to-Door time’ can also be configured per client:
- The permission ‘RailEditCompanyLocationFields' is required to edit the company level field.
‘Max door-to-door time’:
- Is taken from the ‘Per Client’ setting.
- If ‘Per Client’ is blank, the ‘global’ setting is used.
‘Rest between shifts of less than 12 hours’ temp compliance check
When placing/extending a candidate on shifts on temp rail jobs, with the ‘Rest Between Shifts’ check enabled, the candidate’s Rest Between Shifts is checked.
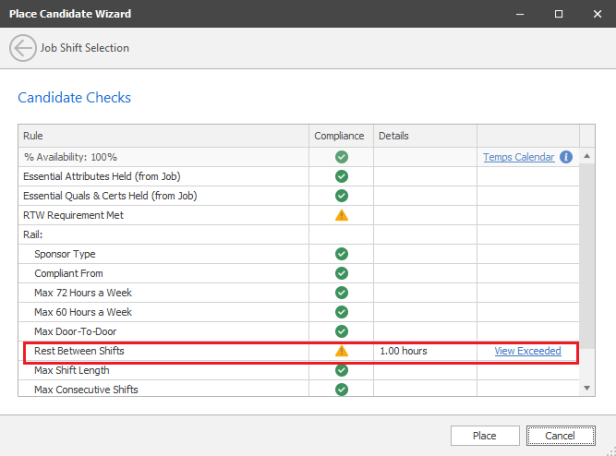
- Candidates whose Rest Between Shifts is less than 12 hours fail the check with a warning and require approval.
- Candidates whose Rest Between Shifts is 12 hours or more, pass the check and do not require approval.
- Only users with permission ‘RailPlaceOverMaxRestBetweenShifts’ can approve a candidate who has less than 12 hours rest.
- Users without permission will fail the check with the reason ‘Requires permission to place for x hours rest between shifts’, and the candidate is prevented from being placed.
- Users with permission will be warned with the ‘Calculated Rest Between Shifts’ displayed and can place the candidate if they complete the Approval process.
- Bulk Placing and Extending does not allow the placing of candidates who fail the check and require Approval.
When the user places a candidate who fails the ‘Rest Between Shifts’ check, the ‘Rest Between Shifts Approval’ window is displayed, and the user must confirm ‘Yes’.
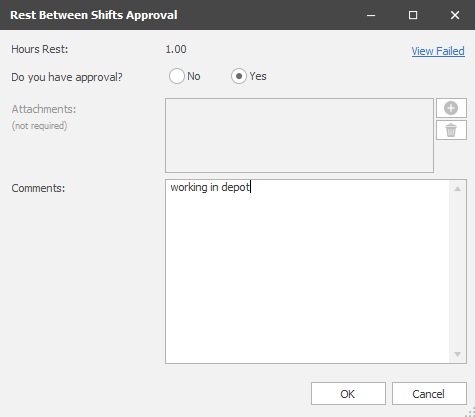
- The user must add comments
- A copy of the details is stored in the ‘Approval Log’ (See ‘Approval Log’ section below)
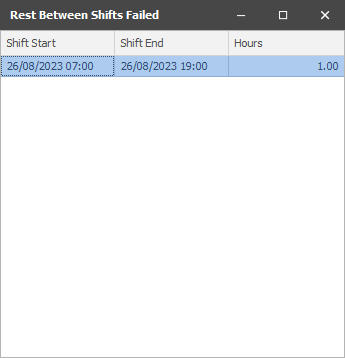
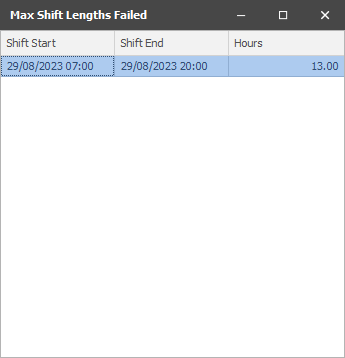
- The ‘View Failed’ hyperlink, displays the shifts that do not have sufficient rest before and/or after them
- The ‘Hours’ column displays the shortest time (either before or after)
How ‘Rest Between Shifts’ is calculated
- There must be 12 hours immediately before the shift where the candidate is not working.
- Shifts and Other work are used by this check.
- There must be 12 hours immediately after the shift where the candidate is not working.
- Shift and Other work are used by this check.
- All shifts being placed on are checked.
‘Shift longer than 12 hours’ temp compliance check
When placing/extending a candidate on shifts on temp rail jobs, with the ‘Shift Longer than 12 hours’ check enabled, the shift lengths are checked.
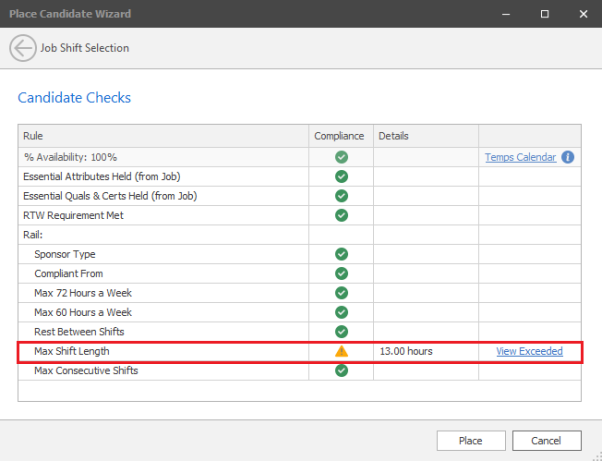
- To pass the check, all the Shifts that they are being placed on must not be longer than 12 hours.
- If the check fails, and is configured in the administration screen to warn, the candidate can be placed, if the user has permission.
- Users require the ‘RailPlaceOverMaxShiftLength’ permission to place a candidate who fails the check.
- Users without permission will fail the check with the reason ‘Requires permission to place a shift for x hours’, and the candidate is prevented from being placed.
- Users with permission will be warned with the ‘Max Hours per Shift’ displayed and can place the candidate.
- If the check fails, and is configured in the administration screen to prevent, the candidate cannot be placed.
- No approval is required.
The ‘View Exceeded’ hyperlink, displays the shifts that are greater than 12 hours.
‘Max 13 consecutive shifts’ temp compliance check
When placing/extending a candidate on shifts on temp rail jobs, with the ‘Max 13 Consecutive Shifts’ check enabled, the number of consecutive shifts is counted.
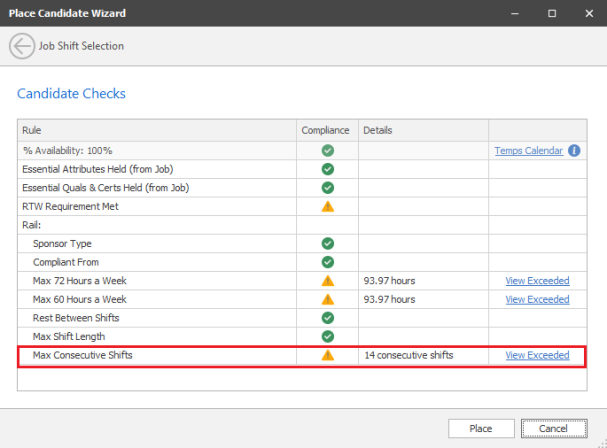
- To pass the check, all the Shifts that they are being placed on must not allow the candidate to work more than 13 consecutive shifts, days or nights.
- If the check fails, and is configured in the administration screen to warn, the candidate can be placed, if the user has permission.
- Users require the ‘RailPlaceOverMaxConsecutiveShifts’ permission to place a candidate who fails the check.
- Users without permission will fail the check with the reason ‘Requires permission to place for x consecutive shifts’, and the candidate is prevented from being placed.
- Users with permission will be warned with the ‘x consecutive shifts’ displayed and can place the candidate.
- If the check fails, and is configured in the administration screen to prevent, the candidate cannot be placed.
- No approval is required.
The ‘View Exceeded’ hyperlink, displays the continuous shifts that are greater than 13.

How ‘Consecutive Shifts’ are calculated
- Shifts are deemed consecutive if there are less than 24 hours between them
- More than 13 consecutive day shifts fail the check
- More than 13 consecutive night shifts fail the check
- Example 1 (Day Shifts):
- The following series of shifts will pass the check.
- If another shift is added 24 hours or less before the first shift, or 24 hours or less after the last shift, the check will fail
- Sat 15 Oct – 7am – 7pm
- Sun 16 Oct – 7am – 7pm
- Mon 17 Oct – 7am – 7pm
- Tue 18 Oct – 7am – 7pm
- Wed 19 Oct – 7am – 7pm
- Thu 20 Oct – 7am – 7pm
- Fri 21 Oct – 7am – 7pm
- Sat 22 Oct – 7am – 7pm
- Sun 23 Oct – 7am – 7pm
- Mon 24 Oct – 7am – 7pm
- Tue 25 Oct – 7am – 7pm
- Wed 26 Oct – 7am – 7pm
- Thu 27 Oct – 7am – 7pm
- Example 2 (Night Shifts):
- The following series of shifts will pass the check.
- If another shift is added 24 hours or less before the first shift, or 24 hours or less after the last shift, the check will fail
- Sat 15 Oct 10pm – Sun 16 Oct 6am
- Sun 16 Oct 10pm – Mon 17 Oct 6am
- Mon 17 Oct 10pm – Tue 18 Oct 6am
- Tue 18 Oct 10pm – Wed 19 Oct 6am
- Wed 19 Oct 10pm – Thu 20 Oct 6am
- Thu 20 Oct 10pm – Fri 21 Oct 6am
- Fri 21 Oct 10pm – Sat 22 Oct 6am
- Sun 23 Oct 1am – Sun 23 Oct 6am – Note: This shift starts after midnight
- Mon 24 Oct 1am – Mon 24 Oct 6am – Note: This shift starts after midnight
- Tue 25 Oct 1am – Tue 25 Oct 6am – Note: This shift starts after midnight
- Tue 25 Oct 10pm – Wed 26 Oct 6am
- Wed 26 Oct 10pm – Thu 27 Oct 6am
- Thu 27 Oct 10pm – Fri 28 Oct 6am
- Note: Some night shifts start before midnight and some start after midnight. They are all consecutive night shifts.
- All shifts being placed on, and existing shifts are included in the check
- ‘Other work’ is also included in the check
Editing Placement Shift Times runs the relevant Temp Compliance Checks
When you ‘Edit Placement Shift Times’

The following Rail Temp Compliance Checks re-run:
- Max 72 hours a week
- Max 60 hours a week
- Max Door-to-door
- Rest Between Shifts
- Max Shift Length
- Max Consecutive Shifts
Users require the 'OverrideEditShiftTimeWarnings' permission to place a candidate who fails the check with a warning.
This permission is off for all users by default.
When set to Warn and checks fail, approval is required for the following checks:
- Max 72 hours a week
- Max 60 hours a week
- Max Door-to-door
- Rest Between Shifts
When set to prevent and checks fail, shift times cannot be edited.
Approval Log
All approvals are stored in the Approval Log on the placement page.
- The approval log is not editable
- There could be more than one set of data with the same approval type per placement e.g., if a placement is extended
- There could be more than one entry per ‘group of shifts’ being placed on e.g. a sub sponsored candidate who is working more than x hours door-to-door
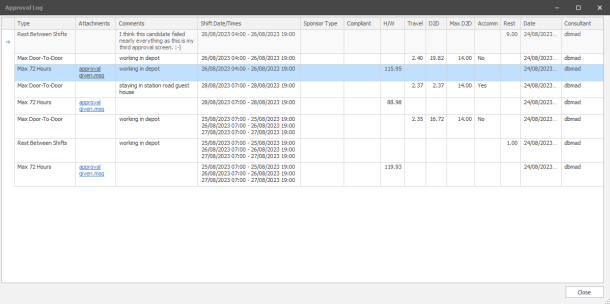
The approval log columns are as follows:
- ‘Type’ - Shows which approval process was run:
- Sponsor Type
- Max 72 Hours
- Max 60 Hours
- Max Door-to-Door
- Rest Between Shifts
- Attachments – Shows the filenames of any attached files
- Clicking on the hyperlink in the ‘Attachments’ column, opens the file
- If multiple files are added, you must select which one you want to open
- Comments – Shows the comments
- ‘Shift Date/Times’ - Shifts they were being placed on when approval was given
- ‘Sponsor Type’ -Candidates Sponsor Type when they were placed, for candidates who fail the Sponsor Type check
- ‘Compliant’ -Candidates Compliant from date when they were placed, for candidates who fail the Sponsor Type check
- ‘H/W’ - ‘Hours per Week’, for candidates who fail the 72 and/or 60 Hours per Week check
- ‘Travel’ - ‘Travel time’, for candidates who initially fail the door-to-door check
- ‘D2D’ - ‘Door-to-Door time’, for candidates who initially fail the door-to-door check
- ‘Max D2D’ -‘Allowed Door-to-Door time’, for candidates who initially fail the door-to-door check
- ‘Accomm’ - ‘Staying in Accommodation’ tick box, for candidates who initially fail the door-to-door check
- The ‘Rest’ column shows the ‘Rest between Shifts’, for candidates who fail the Rest Between Shifts check
- Date - date the candidate was placed on these shifts
- Consultant - the user who placed the candidate on these shifts
Note: The Approval log lists all approval requests that were run when the placement shifts were created. If the Rail Compliance checks were not enabled, or the job wasn’t ticked as a rail job when the placement shifts were created, an entry will not appear in the Approval Log.
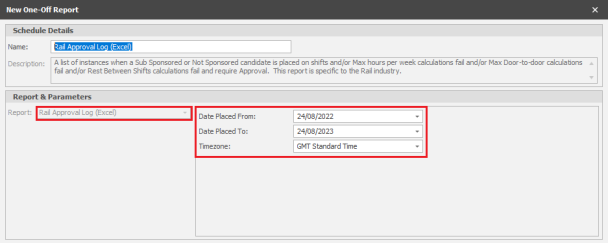
Rail Approval Log Report
The ‘Rail Approval Log’ report is available in the placement folder.
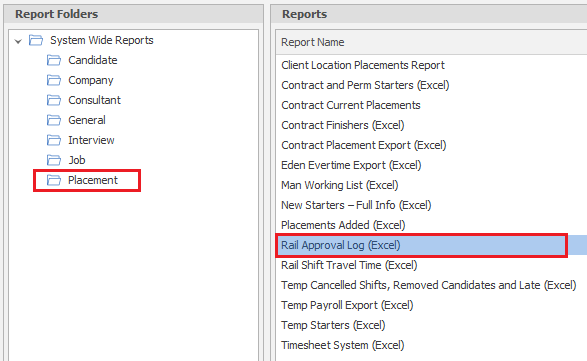
This reports on the data stored in the ‘Approval Log’ of the placement page, with some extra columns.
The date range is the ‘Date placed on shifts’ as displayed in the Approval Log.
The report includes one row for each of the following checks that fail and require approval:
- Sponsor Type
- Max 72 Hours
- Max 60 Hours
- Max Door-to-Door
- Rest Between Shifts
There could be more than one set of data with the same approval type per placement e.g., if a placement is extended.
There could be more than one entry per ‘group of shifts’ being placed on e.g., a sub sponsored candidate who is working more than x hours door-to-door.
The report is ordered by ‘Date Placed on Shifts’ – Oldest first


Note: The Approval log report lists all approval requests that were run when the placement shifts were created. If the Rail Compliance checks were not enabled, or the job wasn’t ticked as a rail job when the placement shifts were created, an entry will not appear in the Approval Log Report.
Working time regulations do not run on Rail Jobs
The working time regulation checks do not run on ‘Rail’ jobs. Maximum weekly working hours, daily rest break, and weekly rest break are configured in Administration / Global Temp Settings / Regulations.
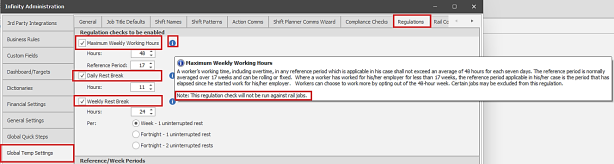
A note has been added to the ‘info’ button against each check.
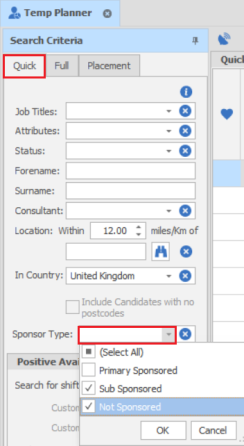
Temp Planner ‘Sponsor Type’ criteria
On Infinity databases configured for ‘Rail’, the Temp Planner can search for candidates with a specific ‘Sponsor Type’. Multiple options can be selected if required.
Rail Searching candidates by Sponsor Type
The Candidate ad-hoc search and re: job search has search criteria for ‘Sponsor Type’ under the ‘Rail’ menu item.
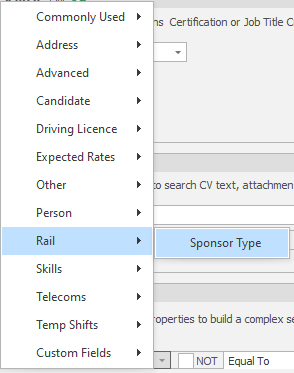
Multiples can be searched using the ‘OR’ option.

Sentinel Number Shift Planner column
The Shift Planner has a new column ‘Sentinel Number’ that is not displayed by default.
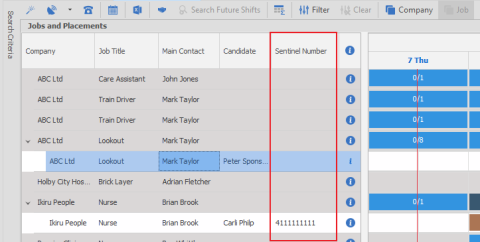
The 'Shift Planner export to excel' includes the ‘Sentinel Number’ if visible
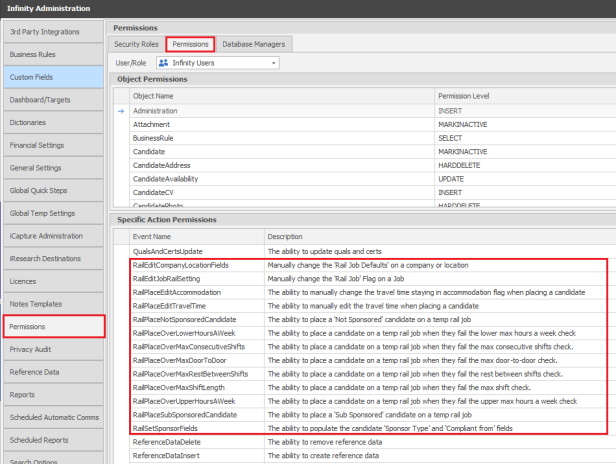
Rail Permissions
All Rail permissions start with the word ‘Rail’, so they are all grouped together.
All Rail permissions are off by default.
The screenshot below lists all the rail permissions and their descriptions:
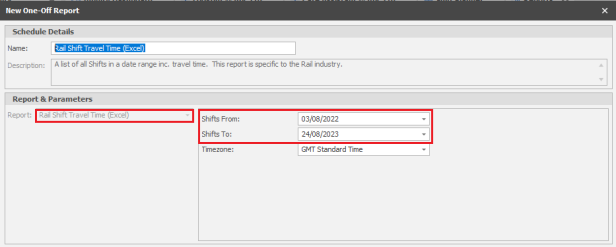
New Rail Shifts Travel Time report
The ‘Rail Shift Travel Time’ report is available in the placement folder.
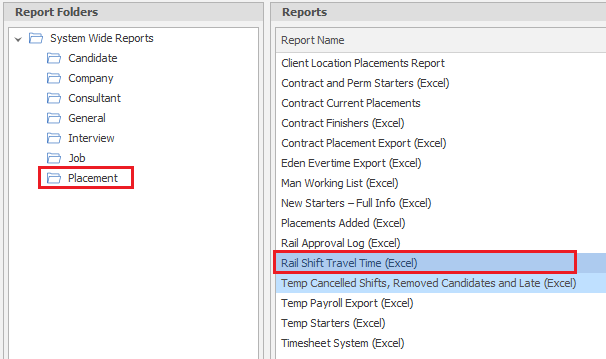
The report lists all Shifts in a date range inc. travel time.
The date range is the ‘Shift Date’.
- There is one row per shift


- Only Rail Jobs are included
- For Shifts that required approval, the Travel time data is taken from the Approval Log
- For Shifts that didn’t require approval, the data is stored in the database when the placement shifts are created
- If multiple PO numbers are stored on the placement page, the PO number that is valid on the ‘Date Placed on Shifts’ is used
- The report is ordered by Shift Start Date/Time, latest first, then Candidate Name
- The following fields are stored in hours/mins in a format that allows calculations to be performed on them in excel if required e.g., averages
- Travel Time
- Total Door-to-Door
- Allowed Door-to-Door
Note: The report lists all shifts for rail jobs in the date range. As the travel time is stored when the placement shifts are created, if the Rail Compliance checks were not enabled, or the job wasn’t ticked as a rail job when the placement shifts were created, no Door-to-Door information will be displayed in the report for those shifts.
New Rail Quals & Certs Report
The ‘Rail Shift Travel Time’ report is available in the candidate folder.
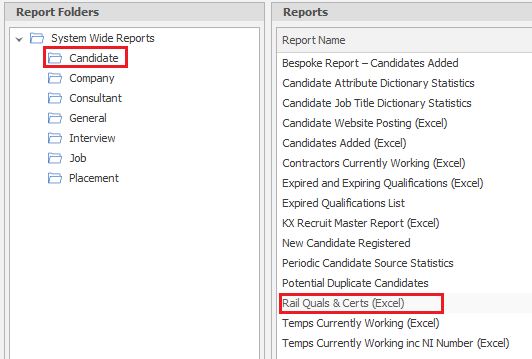
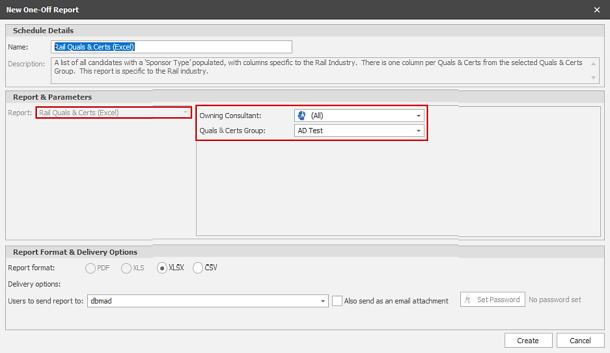
- The report lists all candidates with a ‘Sponsor Type’ populated and includes columns specific to the Rail Industry.
- The Owning Consultant parameter can restrict which candidates are listed
- The ‘Quals & Certs Group’ parameter controls which ‘Quals & Certs’ columns are displayed.
- There is one row per candidate
- There is one column per Quals & Certs from the selected Quals & Certs Group.

- The report is ordered by Candidate Surname, and then by Candidate Forename
- If the candidate has multiple owning consultants, the ‘Owning Consultant’ column lists them all
- The ‘Owning Team’ column displays a list of all the teams that the owning consultants are members of
- Quals & Certs are listed in Alphabetical Order
- Quals & Certs Columns:
- If the candidate does not have the Quals & Certs, the column is blank
- If the candidate does have the Quals & Certs, and the Quals & Certs Expires e.g., Passport, the Expiry date is displayed in the column
If the candidate does have the Quals & Certs, and the Quals & Certs doesn’t expire e.g. Birth Certificate, Yes/No is displayed in the column.
Known Issues
Portal
Changing the reason of an unavailability entry on the Portal creates a duplicate entry in Infinity. This has been fixed in the next version of Infinity as part of the ticket below.
Issue: 132136 – Portal Avail / shift advanced screen should not add availability if it already exists

If you require further assistance please contact Ikiru People using the details published on www.ikirupeople.com
Visit our Customer Portal at https://portal.ikirupeople.com/ for future events and clinics.
If you would like to make suggestions or have found any errors with this Help section please contact our Support team.
Version 4.87
Voyager Software is a brand of Ikiru People Ltd, a subsidiary of Dillistone Group Plc. The group is a leading global provider of software and services that enable recruitment agencies and in-house recruiters to better manage their selection process and address the training needs of individuals. Across its brands – which include Voyager Software (recruitment software UK & Australia), Dillistone FileFinder executive search software, GatedTalent, the global database of the world’s leading executives, Talentis.Global – the next generation of recruitment software and also ISV.Online, provider of online pre-employment skills testing and training tools. Dillistone Group serves thousands of clients worldwide. Ikiru People Ltd: Registration Number 02043300. Registered in England & Wales.
 |  |  |  |