Voyager Infinity – Release Notes
Version: 4.119
Release Date: 18th October 2024
What have we released?
- Infinity 4.119 has been released
Release overview
Here’s a snapshot of what we’ve delivered in this release:
- Integrated Data Services (SaaS Only) search people / companies on the internet and download
- Database wide option to search for skills at contact level only
- Multi-factor authentication (MFA) by email
Feedback please
We are continuously looking to improve Voyager Infinity and are keen to hear your thoughts. Please email suggestions@ikirupeople.com with any feedback on existing functionality or ideas for new functionality.
Enhancements
Enhancement 128988 Integrated Data Services (SaaS Only) - Overview
Overview
This is a feature allowing Infinity users to search for companies / people across public profiles found on the internet and download selected data to the Infinity database.
The searching is free, but the download of a record consumes a credit. Each Infinity database is given a number of free credits in each calendar month as standard, but when all the credits on a database have been used, data cannot be downloaded until either more monthly credits are purchased from Ikiru People or the next calendar month starts.
To purchase more monthly credits, please call your Client Success Manager or email your request to the Client Success team clientsuccess@ikirupeople.com.
Disclaimer this information is sourced from various 3rd party data providers and neither Ikiru People nor its affiliated companies can accept any liability, or provide any warranties, for the accuracy of the data provided or its fitness for any purpose. When public profiles are updated, there can also be a delay before this information is available. We therefore recommend taking steps to further validate before relying on the data provided.
Enhancement 128998 Integrated Data Services (SaaS Only) - Companies
Company Quick Search
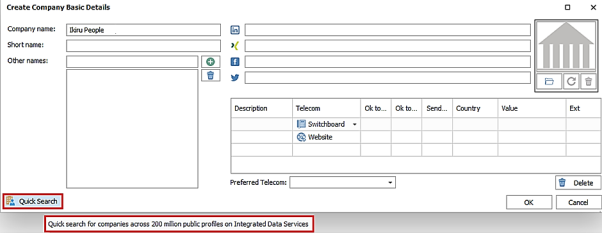
If a company cannot be found on Infinity and the user needs to create a new one, Integrated Data Services is available to search for companies across 200 million profiles and help populate the company / location / contact structure.
There is an Integrated Data Services ‘Quick Search’ button on the Application menu / Create New / Company screen.
There is an Integrated Data Services ‘Quick Search’ button on the Application menu / Advanced find / Company screen.

Both buttons take the user through the same functionality. When the button is pressed the Integrated Data Services ‘Quick Search’ company screen is launched.
Search Criteria
Company fields available to search are as follows and have no size limitation:
- Company name
- Single entry
- If the user had entered a company name in the previous screen, this is automatically populated
- City
- Single entry
- Industry
- Single entry
- Country
- Single select
- Defaults to the country as set in Administration / General Settings / Main pages tab
- Is a drop-down list of all countries
The user can remove search criteria by clicking the adjacent cross button.
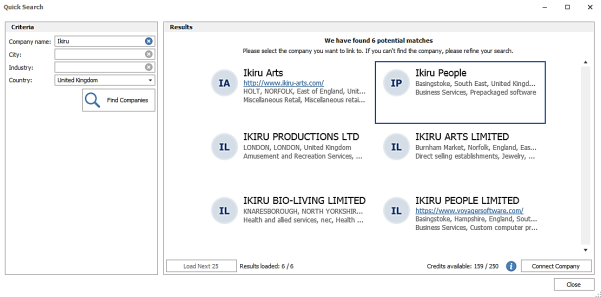
Search Results
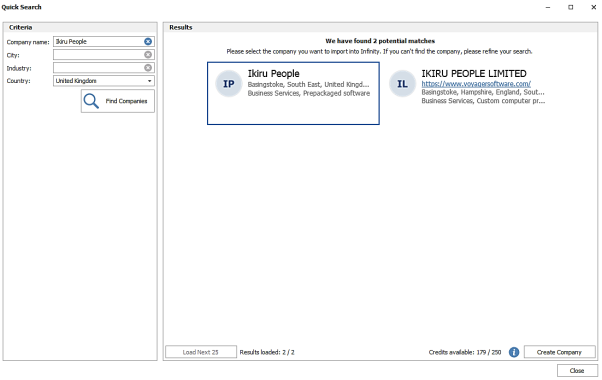
The ‘Find Companies’ button is enabled if search criteria is entered. When the button is clicked, or the user presses Enter on the Company, City or Industry fields, Infinity will search for companies and results are returned in the right-hand side of the screen.
- The total number of potential company matches is displayed at the top of the screen
- 25 results are loaded initially, and the number of loaded results / total results is displayed at the bottom of the screen
- The user can press the ‘Load Next 25’ button to load more results
- The user can scroll through the loaded results using the vertical scroll bar
- Results are displayed as a tile with the following company fields shown:
- Company name
- Alternate names - comma separated
- Circle image avatar showing the company initials
- Website address - this is a clickable hyperlink to take the user to that web page externally in their web browser
- Location - the full address is available on an ellipsis hover over
- Size – small / medium etc... is returned
- Industries - comma separated
- If data does not fit on the line in the tile an ellipsis is shown
- Hovering over the tile will display a tooltip with all information shown
- The company description is also shown on the tooltip
- A result can be selected by clicking on an individual tile; this will unselect any previously selected tiles
- When a tile is selected it will appear with a solid line around it
- User can close and return to the Leads screen
- Use can close and return to previous screen
Creating company and credits
The user can select a single result to create as the company by clicking the ‘Create Company’ button.

If no credits are available, the user cannot create the company. Credit information is displayed at the bottom of the results screen.
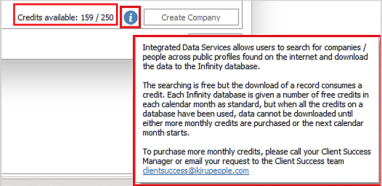
This is the number of credits remaining, out of the total number available for the current calendar month on that database. Credits are reset each calendar month and if credits are not used, they are lost. There is an adjacent ‘information’ button that gives further details and how to purchase more monthly credits by contacting the Client Success team.
Note: If the user selects results and credits are then used by other users on the database, the number of credits available updates immediately on the screen. If there are not enough credits for the selected results the create button is disabled.
If credits are available, the user can create the company from the selected result. A credit is used and the user is taken to ‘Create Company’ screen where they can select locations and contacts.
Note: if the user cancels out of this screen the company is not created, but a credit has been used. The user is warned and can continue to cancel or return to the Create Company screen.

Credit information is displayed at the bottom of the screen.

Note: a credit is required to create each contact. Credits are not required to create locations as they have already been downloaded with the company record.
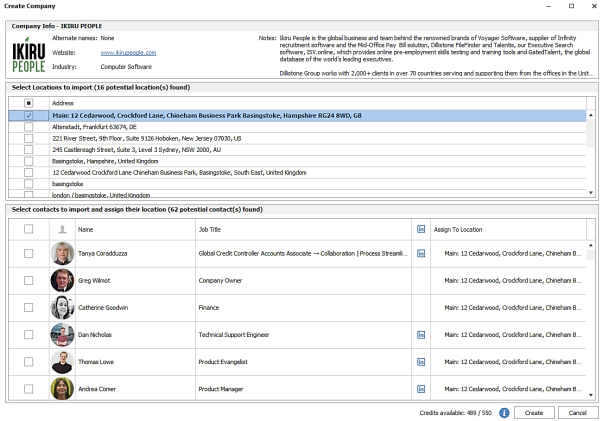
Locations
The user can see a list of all locations found for the selected company.
![]()
- User can choose which ones to create on the new company page by ticking in the first column
- The main address is prefixed with ‘Main’ and appears in bold and is the first location listed.
- As default the main address is selected only
- The main address cannot be deselected, so is always created as a location at the new company on Infinity
Contacts
The user can see a list of all employees found for the selected company.
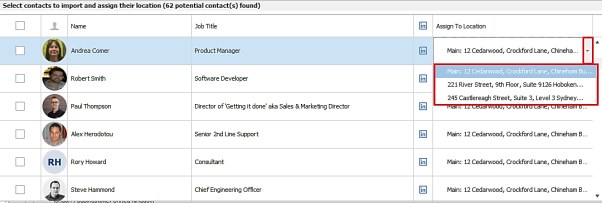
- User does not have to select contacts to create the company / location(s)
- User can choose which contacts to create on the new company page by ticking in the first column
- User must assign a location to each contact selected, so Infinity knows which location to create the contact at. This will default to the main address.
- User can change the location of a contact to any that are selected in the location section
- If a location is assigned to a contact that is then deselected from the location section, the contact’s location will default to the main address
- If ‘Select All’ is ticked in the first column header, the ‘Create’ button is not available. This is to avoid mass selection and downloading of contacts.
- The LinkedIn icon in each row is a clickable hyperlink that launches the person’s LinkedIn profile, externally in the user’s default web browser.
Creating the company/location/contacts
When the ‘Create’ button is pressed the company, selected locations and contacts at the assigned locations are created, and the user is taken to the company page.
- Defaults are applied, the same as if the company / location / contact records were manually created e.g. owning consultant.
- Created events are logged on each page if ticked to do so in the Administration / General Settings tab.
The fields are mapped as follows for the created records:
Company
|
Integrated Data Services company field |
Company field |
|
Name |
Company Name |
|
LogoURL |
Logo |
|
Alternative Names |
Other names |
|
URLs |
Website telecom(s) |
|
Profile Types and values |
If type match the following: |
|
1st Industry |
Business Sector (if matched to reference data entry) |
|
Description |
Notes |
Location
Infinity locations are mapped from the Integrated Data Services locations as follows:
- If there is only one line in the address field that contains data - use for location name and town of address
- If there are two lines in the address field and one is a postcode - use the non-postcode as the location name and town and use postcode as postcode
- If there are two lines in the address field and none are a postcode - use the first one as name and town and second as county
- If there are more than two lines in the address field - if one is a postcode, add to postcode field. Add other lines to address starting with address line 1. Use the first non-postcode one as the location name
- Active Country ref data is searched for and the first match found is populated
- If no country found, it is blank
- If the address is the main / primary address, ‘Main’ is put at the start of the location name
- Fields are truncated if contents do not fit on the location address fields
Contact
|
Integrated Data Services person field |
Contact field |
|
PhotoURL |
Logo |
|
Name |
Forename + Surname |
|
Biography |
Contact Notes |
|
1st Current Experience Job_Title |
Job title |
|
1st Current Experience Start_Date |
Start Date |
|
Profile Types and values |
If type match the following: |
|
Non Current Experience entries |
Work History
|
Connect Company
If the company is not connected to Integrated Data Services, there is a button on the company / location / contact page toolbar called ‘Connect Company’.
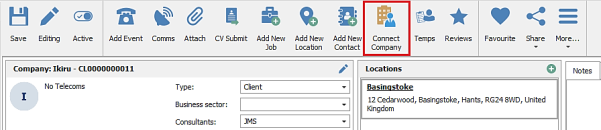
This launches the Integrated Data Services ‘Company Quick Search’ screen with the company name populated and runs the search.
The user can close and return to the company page or select a single result to connect to.
Selecting a company and clicking ‘Connect Company’ button will use a credit and take the user to the ‘Connect Infinity Company’ screen, where the user can select locations and contacts to import.
Credits are required for importing contacts but not locations and the functionality is the same as when creating a new company from Integrated Data Servies, except for the following:
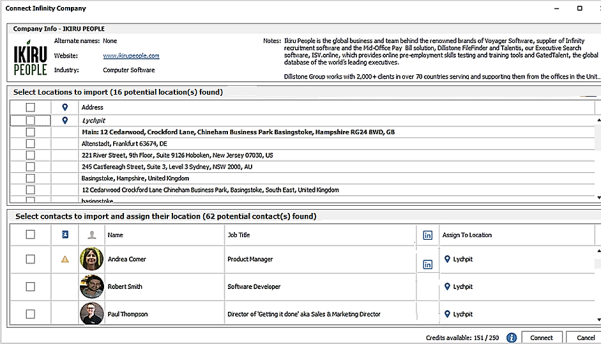
Location results section
Infinity active locations are also listed.

There is column that shows the location icon if it’s an Infinity location and they are greyed out and cannot be selected to import
This is so the user is aware which locations already exist on the company record and can avoid importing duplicates, and so they are available to assign to imported contacts in the contact results section.
Contact results section
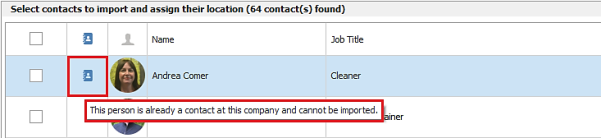
There is a column that shows the contact icon if the result is already a contact at that company. This matches on the Integrated Data Services ID. The result cannot be selected and imported.
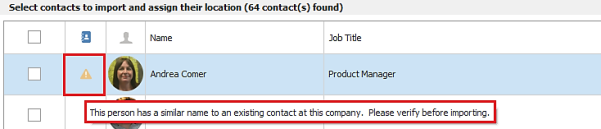
If there is no match, the column shows the warning triangle if the result has a similar name to an existing contact at the company. This matches on forename and surname. The result can be imported but it is advisable to verify before doing so.
Results selected to be created as new contacts can be assigned to Infinity active locations at that company, in addition to the Integrated Data Services locations selected to be imported. Infinity active locations will show the location icon at the front of the location name.

Connect
When the ‘Connect’ button is pressed, the Infinity company fields are updated from the Integrated Data Services record, only if they are blank and locations / contacts are imported as new as per existing functionality.

The company is connected to the Integrated Data Services record and the button on the toolbar changes to ‘Update Company’.
Update Company
If the company is connected to Integrated Data Services, there is a button on the company / location / contact page toolbar called ‘Update Company’.

Clicking the button takes the user to the ‘Update Infinity Company’ screen, where the user can select locations and contacts to import.
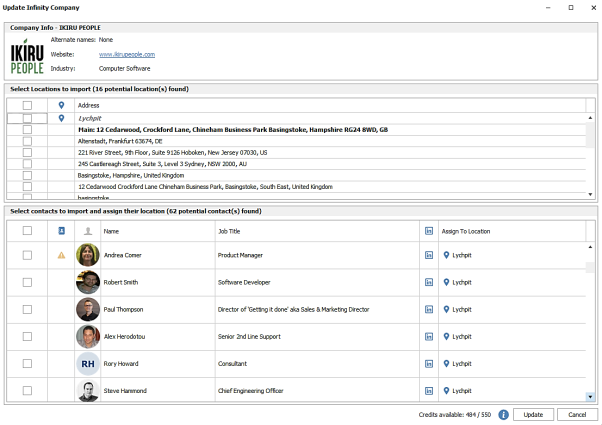
Functionality is the same as when using ‘Connect Company’ to Integrated Data Services.
Enhancement 128988 Integrated Data Services (SaaS Only) - Leads
Leads Quick Search
There is a new ‘Quick Search’ button on the Lead toolbar to search for people across 850 million public profiles on Integrated Data Services.

The button is available to all users and opens the Quick Search people screen.
If there are unsaved changes on leads, the user is prompted to save before the screen is opened.
Search Criteria
The user can enter the following search criteria and there is no length limit:
- Forename – free text
- Surname – free text
- Job Title – free text
- with options available to search in the person’s work history experience flagged as current/previous/either
- ‘Current’ experience is the default
- Company – free text
- with options available to search in the person’s work history experience flagged as current/previous/either
- ‘Current’ experience is the default
- Keywords – free text and searches various fields of the profiles
- multiple keywords can be entered
- with options available to search for at ‘least one keyword(or)’/’all keywords (and)’/’exclude all keywords’
- the default is ‘at least one keyword(or)’
- City – free text
- This searches for people that may have links to the entered city/town/county. It uses ‘contains’ and looks in the person location address and the current/previous work location addresses too
- Country – a single select drop down list of all countries enabled in the database, in the reference data administration screen
- Default is as per the Infinity database default setting in Administration / General Settings.
The user can remove search criteria by clicking the adjacent red cross button. The last search criteria is remembered until the user closes down the Leads screen.
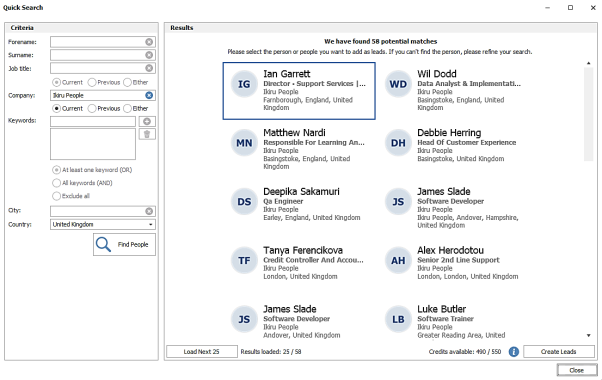
Search Results
The ‘Find People’ button is enabled if search criteria is entered. When the button is clicked, Infinity will search for profiles and results are returned in the right-hand side of the screen.
- The total number of potential people matches is displayed at the top of the screen
- 25 results are loaded initially, and the number of loaded results / total results is displayed at the bottom of the screen
- The user must press the ‘Load Next 25’ button to load more results
- The user can scroll through the loaded results using the vertical scroll bar.
- Results display as a tile with the following person’s fields:
- Circle avatar showing the Forename and Surname initials
- Full name
- Current Experience/Work History Job title
- Current Experience/Work History Company Name
- Location
- If data does not fit on the line in the tile an ellipsis is shown
- Hovering over the tile will display a tooltip with the information in uncropped form
- A result can be selected by clicking on an individual tile, this will unselect any previously selected tiles
- When a tile is selected it will appear with a solid line around it
- Ctrl & click or Shift & click can be used to select multiple tiles
- User can close and return to the Leads screen
Creating Leads and credits
The user can create leads from the selected results by clicking the ‘Create Leads’ button.

If no credits are available, the user cannot create leads and the button is disabled. Credit information is displayed at the bottom of the results screen.
![]()
This is the number of credits left out of the total number available for the current calendar month on that database. Credits are reset each calendar month and if credits are not used, they are lost. There is an adjacent ‘information’ button that gives further details and how to purchase more monthly credits by contacting the Client Success team.
Note: - If the user selects results and credits are then used by other users on the database, the number of credits available updates immediately on the screen. If there are not enough credits for the selected results the create button is disabled.
If credits are available, the user can create leads from the selected results. Up to 25 results can be selected at once and downloaded. A credit is used for each lead downloaded / created.
When leads are created, the fields are mapped as follows:
|
Integrated Data Services person field |
Lead field |
|
PhotoURL |
Logo |
|
Name |
Forename+ Surname |
|
Phone / Mobile / Email |
Phone / Mobile / Email |
|
Biography |
Lead Notes |
|
1st Current Experience Job_Title |
Job title |
|
1st Current Experience Start_Date |
Start Date |
|
1st Current Experience Company_name |
Company Name |
|
1st Current Experience Company website |
Company Website |
|
Profile LinkedIn |
LinkedIn URL |
The lead ‘Source’ field is set to ‘Integrated Data Services’. Other lead fields are defaulted the same as per manually creating a lead – e.g. created by, owning consultant, status.
The created leads are saved and will appear in the ‘New’ tile, then the user is taken back to their previous location on the leads screen.
If the setting to ‘Automatic link manually entered leads to contacts’ is ticked in the Administration / General Settings / Main pages tab / Leads section, the new leads will be checked and linked if a match is found.
Connect Lead
When a single lead is selected that is not already connected to an Integrated Data Services record, a ‘Connect Lead’ button is available on the toolbar.

This launches the Quick Search people screen.
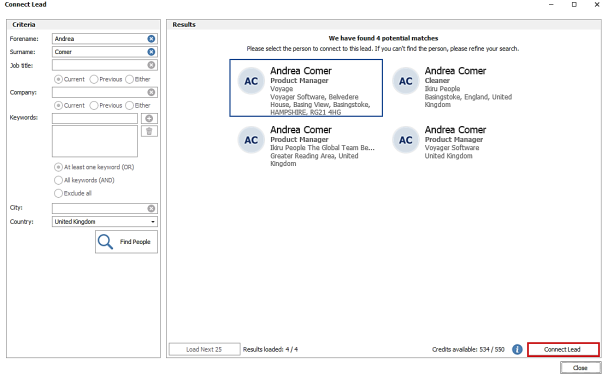
The following fields are automatically populated, and the search is run:
- Lead forename and surname
- Lead company
The user can customise and rerun the search if required.
A single result can be selected and connected to the lead if credits are available.
When the ‘Connect Lead’ button is pressed, fields are populated on the lead page from the Integrated Data Services record, only if they are blank. The user is then returned to the lead page.
Enhancement 128988 Integrated Data Services (SaaS Only) - Credit usage information
In the Administration / Licences tab there is a button called 'Show Integrated Data Services Credit Usage'.

Clicking the button opens a window where the user can enter a start and end date range to check. When the ‘Show Usage’ button is clicked, the following information is shown:
- Total number of credits used for the date period
- Number of credits used per consultant for the date period
Enhancement 126443 Database wide option to search for contact level skills only
In Administration / Search Options / General tab - there is an option to search for contacts with skills (job titles, attributes, quals and certs) that are against the contact and not inherited from the company / location / above.
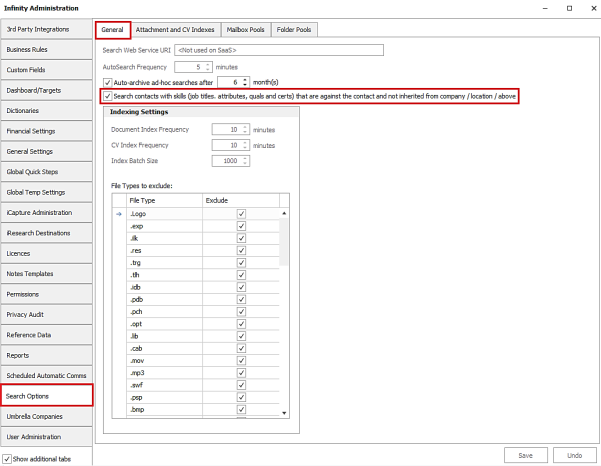
The setting is off as default.
When enabled, searching for skills in contact searches, will return contacts that have the skill criteria only and not inherited from the above location / company skills. This will affect all users.
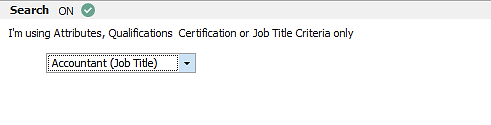
Contact skills can be searched in the ‘Search’ section.
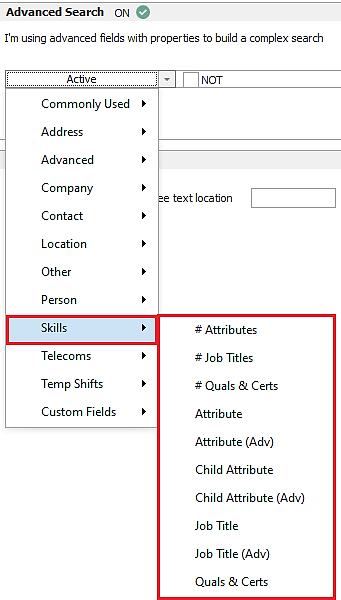
Contact skills can be searched in the ‘Advanced Search’ section skills menu.
Enhancement 129878 MFA by email
In Administration / User Administration / Users tab / Edit User screen, if MFA is enabled for the user, there is a setting to send 'MFA via email’.
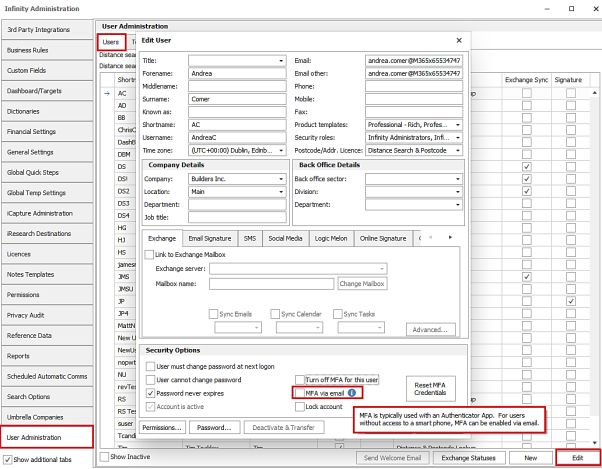
The setting is off as default and has an adjacent information tooltip.
The user must have an email address (email or email other) for the setting to enable, otherwise it will appear greyed out.
For users with 'MFA via email' ticked, when the user successfully enters their correct username and password when logging in, they are informed their 6-digit code has been sent by email.
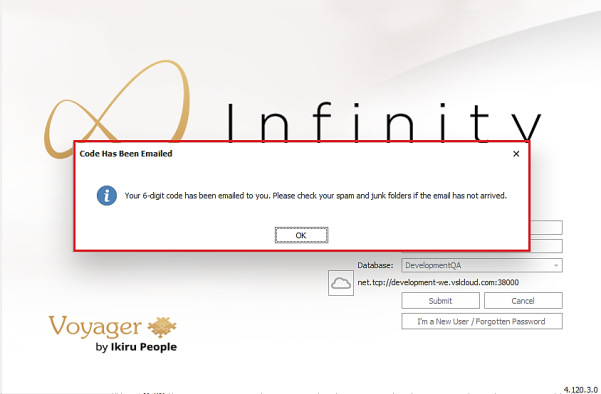
The email is sent to the user’s 'Email' address field and if this is blank 'Email Other' is used.
![]()
The user must enter the 6-digit code from the email into the Infinity login screen. The code lasts 10 minutes.
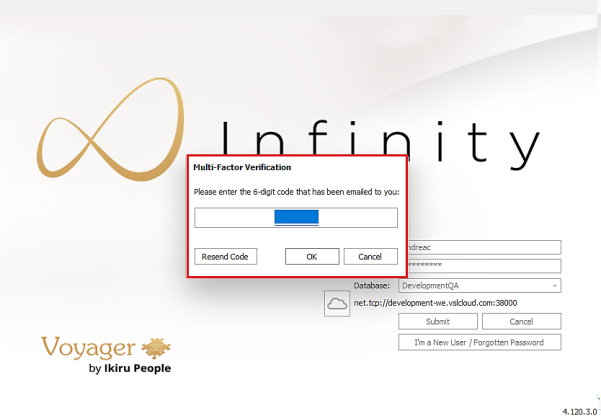
- If the user enters the correct code they are logged in
- If the user enters the incorrect code, they are not logged in
- The user can re-send the code
- If the user enters the wrong code 3 times consecutively, their user account will lock and can only be unlocked in User Administration.
- When an administrator unlocks a user account ticked as ‘MFA via Email’, by unticking the “Lock account” box in the Edit User screen, the user can log in again and will be prompted to end their current login session and then they are sent a new code by email.
- The user can login with the new code or can use the existing code if not expired
Enhancement 130032 Reason for leaving added work history.
There is a new field in work history called ‘Reason for leaving’.

This is a free text, 100-character field that appears in the candidate’s work history default layout, after the ‘End Date’ field.
On the candidate ‘Current Employment’ and contact ‘Work History’ grid it is available via the column chooser.
The new field has been added to the Candidate SARs report (Excel) on the Work History tab.
Enhancement 129811 "Has Internal Interview" search change
Candidate and candidate re: job searches on "Has Internal Interview" return candidates with at least one internal interview set in the past, present or future, instead of only past interviews.
![]()
When the NOT setting is used, candidates without any internal interviews are returned.
Enhancement 129835 Blank custom date fields to merge blank
Blanked custom date/datetime fields merge blank instead of "01/01/1900" in the Comms Centre.
Enhancement 129836 Dashboard Job Ratio stats changed
On Dashboard ‘Job Ratios’ widget, the following ratios have been changed:
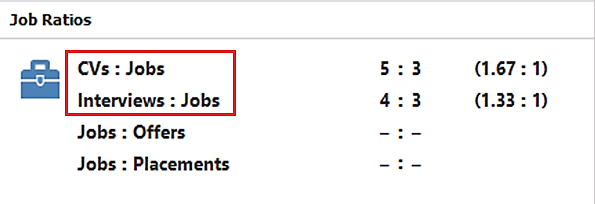
- The ‘Jobs : CVs’ information has been changed to show how many CVs were submitted and how many jobs created in the dashboard date range, displaying the average number of CVs submitted per job in brackets

- The ‘Jobs : Interviews’ information has been changed to show how many interviews and jobs were created in the dashboard date range, displaying the average number of interviews per job in brackets

Enhancement 62593 "Filled By" system reference data locked down
In Administration / Reference Data / Filled By tab, ‘US’ entry that is flagged as a system value cannot be edited.

Upon upgrade, any entries that were previously changed will revert back to the value of ‘US’.
Enhancement 128985 Placement Rate ‘Comments' field exported to Mid-Office
If the database is configured for Mid-Office, the first 100 characters of rate ‘Comments' field on contract and temp placements is exported.
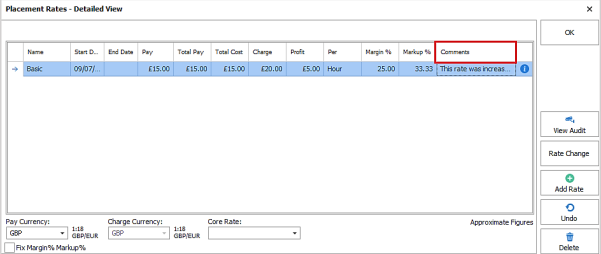
Mid-Office version 13, when available on general release, will read and utilise this field.

If you require further assistance please contact Ikiru People using the details published on www.ikirupeople.com
Visit our Customer Portal at https://portal.ikirupeople.com/ for future events and clinics.
If you would like to make suggestions or have found any errors with this Help section please contact our Support team.
Version 4.87
Voyager Software is a brand of Ikiru People Ltd, a subsidiary of Dillistone Group Plc. The group is a leading global provider of software and services that enable recruitment agencies and in-house recruiters to better manage their selection process and address the training needs of individuals. Across its brands – which include Voyager Software (recruitment software UK & Australia), Dillistone FileFinder executive search software, GatedTalent, the global database of the world’s leading executives, Talentis.Global – the next generation of recruitment software and also ISV.Online, provider of online pre-employment skills testing and training tools. Dillistone Group serves thousands of clients worldwide. Ikiru People Ltd: Registration Number 02043300. Registered in England & Wales.
 |  |  |  |